Introducing YippieMove '09. Easy email transfers. Now open for all destinations.
Apr
20.
Comments Off
Comments
Category: Uncategorized

I’ve been using Windows Vista on occasion recently. When I used it for the first time, I was expecting to see the now infamous ‘Cancel or allow?’ dialog boxes popping up left and right. To my surprise there was nothing of the sort. It took me a moment and to realize that the default account that had been created for me in Vista was an ‘administrator’ account, which allows you to do anything.

I’m not really sure why this is the default account. It’s like your Linux box would log you in as root by default. But fair enough, if that’s the Vista way, that’s the Vista way. I went ahead and created a normal account for myself and logged into that account instead.

Everything was well until I restarted my Vista machine the next time. I found myself right back in the administrator account. Apparently Vista insists that Administrator is the right account to be in.

To make a long story short, it took me just about forever to figure out how to make Vista not log me in automatically this way. I’m going to post it here to help other people with the same problem.

  1. Pull up the Run… menu (Windows + R on the keyboard)
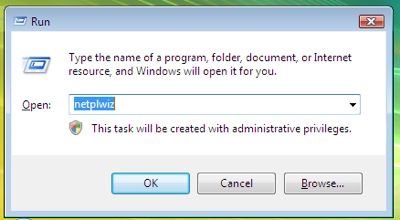
  2. Enter “netplwiz” and click “Ok”.Windows Vista Run Menu.
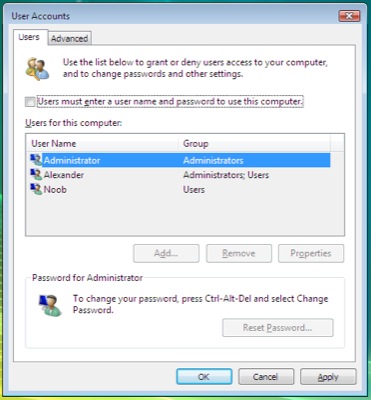
  3. Check the “Users must enter a user name and password to use this computer” checkbox.Advanced User controls in Windows Vista.

Hope that helps someone. It’s hard to find for sure. You can also check the box, and then click on another account name in the list, thus selecting it. Then uncheck the box again and you’ll be asked for the password for that account – now the selected account is your new default account. If you make this a non administrator account you should have increased your security a little bit during day to day computer use.

Author: Tags: ,
Introducing YippieMove '09. Easy email transfers. Now open for all destinations.
Apr
14.
Comments Off
Comments
Category: Other

If you get the following error when you’re trying to ‘make world’ for a jail in FreeBSD,

can’t cd to /usr/src/tools/build/make_check

the problem is simply that you’ve forgotten to run cvsup to download the sources.

I’m posting it here so that in case someone else has this problem they won’t waste 20 minutes wondering what’s wrong and Googling fruitlessly like I did. :)

Author: Tags:
Introducing YippieMove '09. Easy email transfers. Now open for all destinations.

Agency Byte has a good article up about scope creep. Scope creep is the unfortunate tendency where project scopes tend to balloon up during a contracting job. Most clients don’t know what they want exactly, but they’ll be sure to tell you during your work. And they’ll expect you to add these new things that were obviously needed without any additional payment.

Personally I believe that an agile development method is a good way to counter scope creep. When you deliver small incremental improvements frequently there will be fever surprises for the customer and many more chances to make adjustments. In fact this might be one of the most important features of agile development. Of course you still need a clearly defined scope or your project may never end.

So for that agile scope, or if agile isn’t your thing at all, Agency Byte has plenty of advice for you. Here’s a good one:

“Defining what is “out of scope” can be as important as defining what is in, especially because you probably already know the areas in which clients usually tend to push the limits. Write them down and include them in your proposal.”

Read all of the tips from Agency Byte’s here.

Author: Tags:
Introducing YippieMove '09. Easy email transfers. Now open for all destinations.
Apr
05.

If you’re a regular reader of our blog, you may remember an article a while back about a piece of software called Cacti. It’s a nifty little web-based program that gathers information from a variety of hardware using SNMP. Cacti then presents the data in easily readable graphs.

At the time of the article, I installed Cacti for one of the organizations that I administrate the IT infrastructure for. Not only did I get a better idea of the utilization of bandwidth and hardware on the servers, but I could also see how much CPU resources the workstations were consuming. Although I knew that the CPU usage on the servers was quite low, I didn’t anticipate that the CPU usage on the workstations was quite as low as it was.

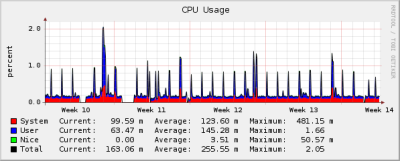
The organization is quite a typical office environment with 20-some workstations running mainly our own software plus web, e-mail, word-processing and spreadsheet applications. The hardware is quite modern with CPUs ranging from 1.8 Ghz to 2.7 Ghz Celerons and RAM between 256 MB to 512 MB. All workstations are running Windows 2000 Professional. Before I installed Cacti, I thought that the CPU usage during day use would average maybe 30-40%, with some significant peaks pushing up the average. However, I was quite surprised to find out how wrong my estimate was. It turned out that the average CPU usage on these workstations was less then 10% for all machines, and less than 5% for most of the machines with only few significant spikes. It’s true that Cacti only polls information from the workstations every 5th minute, but it should still give a quite accurate value these passed months as I’ve been running it.

Cacti Monthly

Sample of the monthly view in Cacti

With this data on hand it’s quite obvious that we’ve been over-investing in hardware for the workstations. Even though I would rather overestimate a little bit than underestimate, it seems my estimates were far too high. Even so, when purchasing new workstations, we’ve pretty much bought the cheapest Celeron available from the major PC vendors, so maybe it would have been hard to adjust the purchases even with these figures on hand.

After some thinking I came up with three possible ways to deal with this problem:
1. Ignore it
I guess this is what most companies does. Maybe the feeling of being ‘future-proof’ is valued more than the fact that you have a lot of idle-time. The benefit of doing this is that you have modern hardware that is less likely to break than old hardware.

2. Buy used hardware
Most people in power would be scared of just thinking about this. However, since there is no really new low-end hardware available, this appears to be the only way. The first problem you will be facing is probably to find uniform hardware. As an administrator, you know how much easier it is to administrate 20 identical workstations, rather than 20 different workstations, both in terms of drivers and hardware maintenance.

The second problem I came thinking of is the reliability problem. Obviously 5-10 years old hardware is more likely to break than brand new hardware, and if it does, there is no warranty to cover it. However, if you buy used hardware your budget will likely afford you to buy a couple of replacement computers.

There are also security implications of buying used computers. Every modern company with an intelligent IT staff is really concerned about security, both software and hardware. If you buy used hardware, there is a chance that it might be compromised (hardware sniffers etc.) I guess the only way to deal with this problem is to carefully physically inspect all the hardware you purchase.

If you or your company do choose to buy used hardware, there are plenty of sources to do so. One of the more interesting pages I found was a company in Australia, called Green PC, which sells a variety of computers and peripherals for a reasonable price.

3. Donate idle-time (to internal or external use)
With the rise of clusters, distributed computing and virtualization, there are today plenty of ways to put idle-time to good use. One of the more famous projects that deal with this is Folding@Home, which is a project at Stanford University that uses the participants’ idle-CPU/GPU time to do medical research. More recently a project at Berkeley called BOINC created a program that lets the user choose between a variety of distributed computing projects within the same application. By participating in such project, the company will create positive publicity (if the participation is significant).

If your company isn’t interested in donating idle-time to charity/research, they might still be able to use the idle-time. If all your workstations are connected with a high-speed connection (preferably gigabit), you might be able to use the computers in a virtualization environment. However, this is doable in theory, but I don’t know how well this would work in reality. Another alternative might be to use the idle-time to internal computations. If your company is in the software-business, distributed compiling might be one way to use the CPUs more efficiently. If this is not interesting, there are plenty of distributed computing solutions that might be used for intranets for various calculations that the company might else use a 3rd party company to compute.

Hopefully you have a better idea of how you can use your idle-time more efficiently, but you should be careful though. Some people argue that today’s computers are not built to run at 100% utilization 24/7. This is a very valid point, since neither the components on the motherboard, nor the fans is likely to stand a 100% utilization for very long without breaking. Therefore it is recommended to try to find an optimal distribution algorithm that spreads the calculation over the nodes without pushing the individual workstations until they break. I have to admit that I don’t have any available data on how the life-time of the workstations will be affected by running these type of softwares, but I would guess that it will have some impact on the life-time.

To round up this article, I would like to discuss one question that is highly relevant: “Why are there no low-end, cheap computers available?”

If you go to Dell or HP’s homepage and look for their cheapest ‘office’ hardware, it’s still far more than what is required for most office use. So why is it this way? As I see it, there are several reasons for this, involving both the software and hardware manufacturers in a mutual effort to stimulate sales. Obviously, the hardware manufacturers want us to replace our computers as often as possible, since this is how they make their profits. The software manufacturers on the other hand, want to sell new versions of their softwares by implementing new fancy features, that is unlikely to add to productivity, but requires hardware upgrades to run properly.

Let’s say you’re onboard with my ideas, and that you decide to look for cheaper hardware, but still feel like used hardware is too risky. One possibility might be to go for some kind of ITX-solution. These comes with a less powerful CPU, and often includes everything you need for desktop usage, but costs less than regular computers. One benefit of using ITX boxes is that they are very tiny and light, which makes them cheap to store and ship internally.

Author: Tags:
Introducing YippieMove '09. Easy email transfers. Now open for all destinations.
Mar
28.

In the past I have used MoinMoin Wiki for my wiki needs, with great success . MoinMoin Wiki is very easy to set up and doesn’t have all too fancy requirements on the server side. The other day I was setting up a new wiki, and unlike my previous wiki projects this one would be facing the public. In order to get the syntax, template system and features most people recognize I went with the famous, Wikipedia powering MediaWiki software instead.

MediaWiki requires much more manual work to install than MoinMoin Wiki. Unfortunately, I was unable to find a comprehensive guide detailing how to go from scratch to fully operational wiki. There is the Installation Guide which details the basic server setup. It then redirects you to two pages: one on configuration and one on administration. Most of these documents are fine but at the time of this writing the ‘configuration’ document is fairly empty and I was left wondering about many configuration options. Hence this guide which will try to tie together all the things you need in order to get up and running.

To keep things moving this guide will be written at a fairly advanced level. If you don’t feel comfortable installing server side software you may want to check out some of our other How To’s for inspiration.

These instructions are suitable for FreeBSD 5.3-RELEASE-p37 and MediaWiki 1.9.3, although you will probably find it useful regardless of the platform and MediaWiki version you use.

Basic Installation

This part is covered very well by the Installation page of MediaWiki. Here’s the super condensed FreeBSD take on installation:

To install MediaWiki in FreeBSD,

# cd /usr/ports/www/mediawiki
# make install

This will install MediaWiki into /usr/local/www/mediawiki/, by default. You will probably want to copy this installation to some other folder since MediaWiki changes files in its installation folder during use.

# cp -Rf /usr/local/www/mediawiki /www/mywiki

Then,

  1. Make sure the config folder is writable by the httpd user (www usually).
  2. Set up your web server to serve pages from the location.
  3. Surf to your new wiki. You will be prompted to go through an installation procedure. This part is very straight forward.
  4. Move config/LocalSettings.php to the root of the wiki installation. You can now delete the config folder.

Now that was the easy part. Here comes the stuff that took a little bit longer to figure out. Thanks to Playing With Wire you’ll be able to do it in minutes! :)

Additional Manual Configuration

The installer does some things but not everything. While many online applications such as WordPress come with fancy online configuration tools, MediaWiki uses more traditional configuration files which you’ll be editing by hand.

Here’s what you’ll need to do:

  1. Copy AdminSettings.sample to AdminSettings.php in the base folder. Edit the new file. The config file requires you to configure a database account for maintenance scripts. Presumably you may use the same account you used for the wiki, although I didn’t run any of the maintenance scripts yet to test this.
  2. Edit LocalSettings.php. This file has been created for you by the installer, so it will contain some good defaults.

LocalSettings.php is the primary configuration file of your new wiki. This file contains the actual basic settings for MediaWiki, and it overrides the defaults found in includes/DefaultSettings.php. You shouldn’t edit DefaultSettings.php directly, but it should be your first stop if you’re wondering what variables you can put in LocalSettings.php.

Linking up the Help Pages

By default MediaWiki ships without help pages. Unless you want to write them yourself you have a couple of options. The option I chose is to simply copy all Help sections from the primary MediaWiki site – they’re released into the public domain. Follow the instructions on Help:Copying to do this.

You may wish to export the following pages:

Help:Contents
Help:Navigation
Help:Searching
Help:Tracking_changes
Help:Editing_pages
Help:Starting_a_new_page
Help:Formatting
Help:Links
Help:Categories
Help:Images
Help:Templates
Help:Tables
Help:Variables
Help:Managing_files
Help:Preferences
Help:Skins
Help:Namespaces
Help:Interwiki_linking
Help:Special pages
Template:PD_Help_Page
Template:Meta
Template:Admin_tip
Template:Prettytable
Template:Hl2
Template:Hl3
Template:Thankyou
Image:Example.jpg
Image:Geographylogo.png
Help:Editing
Image:PD-icon.svg

This is the same list as found on the Help:Copying page at the time of this writing, with the addition of the two last entries.

Notice that Template:Languages isn’t included in this list, although it is referenced from Template:PD_Help_Page. You may wish to edit the PD Help Page template and remove the {{Languages}} part towards the end to get rid of this dependency.

You will have to download and upload the images separately by clicking them and finding their respective file downloads. Upload the images using the normal ‘Upload file’ link from your wiki. The .svg image probably won’t upload by default. We’ll tackle the SVG format later.

Nice URLs

At this point the installer script has probably given you URLs that look like,

http://www.yourdomain.com/index.php/My_Page

(Unless your PHP runs as a CGI script in which case things might even look worse. Don’t run as CGI.)

To make your URLs more readable, you’ll need to configure both your web server and MediaWiki to cooperate. Here’s a good resource: Using a very short URL.

Basically you will want to edit your httpd.conf, if you can do that, or an appropriate .htaccess file, if you have to. Remember that a .htaccess file is slower than httpd.conf. If you can use httpd.conf, do that and disable .htaccess support.

Here’s how to set things up within Apache’s httpd.conf. Edit your Directory entry to resemble the following:

<Directory /www/mysite.com/>
        Options Includes FollowSymLinks

        AllowOverride None

        RewriteEngine On
        RewriteCond %{REQUEST_FILENAME} !-f
        RewriteCond %{REQUEST_FILENAME} !-d
        RewriteRule ^(.+)$ /index.php?title=$1 [L,QSA]

Notice the AllowOverride None line. This is the part that turns off .htaccess support. It’ll give you a bit of a speed boost since your web server won’t have to look for a .htaccess file for every request made.

Next, add this line to LocalSettings.php:

$wgArticlePath = "$wgScriptPath/$1";

Change the Wiki Theme or Looks

MediaWiki’s term for themes is ‘skins’. The default skin looks exactly like Wikipedia, so you may want to change this if you’re looking to achieve a spiffy unique look for your public wiki.

To find out what skins came with your MediaWiki installation, look in your skins/ folder. You will see something like,

# ls skins 
Chick.deps.php          Nostalgia.php           common
Chick.php               Simple.deps.php         disabled
CologneBlue.php         Simple.php              htmldump
MonoBook.deps.php       Skin.sample             monobook
MonoBook.php            SkinPHPTal.sample       myskin
MySkin.deps.php         Standard.php            simple
MySkin.php              chick

From this list you can infer the list of available skins. In this case it looks like we have Chick, CologneBlue, MonoBook, MySkin, Nostalgia, Simple and Standard. The folder names (the lower case names) are the skin names.

To make the change, edit your LocalSettings.php file again and alter the line that reads,

$wgDefaultSkin = ...

In our case we might put,

$wgDefaultSkin = 'cologneblue';

If you make a mistake setting the property you will get a default skin.

You can find more skins here. Each skin is accompanied by instructions for how to set it up. Normally this involves downloading a zip file and unzipping it into the skins/ folder. You may also have to edit theme files to set up proper paths.

Changing User Access Levels

If you want to disable anonymous editing, you can add something like the following to LocalSettings.php:

$wgGroupPermissions['*'    ]['createaccount']   = true; 
$wgGroupPermissions['*'    ]['read']            = true;
$wgGroupPermissions['*'    ]['edit']            = false;
$wgGroupPermissions['*'    ]['createpage']      = false;
$wgGroupPermissions['*'    ]['createtalk']      = true;

For other possible settings, take a look at the defaults provided in includes/DefaultSettings.php. Again, remember not to edit the defaults file: just copy the lines you want to change to LocalSettings.php and make your changes there.

Support for SVG images

The SVG image file format is very useful but turned off by default in MediaWiki. Look in include/DefaultSettings.php and locate the SVG related stuff. For my installation this is what I had to add to LocalSettings.php:

$wgSVGConverter = 'inkscape';
$wgSVGConverterPath = '';
$wgSVGMaxSize = 1024;
$wgMaxImageArea = 1.25e7;
$wgThumbnailEpoch = '20030516000000';
$wgIgnoreImageErrors = false;
$wgGenerateThumbnailOnParse = true;

$wgFileExtensions = array( 'png', 'gif', 'jpg', 'jpeg', 'svg' );

You will also need to install inkscape. There are options to use rsvg, ImageMagick and others instead but none of those options worked for me. Rsvg and ImageMagick didn’t render gradients right, and I was unable to install the other alternatives on FreeBSD without crashes or other problems. This is unfortunate because inkscape is positively enormous if you also consider all the pre-requirements that you normally wouldn’t have to install on a server. It is the one program that does things right though and SVG is a really nice format to have support for.

Conclusion

That’s it. You are all set. Your next steps will probably be to create your own account and then use the Sysop account to turn your own account into an admin account. Happy writing!

Author: Tags: ,

© 2006-2009 WireLoad, LLC.
Logo photo by William Picard. Theme based on BlueMod © 2005 - 2009 FrederikM.de, based on blueblog_DE by Oliver Wunder.
Sitemap