Introducing YippieMove '09. Easy email transfers. Now open for all destinations.

Over the last few days, iPhone unlocking has seen a couple of sharp turns. First iPhoneSimFree promised to deliver a commercial solution to unlock your iPhone. Then they hesitated and decided to become a wholesale only company, further delaying their release. Ultimately, they missed the train and the hacking community stepped in (Free iPhone unlock supposedly pending (Updated x2)), and released a free hack: iUnlock by the iPhone Dev Team (no association with Apple).

The box for a 4GB iPhone.Since vendor lock-in is never a good thing for the customer, the release of this software is great news. And as fans of the free market may be aware, cell phone unlocking is legal. But does it work? Playing With Wire decided to find out. We picked up a 4GB Apple iPhone, headed out on the internet and soon found a great unlocking tutorial at modmyiPhone. The guide is Mac specific, but we also stumbled across unlock.no which appears to offer a guide for Windows users – we didn’t try it though.

The Unlock Process

The process is a little bit lengthy but everything is done using simple graphical tools. For starters, you need to make sure your iPhone is entirely up to date. iTunes does this for you after you trigger the ‘recovery mode’ of your iPhone, by pressing Sleep and Home for 25 seconds.

iPhone in recovery mode.
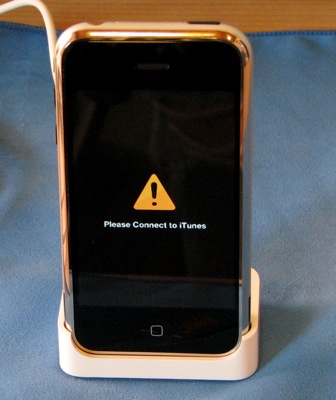
The iPhone in recovery mode.

Once you’re in recovery mode you can just connect the iPhone to your computer and iTunes will offer you the option of restoring the phone. Prepare yourself for the first of a couple of lengthy downloads – for us iTunes downloaded 96 MB of software updates (we used iTunes 7.4.0 and iPhone Firmware 1.0.2 for this article). When it’s all done, iTunes will tell you so and you can close down the application.

So now we had an updated but not yet activated iPhone. The Mac application “iNdependence” makes activation a breeze, but this is where the second lengthy download comes into the picture as you have to download the firmware a second time. We did run into a minor snag: when we followed the instructions on the page we couldn’t get the activation to work on our first attempt. Disconnecting the phone, restarting iNdependence and then reconnecting the phone took care of it though – iNdependence unlocked the phone without complaint. Voila, now we had an iPhone that was basically like Apple’s latest iPod, the iTouch: it could play music and video, but it couldn’t make phone calls.

iNdependence activating an iPhone.This is where the Unlock application comes into play. To actually get it onto the phone, you need SSH installed though. Just like the guide says, the AppTapp application allows you to install third party software on your iPhone. We ran into trouble here though: when we ran AppTapp we got an indefinite progress bar. We waited a good 15 minutes for the application to finish, but it never did. What’s worse, our iPhone locked up in ‘recovery mode’ and could no longer be started. We realized that we had left iNdependence running from the previous step, and perhaps this application conflicted with the AppTapp installer. Regardless of the reason, the iPhone was dead at this point.

AppTapp making no progress.
AppTapp never got any further than this for us.

We restarted the iPhone and connected it to iTunes to restore it to factory settings. We were horrified as iTunes crashed very early on in the process. We mentally readied ourselves for creating our own Will It Blend episode, thinking the phone was a goner. Luckily after a full reboot of both the computer and the phone, the software reset went through.

We were back to square one, and had to go ahead and again activate the phone with iNdependence and then go for a second attempt at installing AppTapp. To be on the safe side, we downloaded the most recent version of AppTapp from its homepage. We made sure iNdependence was turned off.

This time we got an error message instead – something about a boot strapping process failing and a reference to the console. So we pulled up Console.app (/Applications/Utilites/Console) and took a look. To our surprise, the iPhone installer software was still working despite the error message.

AppTapp is reporting stuff in the Console.
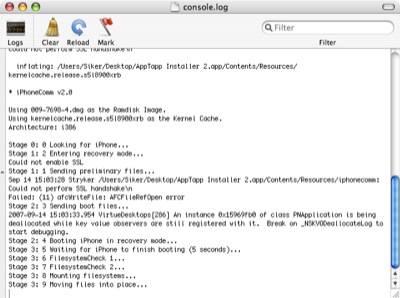
Look! Something is still installing.

A couple of minutes later the phone restarted and all was well. The Installer icon appeared on the iPhone desktop and we could install the required software as described in the guide.

Installer.app on the iPhone.
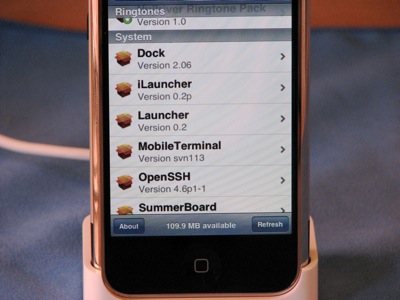
Some of the applications the AppTapp Installer can install.

An activated iPhone with it’s SIM card removed.
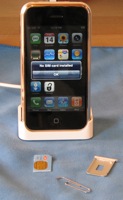
In the final part of the guide, the actual Unlock software is installed using SFTP. The guide recommends transferring the application bundle using Cyberduck, but we figured any SFTP client would do it. We had Panic’s Transmit installed, which worked just fine. After copying the files as instructed, and restarting the phone one more time, we finally had the Unlock icon on the iPhone desktop. It was time to install our T-Mobile SIM card and hope for the best.

25 minutes later we were making T-Mobile phone calls.

Notes and Observations

During the above process SSH was installed on the iPhone. This allows anyone who knows the default root password to log into your iPhone and do anything they want, as long as the phone is on a wireless network. We strongly recommend that you change your password as soon as possible using the ‘passwd’ from an SSH session.

With the same IP as before, SSH in using Terminal and run ‘passwd’ to change the root password.
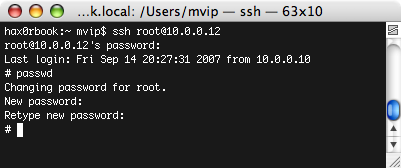
Using SSH to change the default password (dottie).

So far, our iPhone has worked very well with T-Mobile. Initially there was an artifact ‘missed call’ icon hanging around over the Phone icon – a red circle in the upper right corner of the phone. Obviously, visual voice mail isn’t enabled as that’s an Apple and AT&T special feature, but the voice mail indicator works. When you press the icon, the phone calls your voice mail like a regular cell phone would.

Verdict

The Unlock application works just as advertised. Including the time it took us to take photographs and the time we spent resolving our few problems, the whole unlocking process took no longer than 2 hours. At no point was a non graphical tool needed, which surely will come as a relief to some users.

Unfortunately, the process is not entirely simple even with the graphical tools, since there are several opportunities to brick the phone or otherwise get tripped up. Still, if you feel confident with your technical abilities, and you don’t feel confident in AT&T’s cell phone abilities, this is the tool you’ve been waiting for. The iPhone is free.

Author: Tags: , ,
Introducing YippieMove '09. Easy email transfers. Now open for all destinations.

(We apologize for the recent slow flow of posts on the blog, but we’re spending all our time finishing off our first product for the Private Beta launch and we still haven’t figured out how to extend the 24h limit per day.)

In our last article, Building an IT infrastructure with a sub-3,000 budget we discussed the possibility to build an extremely cheap, yet modern IT infrastructure. Now a couple of weeks later, I’ve actually deployed a setup based on that article.

The final system I deployed differed slightly from the specs provided in the previous article. For instance, instead of 10 clients as the article stated, my deployment only included 4 clients (at this point). Other than that, the hardware used was very similar to the article. Below is a list of all the components that was purchased and the approximate price in dollars.

New Inventory

Note that I decided to buy three different brands of hard drives to reduce the chances of having two drives collapse at the same time (two drives from the same batch are more likely to collapse around the same time than two random drives).

The company already had a handful of semi-obsolete computers that would work fine as clients in the new environment. Also, as in most organizations there were already other peripherals available that I had to make working in this new infrastructure. Fortunately, this went smoother than what I had anticipated. The peripherals were as follows:

Existing Inventory

The Server

The server is the heart of this environment (as in most environments), therefore, I’ll start describing the setup of the server first. (I’m not really going to describe what LTSP is, and instead kindly refer you to the previous article for an introduction on the topic).

The initial plan, as I described in the previous article, was to install the 64-bit version of Ubuntu 6.06.1 LTS Server on the server, primarily because of the Long Time Support. Unfortunately it turned out to be a bad choice for two reasons:

1) Ubuntu 6.06.1 has quite limited support for LTSP. Although many of the features work fine, some features such as sound-forwarding to the clients are not implemented. It would quite likely be possible to modify the 6.06.1-setup to support sound as well, but I decided to save some time and just switch over to 7.04 server instead.

2) I was forced to use the 32-bit version instead of the 64-bit version. Although I really tried to avoid this, the software support in the 64-bit version didn’t meet my requirements. For instance, I didn’t manage to print from Wine to Cups in the 64-bit version due to some problem with libcups. Moreover, I discovered that there is no Flash support in the 64-bit distribution. Since many websites today require Flash, I had no choice but to use the 32-bit distribution.

So we decided to use the 32-bit version of Ubuntu 7.04 Server. The next problem I came across was how to partition the hard drives. In contrast to what my previous article stated, it turns out that /opt/ltsp/i386 only includes the boot-environment for LTSP, and not the entire system. Therefore it makes little sense to have an 800GB RAID5 array devoted to it. Once the clients have booted up, they log into the core-server. Because of this, I had to change the partitioning strategy. What I ended up doing was to create two partitions on the RAID5 array: one of 795GB to be used for / and one 5GB to be used for swap. I did discover one problem with this setup though: Grub had problems booting off a software RAID array. After some research, I found that it’s possibly to boot Grub from a software RAID, but it required some hacking. Because of this, I decided to create a small partition on the stock hard drive for a /boot and use the remainder of that drive for backup (mounted as /backup). The problem with this setup is that we have a single point of failure – the stock hard drive. Although nothing important is kept on this drive (unless we need to recover our backups), a failure of the drive would still prevent the system from booting.

The hardware

APC Smart-UPS SC 450VA
The only piece of hardware that requires a bit configuration other than the RAID is the UPS. Fortunately setting up this particular brand of UPS is dead simple. Just install the NUT package and modify your configuration files to match the following:

/etc/nut/ups.conf
[ups]
driver=apcsmart
port=/dev/ttyS0
desc="UPS for BLServer1"
sdtype=0

/etc/nut/upsd.conf
ACL all 0.0.0.0/0
ACL remote 192.168.10.0/24
ACL localhost 127.0.0.1/32

ACCEPT localhost
ACCEPT remote
REJECT all

/etc/nut/upsd.users
[monuser]
password = ups_password
allowfrom = localhost
upsmon master

/etc/nut/upsmon.conf
MONITOR ups@localhost 1 monuser ups_password master

and edit /etc/default/nut to
START_UPSD=yes
START_UPSMON=yes

Brother MFC-8460N
Setting up the network printer was a breeze. Just enter the IP address and you’re set. What surprised me a bit was that even the network scanner worked. After installing the Linux driver from Brother’s homepage and following the instructions, the scanner was up and running in less than 5 minutes.

Brother HL-2040
This printer was locally connected, and once it was added in LTSP (see the next section), the printer worked without any problems.

Dymo Labelwriter 400 Turbo
The printer was connected locally to one of the workstations and added without any problems using the pbm2lwxl-driver (ex. CoStar LabelWriter II). I did not spend much time with this printer, but according to openprinting.org the printer is supposed to work fine in OpenOffice with a specific template matching the paper size in the printer.

Setting up LTSP

As described earlier, the way I described LTSP in the prior article was slightly incorrect. Instead of having the entire environment in /opt/ltsp/arch, the clients actually log into the server as if they were local users. Because of this, the first thing we need to do is to install the desktop environment (since the server-edition comes without this). To do this, simply run:

# sudo apt-get install ubuntu-desktop
Note that this will take quite some time, and I would encourage you to use the installation CD as the source unless you have a very fast internet connection.

Once this is done, it’s time to set up LTSP.
# sudo apt-get install openssh-server
SSH is required to run LTSP, since the traffic from the clients runs through an SSH tunnel

# sudo apt-get install ltsp-server-standalone
Install the LTSP-software

# sudo ltsp-build-clients
Build the client environment. This will take a while.

It’s important that you install the ‘standalone’ edition, else you won’t get the dhcp-server that enables the clients to boot from the actual server. Once you’ve run all the commands above without receiving any errors, you need to make some changes to the dhcp-server. Go ahead and edit /etc/ltsp/dhcpd.conf with your favorite editor to match your network.Then restart the dhcp-server:

# /etc/init.d/dhcp3-server restart

If you changed the IP-address of your server after you ran the installation of ltsp-server-standalone, you need to update the SSH-keys. Do this by running:

# ltsp-update-sshkeys

Setting static IP on clients and allowing local printers

Once you have LTSP configured, you might need to access local devices on the clients. In my case, I had a couple of locally attached printers (both USB and Parallel). To enable the use of these, the first thing you want to do is to set a static IP for the client that holds the printer, based on the MAC address. To do this, we first need to configure the DHCP server to assign a static IP to the client. Edit /etc/ltsp/dhcpd.conf and add:

host ExampleWS1 {
hardware ethernet 00:01:02:03:04:05;
fixed-address 192.168.10.21;
option host-name "ExampleWS1";
}

Now we need to tell LTSP to share the printer assigned to that given workstation. Edit /opt/ltsp/i386/etc/lts.conf and add

[00:01:02:03:04:05] #ExampleWS1
PRINTER_0_DEVICE=/dev/lp0

for sharing a parallel port attached printer, or

[00:01:02:03:04:05] #ExampleWS1
PRINTER_0_DEVICE=/dev/usblp0

for sharing an USB printer.

Once you’ve added this, you need to restart the DHCP server as well as the local client to receive the new IP (or wait for the current IP lease to expire). Now all you need to do is to add the printer using TCP/IP printing with the above IP as the IP address and the appropriate driver for the printer.

That’s it for LTSP. Your server should be ready to have your clients boot off of it now.

Creating a shared space

This part was something that I anticipated to be very simple, but it turned out to be more complex. My plan was to create a folder (/home/shared) and simply just set the owner of that folder to the same group in which I had placed all the desktop users. Although this seemed to work fine at first, a problem appeared when a user created a folder inside of /home/shared. The problem was that all the other users only had read, and not read and write permission to that folder. This means that if User A creates a folder in the shared space, User B cannot rename or delete that folder, which is unlikely to be desirable. After a couple of attempts with chmod, I gave up and started to look for other solutions (correct me if I’m wrong, but it appears as Linux does not inherit folder permission like FreeBSD for instance does). Instead, I found the solution in umask. By editing /etc/profile and changing umask from 022 to 002. What this means is that all files created by the users now have read and write permission by all users in the group. Although this might be considered a security problem, it was the only solution I could find. However, since this is a closed environment, I wouldn’t consider it a very serious problem. Yet, you probably don’t want to have a 002 umask for root and probably want to edit /root/.profile and set umask to 022.

The Clients

Setting up the clients was the easiest part. Just plug in a new Gigabit network adapter and set the BIOS to boot off of it and you’re done. However, I also unplugged the hard drives from the clients to reduce the noise.

The Verdict

Overall the implementation was quite easy. Setting up the LTSP environment was really easy and probably took less than an hour. What I by far spent the most time on was to try to make Wine run the required Windows software (SPCS Administration 2000 Nät). However, after spending about two days hacking configuration files and researching, I threw in the towel – the software just didn’t run well (I primarily blame the software vendor, Visma Spcs, for a very poorly written software with very strange network behavior). Instead, I had to install VMware Server on the Server to run Windows XP (I initially tried Windows 98, since I had a bunch of licenses just laying around, but SPCS Administration 2000 Nät failed to work there too). This was of course undesirable, but with the time constraints I had this turned out to be the only realistic solution. The setup was quite straight forward (using this guide). In order to connect to Windows from the LTSP environment, I simply enabled RDP in Windows and used rdesktop to connect.

The d’oh and ahh’s

* /opt/ltsp/arch only holds the boot environment, not the entire LTSP desktop environment. Once the clients have booted up, they log into the core-server.
* The Windows software that I was supposed to run under Wine didn’t play nice. The only way I got this working was through a Windows XP session running under VMWare Server. Unfortunately this requires a Windows license. However, it’s likely that the company will switch to a web-based program instead, eliminating the requirement.
* I had problems using certain characters when connecting to Windows from the LTSP environment using TightVNC and RealVNC. I solved this problem by switching to Windows’ own RDP-protocol.

Author: Tags: , , , ,

© 2006-2009 WireLoad, LLC.
Logo photo by William Picard. Theme based on BlueMod © 2005 - 2009 FrederikM.de, based on blueblog_DE by Oliver Wunder.
Sitemap