Introducing YippieMove '09. Easy email transfers. Now open for all destinations.

Yahoo! recently released a new Firefox extension called YSlow. This article describes how to get started and what we did at Playing With Wire to get our front page to load in almost half the time.

YSlow is a handy little tool for analyzing the performance of your websites. It will give you vital statistics and grade your site on 13 performance points with helpful hints for what you may be able to do to improve the loading speed of your pages.

Installation

YSlow is actually a plugin to a plugin in Firefox. To use it, you need Firefox and the Firebug web developer plugin. Both are easily installable using links from YSlow’s homepage however.

Once you’ve restarted Firefox with the new plugins installed, all you have to do is to activate Firebug for a particular site and you’re ready to go. Normally, this means surfing to the site and then revealing Firebug from its icon in the Firefox status bar. Just click the Firebug icon and it will reveal it’s main view. In it, it will most likely say that Firebug is disabled. Just click ‘Enable Firebug for this web site’ and you’re ready to start dissecting it’s performance with Yahoo!’s YSlow.
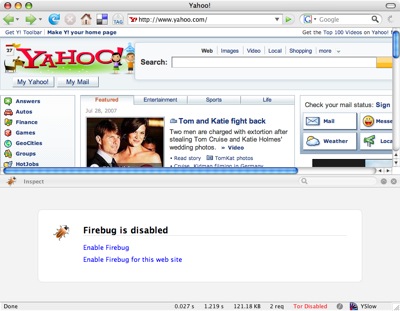
This is what Firebug looks like.
Firebug revealed.

Taking your site apart

Once you have Firebug enabled, switch to the ‘Performance’ tab and you’ll get a grade on your website’s loading performance. The grade breaks down into several subcomponents where each one corresponds to a point in Yahoo!’s Thirteen Simple Rules for Speeding Up Your Web site. The grading is fairly arbitrary and should be taken with a grain of salt. For example, if you have 35 downloads for your page and just four of them don’t have an Expires header, YSlow will give you a harsh F in that category.

YSlow gives Playing With Wire an F for Expires headers.
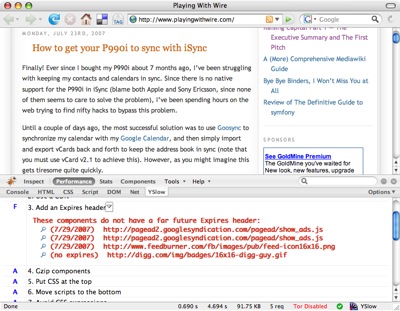
Hello, is this Google? YSlow is giving me an F in Expires headers. Could you reconfigure your ad servers for me?

None the less, the sub-points of the grade-sheet are great hints for what you can do with your site. While you’ll probably be forced to ignore the ‘grades’ if you have externally sourced ad units like we do, you can still work your way through the list and fix everything that you do have control over. This is what we did with Playing With Wire and astonishingly enough we reduced the download size to about half of what it used to be. Below are the best tricks we learnt or revisited after using YSlow.

Eliminate HTTP requests

This is a well known method that we had already worked into the design of Playing With Wire. The idea is to have as few CSS, image and Javascript files as possible. Most browsers will only download two files at a time and there’s always some overhead associated with the download of a new file. If you can combine files you reduce this overhead.

YSlow’s Components page let us know exactly what we were bringing in through links and we could eliminate an external Javascript we were no longer using.

Add Expires headers

Expires headers are important to let web browsers know that once they’ve cached an image, CSS include or Javascript file, they can keep using it for a while. Without these headers most browsers will keep downloading the same files over and over out of fear that they may change frequently. Again, YSlow’s Components tab reveals relevant information: the Expires column lets you know what Expiry date your web server is broadcasting for each downloaded file. If you notice files with a value in the Expires column, it may be time to go into your web server configuration file. In Apache, a section like this one might just do the trick:

<virtualhost ...>
...

<directory ...>
  ...
  ExpiresByType text/css "access plus 1 week"
  ExpiresByType text/javascript "access plus 1 week"
  ExpiresByType image/gif "access plus 1 week"
  ExpiresByType image/jpg "access plus 1 week"
  ExpiresByType image/jpeg "access plus 1 week"
  ExpiresByType image/png "access plus 1 week"
</directory>

  ExpiresActive On
</virtualhost>

Enable compression

Most modern clients support streaming compression. This is a feature that lets the web server compress data before sending it to the client. This reduces the download time of the page at the expense of some CPU time on the server. While most graphics can’t be compressed much, this turns out to work out great for HTML, CSS and Javascript. All of these files can often be reduced to as little as a third of their original size. The best part is that the web server won’t try to compress the data unless it already knows the client can handle it.

How to set up compression depends on your application and web server software. If you’re using Apache, you can have the server do it for you for normal files. For dynamic content such as that generated by PHP it depends. In WordPress there’s a switch in the Options tab. If you’re using wp-cache like Playing With Wire is, it may take some more work to get things up and running, but it’s well worth the effort.

Conclusion

Between these tricks and a couple more, Playing With Wire came out about half as heavy for the main HTML, CSS and Javascript, and as a result felt much more responsive. All in all YSlow was a helpful utility, especially thanks to its ‘Components’ tab which made it easy to see what parts of the page were being cached and compressed properly, and which ones were not. The grading system wasn’t very helpful, not all of the grade hints were applicable, and none of the hints were unknown in the field. Still, the list of suggestions was a useful as a kind of laundry list of things to do for the site, combined with data specific to your site. At the end of the day, I’ve found a new partner for optimizing websites with Yahoo!’s YSlow.

Author: Tags: , , ,
Introducing YippieMove '09. Easy email transfers. Now open for all destinations.

Finally! Ever since I bought my P990i about 7 months ago, I’ve been struggling with keeping my contacts and calendars in sync. Since there is no native support for the P990i in iSync (blame both Apple and Sony Ericsson, since none of them seems to care to solve the problem), I’ve been spending hours on the web trying to find nifty hacks to bypass this problem.

Until a couple of days ago, the most successful solution was to use Goosync to synchronize my calendar with my Google Calendar, and then simply import and export vCards back and forth to keep the address book in sync (note that you must use vCard v2.1 to achieve this). However, as you might imagine this gets tiresome quite quickly.

A benefit with GooSync was that I could synchronize anytime and anywhere as long as I had access to WiFi. The downside however was that I needed to remember to sync the phone every day. Another downside was that I needed to use Google Calendar instead of my personal preference, Apple’s Calendar. (Although it is possible to configure Apple’s Calendar to access Google Calendar in a read-only fashion when offline.)

Ok, lets cut to the chase: how to get your P990i to work with iSync. The solution to the problem is found here. The solution is a plugin written by ‘mate,’ who posted the plugin at My-Symbian.com. The plugin is still quite buggy, and neither we nor the author of the plugin should be held liable for any problems that might occur to your P990i or your data. It can be quite a bit of headache to get the plugin to work properly, so please follow the following steps carefully.

  • Back up your data
  • Make sure you back up all your data. If you have access to a Windows PC (which you will need in the next step anyways), use Sony Ericsson’s Backup-software from the PC Suite. Also, use the phone’s internal backup-software to perform a backup to the Memory Stick on the Calendar (Calendar -> Calendar Manager -> Backup) and the Contacts (Contacts -> Contact Manager -> Backup).

  • Update the phone to the latest firmware
  • In order to get this plugin to work, your phone need to run the latest firmware. Unfortunately there’s no way to do this on a Mac (maybe using Parallel’s might work, but I didn’t try this), so you need to have a PC running Windows to do this update. Just download the latest version of Sony Ericsson Update Service and install it on your PC. Since you’ve already backed up all your data, you can just go ahead and run the update right away. Note that the update takes quite some time, and that it will wipe all the data off your phone.

  • Restore your data from your Memory Stick
  • Assuming that the update went fine, you can just go ahead and restore your Calendar (Calendar -> Calendar Manager -> Restore) and the Contacts (Contacts -> Contact Manager -> Restore) from your Memory Stick. Don’t recover the data using Sony Ericsson’s backup utility, since you won’t be able to perform a sync if you do. We only took that backup to make sure that we have an additional backup in case something goes wrong.

  • Delete your old bluetooth pairing
  • Now let’s move over to the Mac to connect the phone with your Mac. The first thing we want to do is to delete the (possible) prior pairing with the phone. To do this go “Apple” -> “System Preferences” -> “Bluetooth” and Select the Devices tab. Now select your phone and press the delete button.
    bluetooth_thumb.png

  • Install the plugin
  • It’s finally time to install the plugin. Download the file from here (or our local mirror). When the download is completed, just go ahead and click on the dmg-file and run the installation.

    bt-add_device_thumb.png

  • Pair the phone with your Mac
  • The first thing you need to do is to enable bluetooth on your phone. Click Menu (far lower left corner) -> Connections -> Bluetooth -> “Bluetooth On”. Now let’s move over to the Mac and click on the Bluetooth icon up in the very right corner and select “Setup new bluetooth device.” In the wizard, select Phone and select your phone from the list. In the very last step, deselect Dial Up Networking, and just leave Address Book and Contacts selected.

  • Perform your first sync
  • Now, before you hit that sync button in iSync, you should make some changes to the settings. First, go ahead and deselect Calendar, and just perform a Contact sync for the initial sync. If your sync is successful, start by selecting one calendar, and then two calendars in the next sync. I’ve personally had problems with syncing more then one calendar, so you may or may not be able to sync several calendars.

properties_thumb.png
Congratulations, you should now finally be able to sync your P990i with you Mac. As you might notice, the plugin is still in early beta, so it’s not unlikely that you’ll receive some weird error messages or have some failed syncs. Regardless, this is by far the best solution that I’ve run across. If you however do run in to some trouble, I’ve compiled a small troubleshooting guide that you might find useful.

    Troubleshooting

  • My phone crashes and reboots when I try to sync
  • There’s a couple of ways this might happen. I actually ran into this myself, but was able to solve it. If you do run into this problem, try these things:

    * Make sure that you’re running the latest firmware.

    * Deselect the calendar-sync and only sync the Contacts.

    * If you can’t even perform a Contact-sync, you should try to make a Master Reset on your phone. After you’ve performed the Master Reset, try to sync before you restore any data.

  • My phone restarts when I try to sync more than one calendar
  • I actually experienced this too. For some reason some of my calendars won’t sync. At this point I really don’t know why some of my calendars won’t sync, but fortunately my most important calendars synced without problems. What you want to do if your phone crashes when syncing calendars is to select the calendars one by one, and see which calendar(s) cause the sync to fail.

For more troubleshooting ideas, please see the forum over at My-Symbian.com where the plugin was originally posted.

    Other useful tools to make the P990i more Mac friendly

  • USB File mode enabler
  • This little kernel-patch enables you to use the USB cable to connect your P990i to your Mac. Previously I was forced to either use bluetooth or a Memory Stick-reader to transfer data to the P990i. With this nifty tool you are not only able to access the files on the Memory Stick, but the cable also charges the phone.

  • iTunesMyWalkman
  • iTunesMyWalkman is a really nifty tool that works well with the USB enabler mentioned above. The software enables you to easily sync both photos and music to your phone. It also comes with some handy Apple Scripts that you can access from inside iTunes to make your phone act almost like an iPod.

That’s it. Hopefully this article is enough to help making your P990i more Mac friendly. Welcome to the world of synchronized data =)

As a side note I should probably mention that the guide above should be enough to get the m600, P1 and the w950 to get up running with iSync. The only difference (as far as I know) is that you use this plugin for the m600, this plugin for the w950 and this plugin for the P1.

Update: I guess I underestimated Sony Ericsson. As it turns out, the patch/driver mentioned in the article actually turns out to be made by Sony Ericsson (and only leaked, and possibly modified by ‘mate’). Sony Ericsson has now released the driver, which can be found here. The official download offers a new version which is also more stable.

Author: Tags: , , ,
Introducing YippieMove '09. Easy email transfers. Now open for all destinations.

Parallels makes a virtual PC type of software for the Mac which allows you to run Windows on the Mac. Great software, but the company has a little bit of a history of quality control problems. Today the company launched a new design of their website. Unfortunately the company forgot about supporting the default Mac browser, Safari!

Parallels website shows a dropdown in the wrong place in Safari.

Nothing big: a drop down menu is showing out of place. The site actually seems to start working after you resize it for the first time, or click a single link. It’s likely to be fixed by the time many people read this, but it’s still a little bit ironic that a company with a major Mac market would not check their site in Safari.

Author: Tags: , ,
Introducing YippieMove '09. Easy email transfers. Now open for all destinations.
Jul
13.

This guide is for the programmer who needs to write a quick and dirty PHP extension. A PHP extension is a module for PHP written in C. You may wish to write such a module to expose library functionality only available in C, or to optimize certain key sections in your execution path.

As I have done before, I will attempt to make a terse summary. I assume you have or confidently can acquire knowledge of PHP and C. I’m a big fan of simple cookbook ‘recipe’ like guides, so here we go. Hold on to your hat.

Step 1: Compile PHP With Debugging Enabled

When developing your own module, you’ll want to enable debugging in PHP. This will generate error messages which may contain additional information beyond an unhelpful ‘segmentation fault’ when your module crashes.

In FreeBSD, just go into your ports, and do make config. Turn on the ‘debugging’ option and recompile PHP and its modules. Other platforms are similar; if you’re compiling from source by hand, take a look at the output of ./configure --help and you’ll find the right option for your version.

Before you start working on your module, make sure everything is in order with your server and that your extensions.ini file looks good. In my experience, rebuilding PHP under FreeBSD sometimes causes modules to appear twice in the extensions.ini file, and you may wish to be wary of this.

Step 2: Set up a project skeleton

PHP comes with great support for developing your module. There are a couple of scripts and configure related tools that automate almost all the work for you.

First, create a config.m4 file in your new project. (There’s even a tool that does this for you – ext_skel – but we’ll do it by hand for the purposes of this guide.) Here’s a bare bones config.m4 file for an extension named “pwwext”:

dnl config.m4 for extension pww

PHP_ARG_ENABLE(pwwext, whether to enable pww support,
[  --enable-pwwext          Enable pww support])

if test "$PHP_PWWEXT" != "no"; then
  PHP_NEW_EXTENSION(pwwext, pwwext.c, $ext_shared)
fi

You’ll also need some source code. Lets begin with the header file, which we’ll call pwwext.h. Lets write a minimal header:


#ifndef PHP_PWWEXT_H
#define PHP_PWWEXT_H

#define PHP_PWWEXT_EXTNAME  "pwwext"
#define PHP_PWWEXT_EXTVER   "0.1"

#ifdef HAVE_CONFIG_H
#include "config.h"
#endif

#include "php.h"

extern zend_module_entry pwwext_module_entry;
#define phpext_pwwext_ptr &pwwext_module_entry

#endif /* PHP_PWWEXT_H */

In my experience, it’s often a waste of time to learn things before you need them. This is a good example of that: the header code does pretty much what it appears to do, and more in depth knowledge is not strictly needed. In short it exposes the entry point of the module and brings in the most important header files.

Step 3: The Actual Source

Finally, we’ll need the file we referred to in config.m4 previously. It’s the main source file, pwwext.c:

/*
 * This extension enables cool pww functionality.
 */

#include "pwwext.h"

PHP_FUNCTION(pwwext_calculate)
{
  long a, b;
  
  /* Get some params. */
  if (zend_parse_parameters(ZEND_NUM_ARGS() TSRMLS_CC, 
      "ll", &a, &b) == FAILURE) {
    RETURN_NULL();
  }

  if (a < = 0) {
    zend_throw_exception(zend_exception_get_default(), 
      "First argument can't be negative nor zero.", 
      0 TSRMLS_CC);
    RETURN_NULL();    
  }

  /* 
  PHP preallocates space for return values, so
  its important to use these return macros.
  */
  RETVAL_LONG(a+b);  
  return;
}

static function_entry php_pwwext_functions[] = {
  PHP_FE(pwwext_calculate, NULL)
  { NULL, NULL, NULL }
};

zend_module_entry pwwext_module_entry = {
#if ZEND_MODULE_API_NO >= 20010901
  STANDARD_MODULE_HEADER,
#endif
  PHP_PWWEXT_EXTNAME,
  php_pwwext_functions, /* Functions */
  NULL, /* MINIT */
  NULL, /* MSHUTDOWN */
  NULL, /* RINIT */
  NULL, /* RSHUTDOWN */
  NULL, /* MINFO */
#if ZEND_MODULE_API_NO >= 20010901
  PHP_PWWEXT_EXTVER,
#endif
  STANDARD_MODULE_PROPERTIES
};

#ifdef COMPILE_DL_PWWEXT
ZEND_GET_MODULE(pwwext)
#endif

There are a couple of important structures here. The variable php_pwwext_functions lists all the functions we wish to expose from the module. In our example, we’re only exporting a single function.

Then we have the pwwext_module_entry structure which truly is the entry point into your module. If you would look near the sixth line in the structure you’d see a pointer to our list of functions, for instance.

Step 4: Compiling and Running

Finally, we’ll want to build the actual module. The command phpize will get everything in order for a compilation based on your configuration. After phpize is done, the normal configure make dance is all we need. Make note of the ‘--enable-pwwext‘ argument to configure.

  1. [~/pwwext]$ phpize
  2. ./configure --enable-pwwext
  3. make

That’s all there is to it. Your module should now be built and almost ready to go. To wrap up, you’ll need to install the module in your PHP extensions folder. If you don’t know it already, run php -i to find the right folder. For me, the result is,

$ php -i|grep extension_dir
extension_dir => /usr/local/lib/php/20060613-debug => 
/usr/local/lib/php/20060613-debug

so I’ll go ahead and copy the module into /usr/local/lib/php/20060613-debug:

# cp modules/pwwext.so /usr/local/lib/php/20060613-debug/

There’s one last step we’ll have to do. We need to add the module to the list of extensions in your php.ini or extensions.ini file. Locate the section with multiple lines beginning with extension=... and add your own line. For me, this line would do it:

extension=pwwext.so

Step 5: Does it work?

Finally, we can test our new module. Run,

$ php -m

and make sure your new module is in the list.

If all is well you should be able to use your new function from any PHP script. For me, this was the final result:

$php -r'echo pwwext_calculate(1, 2);'
3
$ php -r'echo pwwext_calculate(-1, 2);'

Fatal error: Uncaught exception 'Exception' with 
message 'First argument can't be negative.' in 
Command line code:1
Stack trace:
#0 Command line code(1): pwwext_calculate(-1, 2)
#1 {main}
  thrown in Command line code on line 1

Now you have a bare bones module that does something. All that remains now is to change that one function to do something useful and you’re well on your way.

You’ll undoubtedly need more reference material going forward. Php.net is the logical starting point: The Zend API. If that’s not enough, Sara Golemon wrote a whole book about the subject: ‘Extending and Embedding PHP’.

Good luck, and don’t forget to turn off PHP debugging when you’re done.

Author: Tags: , ,
Introducing YippieMove '09. Easy email transfers. Now open for all destinations.

Writing a business plan is an important step in founding your business. Not only is it a required part if you’re going to raise capital, but it’s also very useful since it forces you to research your competitors and the environment you will operate in. As you may or may not know, the by far most important part of you business plan is the Executive Summary. Document

Recently I attended a seminar about executive summaries, delivered by Steve Foster, Partner at Texas Pacific Group Ventures with long experience from the VC industry. The focus of the seminar was executive summaries, but Foster also shared an insider’s view on what VCs actually value when they chose what company to invest in.

Most people with some business experience have some idea of what goes into an executive summary. Although the information that goes into the executive summary might slightly differ between industries, the main objective is always to summarize your business idea in such way that an investor will be enticed to invest in your company.

So how long is an executive summary supposed to be? Traditionally most people say that it’s supposed to be about one page. According to Foster, he would rather see a three to four pages long executive summary, since it’s too hard to summarize all the information in a single page.

How do you get a VC to choose your company over the rest in the huge pile they’re reading through? Well, let’s face it, it’s very unlikely that an investor will get through even your executive summary and much less the rest of your business plan. If you fail to grab the attention of the person reading the executive summary within the first five seconds, it’s quite likely that he or she will stop right there and move on to the next project. One of the more interesting ideas that Foster suggested was to not to play by the rules. Imagine if you were personally going through maybe hundred executive summaries per day: it’d become quite boring with the typical layout and design. Therefore, it’s crucial to find ways to stand out from the crowd. Here it’s more important to use your imagination than what’s considered standard. Don’t only use blocks of text, but rather combine it with quotes, graphs, tables, bullet points and so on.

Now let’s just assume that you managed to get a person at the VC firm to read through your executive summary. When they read through your executive summary, there are a couple of things that they will look for:

References

Who referred you? This is the single most important element. If you have a personal recommendation from someone within the VC’s network, you’re far more likely to be considered than if you just cold call.

Don’t e-mail

We in the tech industry have a tendency to do all kind of communication through e-mail. However, when it comes to sending your executive summary, this is simply a big no no. You’re up to tough competition, and the fact that it takes more energy to open up an attached document than it is to briefly skim over a piece of paper plays an important role here.

Is there a market?

Is there a significant market for your product or service?

Is there room for a VC-backed venture in the market?

This relates to the previous point, and relates to the size of the market. Is the market really large enough to hold a VC backed company?

Is there urgency?

What is the team composition?

According to the presenter, the optimal team composition in the tech industry consists of one programming/tech genius and one business person who knows how to apply the technology to the market.

Ok, so now you know what to include in your executive summary and how to increase your odds of being selected. Next you might wonder if there’s any good or bad time to submit your executive summary to a VC firm. The answer is yes. Generally you should try to avoid the summer, since many VCs are out of town. Also try to avoid submitting before a major holiday. Conversely, it’s a plus if you get your executive summary read the day after major holidays, since people tend to be in a better mood then. Another time to target is January, since that’s when people come back from their long Christmas break with more energy than when they left.

This was part one in the series “Raising Capital.” In the next part we will dive deeper in how to write your actual business plan. Stay tuned…

Author: Tags: ,

© 2006-2009 WireLoad, LLC.
Logo photo by William Picard. Theme based on BlueMod © 2005 - 2009 FrederikM.de, based on blueblog_DE by Oliver Wunder.
Sitemap