Introducing YippieMove '09. Easy email transfers. Now open for all destinations.
Jan
28.
Comments Off
Comments
Category: Technology

We recently had to decide on a configuration format for one of our internal utilities. In this post I’ll talk a little about why we picked YAML as the format and the reasoning behind it.

WireLoad has a couple of servers, each running a number of different services. For a long time we had almost one backup script per service, all hand hacked in bash to fit the requirements of the application. This wasn’t great because it meant we repeated a lot of work. To make the situation a little more manageable we developed BackupWire, a simple backup utility in a single file with a minimal number of dependencies.

The design goals of BackupWire were,

  • Minimal footprint: BackupWire shouldn’t be much heavier than the bash scripts we already had. Why? Because if it was huge and difficult to deploy we might end up writing little bash scripts instead!
  • Minimal dependencies: BackupWire should not have many dependencies. This is for the same reason as in the previous point. BackupWire needs to be easy to install.
  • Readable configuration: One of the problems with bash scripts is that once they’re a little complicated it gets hard to see what’s happening. BackupWire’s real purpose is to alleviate that headache by distilling most backup jobs down to a few lines of configuration.

In order to make everything dead simple the configuration was stored in the BackupWire script itself. This would make it easier to relocate the script, and it would decrease the chance that a config file was not found due to things such as the cron environment being sparse. However, this design decision made it hard to update the script with new versions. In addition, the configuration format became a little cumbersome because it was just a set of Python class instantiations. Hence this feature went against the third design goal of BackupWire. The latest version now uses a configuration file instead.

Thinking that the world really doesn’t need another arbitrary configuration syntax, I wanted to pick a standardized configuration format. So I read up on Wikipedia’s entry on configuration files and found the top three contenders: Lua, XML and YAML.

Lua, being a programming language these days, looked like it would add too many dependencies to BackupWire. BackupWire is written in Python, which we already have on all servers, but Lua we don’t use for anything else so it would be a new requirement which would have to be installed on each server. Also, it just struck me as a little excessive to have a full blown second programming language as a configuration format unless the application was really complex.

The other problem with Lua was that googling Lua config tutorial didn’t really give that many good results, making me think that perhaps the focus of the language has shifted from configuration to something else over time.

XML was immediately off the table, perhaps obviously to some of our readers. Most importantly XML is not a very readable language with it’s abundance of symbols and markup. But also, it’s not very easy to write for the same reason. The people behind Django’s documentation put it best when they said, “Making humans edit XML is sadistic!”

YAML is readable and easy to write both. There is also a light weight Python module called PyYAML to read the format. Using YAML the new BackupWire configuration files are definitely to the point and concise without being complicated to edit. Here is an example of the new configuration format we developed in YAML syntax:

name:       "Sample Backup"         
to:         "/backup/"                   
frequency:  "daily"                 

tasks:
 - run: 
   command: 'df -h'
   log_output: True
 - archive:
   name: "etc.tbz"
   contents: ["/etc/", "/opt/etc/"]
 - archive:
   name: "tmp.tbz"
   contents: [ "/tmp/" ]
# Dump a database using a run task with 
# %(targetFolder)s to locate the destination.
 - run:
   command: 'mysqldump --quick --extended-insert 
     --compact --single-transaction 
     -u backup --databases sample 
     | bzip2 >%(targetFolder)s/mysql-sample.sql.bz2'
---

Not too bad as far as readability goes and all standardized YAML to spare the world from yet one more syntax.

Author: Tags:
Introducing YippieMove '09. Easy email transfers. Now open for all destinations.

If you’re a regular here at Playing With Wire, you’ve probably already read our articles about Cacti. While Cacti does do a great job on visualizing load on your servers, it does not provide (by default) alerts when a server goes down.

When we launched YippieMove we quickly realized that we needed a reliable 3rd party that could ping our servers from several locations across the globe to ensure that we were not experiencing any problems with the access to our site. As we are quite tech-savvy here at WireLoad, we had a hard time justifying paying more than a few bucks per months for a service like this, since the service is so easy to write (we actually did write our own uptime-monitor with alerts a few years back using Curl, Crontab and some other tools, but would rather outsource this service).

So the search began. We required a few thing for this service:

  • Several servers across the globe that ping our servers.
  • Cheap. Preferably free (we don’t mind some ads).
  • Decent statistics showing response-times etc.
  • Reliable alert system by e-mail (luckily most US Cell providers allow you to send email to your phone, using [email protected].)
  • Must allow monitoring of both SSL and non-SSL servers.
  • A minimum of 4 monitors (we needed to monitor playingwithwire.com, wireload.net, yippiemove.com [with and without SSL]), but it would also be great if we could monitor our mail-server.
  • The more frequent the pings the better.
  • No back-links required.

One of the most impressive sites we found was Pingdom, a small Swedish firm that is trusted by companies such as IBM, Loopt and Twitter (wow, they must spend more bandwidth on alerts than pings with Twitter for sure). What we really liked about Pingdom was the general look and feel of their site. It feels fresh, responsive and reliable. The pricing is definitely within reason: they charge $9.95 for their Basic plan, which includes 5 checks and 20 SMS.

The next site we stumbled upon was SiteUptime. The site has a decent look and feel (but does not come close to Pingdom). After examining their pricing, we realized that we needed their Advanced plan, since none of their lower plans allowed SSL monitoring. The price for this plan is $10 per month. While their site and visualization does not come close to Pingdom, they do give you 10 monitors, as apposed to 5 monitors with Pingdom, with their Advanced plan.

Another site we found was Pingability. The general look and feel of the site is OK, but the service offered was not great. The free plan requires a back-link (which we think is unacceptable for a professional site). At the same time the premium service, for $9.95, only offers one monitor.

Next up for review is Wormly. Priced at $9 per month, their Bronze-plan seems to be a reasonable alternative. The plan includes 5 monitors and they ping your server 5 times every 5 minutes, which is good enough. Unfortunately there’s a big ‘but’ — no SSL monitoring (at least as far as we can tell). That’s a deal-breaker. To Wormly’s defense though, they do offer something that sets them apart from the competition, namely the ‘Server Health Monitor.’ This service is something similar to Cacti (it definitely looks RRDTool-based), that visualizes server-load. However, they will probably have a hard time selling this service to security-concerned organizations, as they require a monitoring-client to be installed on the server (it’s hard to get this data otherwise).

Basicstate is the final service we will cover in this article. A lot can be said about Basicstate’s web design (it’s _really_ bad). However, they do offer a very competitive service. They ping every 15 minutes and allows you monitor as many sites as you want (including SSL). While it might not be a very pleasing site to browse, they do offer sufficient statistics (with graphs) on their site. In addition to that, they also send you daily reports about all your monitored sites (with time data for dns, connect, request, ttfb, ttlb). The only drawback we discovered with Basicstate is that you cannot monitor the same domain-name with SSL and non-SSL (sub-domains is fine though). This may or may not be an issue for you.

The verdict? We settled for Basicstate. Later on, as we grow, we might consider switching to Pingdom. We’re happy with Basicstate for now. Although we did experiencing some false alerts, the guy who runs the site (I assume), Spenser, did a great job on providing an in-depth explanation to the alerts by email. So if you’re on a tight budget, Basicstate is our recommendation. If you have more money to spend, go for Pingdom.

Author: Tags: ,
Introducing YippieMove '09. Easy email transfers. Now open for all destinations.

If you’ve been reading our blog before, you’ve probably already figured out one thing: we love Open Source and Apple products. Because of this, all our desktop machines run either Linux or Mac OS. Although our mixture of platforms might not be representative for all organizations, this article is still likely to apply to all start-ups and companies that are trying to create a company-wide policy for document-formats.

In our organization today we have three different office suites:

While all of these office suites have their pros and cons, they work just fine until the moment you try to move between suites. In the past in most organization it was often the case that everyone was forced to use Microsoft Office because some manager was bribed by Microsoft upper management said so. However, this is no longer a reasonable approach when we have a more diversified desktop environment than ever before. Today it’s no longer rare that we have Macs and PCs running both Windows, OS X and Linux in the same network. Because of this, forcing all users to use Microsoft Office is no longer reasonable.

First out: Microsoft’s .doc/.xls/.ppt

We’ve concluded that requiring all users to use the same software is unreasonable, but we still need to decide on one document-format that all users can both read and write. The first document format that comes to mind is the .doc-format for documents, and the .xls-format for spreadsheets. Let’s analyze this option a bit.

License: Microsoft’s own proprietary format.

Application .doc .xls .ppt
Open Office Yes (but layout problems) Yes Yes (but layout problems)
Apple iWork Yes (but layout problems) Yes (but uses a different structure natively) Yes (but layout problems)
Microsoft Office Yes (native) Yes (native) Yes (native)

Verdict: Ok, so all of the above editors support Microsoft’s proprietary file-formats. However, the drawback is that it is a proprietary format, which means that both iWork’s and Open Office’s implementation of these formats are most likely reverse-engineered. The real implication of this reverse-engineering is that the support is not really perfect. As you might have experienced, when using Open Office or Pages to export to .doc files, oftentimes the layout of the document is ruined. Since they layout tends to be quite important in business-documents, I would consider this a major drawback.

Next: Open Office’s .odt/.ods/.odp (Open Document Format)

You’ve probably already figured out that this would be our favorite, but let’s try to be unbiased. Similarly to the .doc/.xls/.ppt-combo, we’ll start out with a table of the support in the relevant applications.

Licensing: Creative Commons.

Application .odt .ods .odp
Open Office Yes (native) Yes (native) Yes (Native)
Apple iWork No No No
Microsoft Office Yes, with plug-in Yes, with plug-in Yes, with plug-in

Verdict: Unfortunately it seems like the Open Document Format won’t work. Here the biggest problem is iWork. It is really a shame that Apple chose to not include support for this format. However, there might be an answer for why this is. According to Apple’s list of features in Leopard, we can see that there’s support for Open Document Format in TextEdit. Without having any evidence at all for this claim, we would guess that Apple intentionally chose to not include the support for Open Document Format in iWork simply because they would add support for the format on OS-level in Leopard.

The decision

As you can see in the charts above, none of the two alternatives is perfect. What holds the .doc/.xls/.ppt-combo back is its proprietary nature. Because of this, all the other applications fail to read and write these files good enough for a corporate environment. What holds the Open Document Format back is the lack of implementation in iWork. Moreover, it might also be cumbersome to have to use a plug-in to read and write Open Document Files in Microsoft Office, even that that’s still better than no support at all.

The bottom line is that at this point, the only possible approach is to use the .doc/.xls/.ppt-combo. Although we don’t like it, we’re out of luck with Open Document Format due to the lack of support in iWork. However, because of the uncertainty of the support of Open Document Format in Leopard, we will actually wait and see until it’s launched to take a formal policy decision on our Document-format.

Author: Tags: ,
Introducing YippieMove '09. Easy email transfers. Now open for all destinations.

(We apologize for the recent slow flow of posts on the blog, but we’re spending all our time finishing off our first product for the Private Beta launch and we still haven’t figured out how to extend the 24h limit per day.)

In our last article, Building an IT infrastructure with a sub-3,000 budget we discussed the possibility to build an extremely cheap, yet modern IT infrastructure. Now a couple of weeks later, I’ve actually deployed a setup based on that article.

The final system I deployed differed slightly from the specs provided in the previous article. For instance, instead of 10 clients as the article stated, my deployment only included 4 clients (at this point). Other than that, the hardware used was very similar to the article. Below is a list of all the components that was purchased and the approximate price in dollars.

New Inventory

Note that I decided to buy three different brands of hard drives to reduce the chances of having two drives collapse at the same time (two drives from the same batch are more likely to collapse around the same time than two random drives).

The company already had a handful of semi-obsolete computers that would work fine as clients in the new environment. Also, as in most organizations there were already other peripherals available that I had to make working in this new infrastructure. Fortunately, this went smoother than what I had anticipated. The peripherals were as follows:

Existing Inventory

The Server

The server is the heart of this environment (as in most environments), therefore, I’ll start describing the setup of the server first. (I’m not really going to describe what LTSP is, and instead kindly refer you to the previous article for an introduction on the topic).

The initial plan, as I described in the previous article, was to install the 64-bit version of Ubuntu 6.06.1 LTS Server on the server, primarily because of the Long Time Support. Unfortunately it turned out to be a bad choice for two reasons:

1) Ubuntu 6.06.1 has quite limited support for LTSP. Although many of the features work fine, some features such as sound-forwarding to the clients are not implemented. It would quite likely be possible to modify the 6.06.1-setup to support sound as well, but I decided to save some time and just switch over to 7.04 server instead.

2) I was forced to use the 32-bit version instead of the 64-bit version. Although I really tried to avoid this, the software support in the 64-bit version didn’t meet my requirements. For instance, I didn’t manage to print from Wine to Cups in the 64-bit version due to some problem with libcups. Moreover, I discovered that there is no Flash support in the 64-bit distribution. Since many websites today require Flash, I had no choice but to use the 32-bit distribution.

So we decided to use the 32-bit version of Ubuntu 7.04 Server. The next problem I came across was how to partition the hard drives. In contrast to what my previous article stated, it turns out that /opt/ltsp/i386 only includes the boot-environment for LTSP, and not the entire system. Therefore it makes little sense to have an 800GB RAID5 array devoted to it. Once the clients have booted up, they log into the core-server. Because of this, I had to change the partitioning strategy. What I ended up doing was to create two partitions on the RAID5 array: one of 795GB to be used for / and one 5GB to be used for swap. I did discover one problem with this setup though: Grub had problems booting off a software RAID array. After some research, I found that it’s possibly to boot Grub from a software RAID, but it required some hacking. Because of this, I decided to create a small partition on the stock hard drive for a /boot and use the remainder of that drive for backup (mounted as /backup). The problem with this setup is that we have a single point of failure – the stock hard drive. Although nothing important is kept on this drive (unless we need to recover our backups), a failure of the drive would still prevent the system from booting.

The hardware

APC Smart-UPS SC 450VA
The only piece of hardware that requires a bit configuration other than the RAID is the UPS. Fortunately setting up this particular brand of UPS is dead simple. Just install the NUT package and modify your configuration files to match the following:

/etc/nut/ups.conf
[ups]
driver=apcsmart
port=/dev/ttyS0
desc="UPS for BLServer1"
sdtype=0

/etc/nut/upsd.conf
ACL all 0.0.0.0/0
ACL remote 192.168.10.0/24
ACL localhost 127.0.0.1/32

ACCEPT localhost
ACCEPT remote
REJECT all

/etc/nut/upsd.users
[monuser]
password = ups_password
allowfrom = localhost
upsmon master

/etc/nut/upsmon.conf
MONITOR ups@localhost 1 monuser ups_password master

and edit /etc/default/nut to
START_UPSD=yes
START_UPSMON=yes

Brother MFC-8460N
Setting up the network printer was a breeze. Just enter the IP address and you’re set. What surprised me a bit was that even the network scanner worked. After installing the Linux driver from Brother’s homepage and following the instructions, the scanner was up and running in less than 5 minutes.

Brother HL-2040
This printer was locally connected, and once it was added in LTSP (see the next section), the printer worked without any problems.

Dymo Labelwriter 400 Turbo
The printer was connected locally to one of the workstations and added without any problems using the pbm2lwxl-driver (ex. CoStar LabelWriter II). I did not spend much time with this printer, but according to openprinting.org the printer is supposed to work fine in OpenOffice with a specific template matching the paper size in the printer.

Setting up LTSP

As described earlier, the way I described LTSP in the prior article was slightly incorrect. Instead of having the entire environment in /opt/ltsp/arch, the clients actually log into the server as if they were local users. Because of this, the first thing we need to do is to install the desktop environment (since the server-edition comes without this). To do this, simply run:

# sudo apt-get install ubuntu-desktop
Note that this will take quite some time, and I would encourage you to use the installation CD as the source unless you have a very fast internet connection.

Once this is done, it’s time to set up LTSP.
# sudo apt-get install openssh-server
SSH is required to run LTSP, since the traffic from the clients runs through an SSH tunnel

# sudo apt-get install ltsp-server-standalone
Install the LTSP-software

# sudo ltsp-build-clients
Build the client environment. This will take a while.

It’s important that you install the ‘standalone’ edition, else you won’t get the dhcp-server that enables the clients to boot from the actual server. Once you’ve run all the commands above without receiving any errors, you need to make some changes to the dhcp-server. Go ahead and edit /etc/ltsp/dhcpd.conf with your favorite editor to match your network.Then restart the dhcp-server:

# /etc/init.d/dhcp3-server restart

If you changed the IP-address of your server after you ran the installation of ltsp-server-standalone, you need to update the SSH-keys. Do this by running:

# ltsp-update-sshkeys

Setting static IP on clients and allowing local printers

Once you have LTSP configured, you might need to access local devices on the clients. In my case, I had a couple of locally attached printers (both USB and Parallel). To enable the use of these, the first thing you want to do is to set a static IP for the client that holds the printer, based on the MAC address. To do this, we first need to configure the DHCP server to assign a static IP to the client. Edit /etc/ltsp/dhcpd.conf and add:

host ExampleWS1 {
hardware ethernet 00:01:02:03:04:05;
fixed-address 192.168.10.21;
option host-name "ExampleWS1";
}

Now we need to tell LTSP to share the printer assigned to that given workstation. Edit /opt/ltsp/i386/etc/lts.conf and add

[00:01:02:03:04:05] #ExampleWS1
PRINTER_0_DEVICE=/dev/lp0

for sharing a parallel port attached printer, or

[00:01:02:03:04:05] #ExampleWS1
PRINTER_0_DEVICE=/dev/usblp0

for sharing an USB printer.

Once you’ve added this, you need to restart the DHCP server as well as the local client to receive the new IP (or wait for the current IP lease to expire). Now all you need to do is to add the printer using TCP/IP printing with the above IP as the IP address and the appropriate driver for the printer.

That’s it for LTSP. Your server should be ready to have your clients boot off of it now.

Creating a shared space

This part was something that I anticipated to be very simple, but it turned out to be more complex. My plan was to create a folder (/home/shared) and simply just set the owner of that folder to the same group in which I had placed all the desktop users. Although this seemed to work fine at first, a problem appeared when a user created a folder inside of /home/shared. The problem was that all the other users only had read, and not read and write permission to that folder. This means that if User A creates a folder in the shared space, User B cannot rename or delete that folder, which is unlikely to be desirable. After a couple of attempts with chmod, I gave up and started to look for other solutions (correct me if I’m wrong, but it appears as Linux does not inherit folder permission like FreeBSD for instance does). Instead, I found the solution in umask. By editing /etc/profile and changing umask from 022 to 002. What this means is that all files created by the users now have read and write permission by all users in the group. Although this might be considered a security problem, it was the only solution I could find. However, since this is a closed environment, I wouldn’t consider it a very serious problem. Yet, you probably don’t want to have a 002 umask for root and probably want to edit /root/.profile and set umask to 022.

The Clients

Setting up the clients was the easiest part. Just plug in a new Gigabit network adapter and set the BIOS to boot off of it and you’re done. However, I also unplugged the hard drives from the clients to reduce the noise.

The Verdict

Overall the implementation was quite easy. Setting up the LTSP environment was really easy and probably took less than an hour. What I by far spent the most time on was to try to make Wine run the required Windows software (SPCS Administration 2000 Nät). However, after spending about two days hacking configuration files and researching, I threw in the towel – the software just didn’t run well (I primarily blame the software vendor, Visma Spcs, for a very poorly written software with very strange network behavior). Instead, I had to install VMware Server on the Server to run Windows XP (I initially tried Windows 98, since I had a bunch of licenses just laying around, but SPCS Administration 2000 Nät failed to work there too). This was of course undesirable, but with the time constraints I had this turned out to be the only realistic solution. The setup was quite straight forward (using this guide). In order to connect to Windows from the LTSP environment, I simply enabled RDP in Windows and used rdesktop to connect.

The d’oh and ahh’s

* /opt/ltsp/arch only holds the boot environment, not the entire LTSP desktop environment. Once the clients have booted up, they log into the core-server.
* The Windows software that I was supposed to run under Wine didn’t play nice. The only way I got this working was through a Windows XP session running under VMWare Server. Unfortunately this requires a Windows license. However, it’s likely that the company will switch to a web-based program instead, eliminating the requirement.
* I had problems using certain characters when connecting to Windows from the LTSP environment using TightVNC and RealVNC. I solved this problem by switching to Windows’ own RDP-protocol.

Author: Tags: , , , ,
Introducing YippieMove '09. Easy email transfers. Now open for all destinations.

Introduction
No way! That’s impossible.” Well, actually it’s not. Using Open Source technology, it’s actually possible to create a competitive IT infrastructure at very low costs. Not only does Open Source software enable you to create more customized solutions to better fit your needs, but it also means that you can spend your budget on hardware – not software.

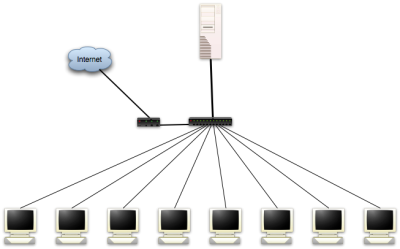
Last month I was asked by a company to figure out how to ‘modernize‘ their IT infrastructure with a minimal (almost non-existing) budget. After plenty of thinking and research, I came to realize that the only way to do this was to use some kind of thin-client solution. The solution that I found to fit my needs the best was Linux Terminal Server Project (LTSP). LTSP utilizes network boot (we will use PXE) to boot the clients directly from the server. Therefore, we can use obsolete clients without hard drives (to reduce the noise) as thin clients. The only thing we need on all the clients is a fast network adapter with PXE-support.

Some of the widest adoption of LTSP has been within K12 the education field. Since many educational institutions are working with very tight budgets, LTSP has a strong advantage. It is a way to save costs without having to compromise too much on usability. Edubuntu is a Linux distribution that targets educational institution. What makes Edubuntu very interesting is that it comes out-of-box with LTSP support, which enables system administrators with limited knowledge of Linux to get a thin-client setup running with little effort. Since Edubuntu is closely related to the regular Ubuntu, it’s not very hard to get Ubuntu up and running as an LTSP server.

Infrastructure

This layout is quite typical for a LTSP setup. You might also want to add a couple of network printers.

The Hardware
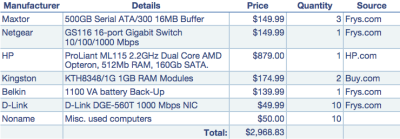
With a very limited budget, I realized that a thin-client solution would be the most realistic approach. As the name implies, the clients are thin and most of the load will be on the server. Therefore we will spend most of the money on a solid server. After a good amount of research to find a cheap, yet powerful and expandable server, I found the HP ProLiant ML115. The server comes with a 64 bit 2.2GHz Dual Core AMD Opteron CPU, which will serve our needs well. However, it only comes with 512Mb of RAM, which is insufficient for the number of users we intend to have. Therefore we’ll need to purchase some additional RAM. The RAM consumption estimates varies across different LTSP projects, ranging from 256Mb + 32Mb per client to 1024Mb + 64Mb per client. However, since I’d rather be on the safe side, I’d recommend that you purchase another 2Gb of RAM (total 2.5Gb) and put in the server (1024Mb + 150Mb per client).

The next thing we need to add is a Gigabit switch to reduce the possibility of having the network as a possible bottleneck (note that I’m not sure if a 10/100 Mbit network would actually create a bottleneck in this setup, but I rather be safe than sorry). Since Gigabit is cheap today, going Gigabit all the way seems like a reasonable move. Therefore, I’ve budgeted for 10 Gigabit network adapters (with PXE support) and a 16 ports Gigabit switch (the HP server comes with Gigabit network adapter).

Now we need somewhere to store the users’ data with high security and performance. Since we’re on a limited budget, we will use a software RAID solution rather than a high-end hardware RAID solution. A RAID-5 setup on three SATA disks using Linux’s software RAID is probably the cheapest and most reliable for the price. This will allow us to increase performance while we also gain protection against loss of any one drive without loss of any data. Moreover, we also use a separate OS disk to reduce the I/O load.

Because everything is both stored and running on the server, it’s crucial that we protect the equipment from power failures and spikes (the server by itself is a single point of failure). Therefore I’ve added an UPS to the budget (1100 VA) that will not only protect our hardware but also reduce server downtime.

The last thing we need to add is the clients. It’s quite likely that you have a many retired PCs (preferably P2>). If not, you’re likely to find a many of these computers for sale (or for free) in your local classified adds section. If Craigslist is available where you live, this is a great source to find this kind of hardware. Even though many of you will get these computers for free, I’ve budgeted $50 per client.

Budget

Here’s the complete budget for the project. As you can see, the total is just below $3,000

The Software
I’ve divided this section into two parts: Server and Desktop. Although all software will be running on the server, the users will only see the software on the Desktop side, which is why I have separated them.

Server
As already touched upon, the server will be running Linux. To be more precise, I’ve decided to use Ubuntu Server 6.06.1 LTS Server (64-bit). The reason why I didn’t chose to use the most recent version (7.04) is to minimize the administrative effort. Since 6.06 is the Long Time Support (LTS) version, the Ubuntu team will supply this version with security patches and updates for a longer period than the 7.04 release (6.06 LTS Server will be supported until 2011).

Installing Ubuntu is very straight forward. The only thing to consider in this setup is to make sure we install the system on the hard drive that came with the server and not the RAID-5 array.

Configuring the RAID 5 can be done though a couple of different ways. You can either do this during the installation (with Ubuntu’s graphical utility), or wait and set it up afterward in the console (see the Software RAID HOWTO for details). After setting up the RAID, go ahead and mount it to /raid or something similar.

Now it’s time to set up LTSP, which is the foundation of our cost-saving solution. There are a couple of different ways to do this, but the one I found to be most useful was to follow a guide from Novell (strangely enough) available here. You might also want to take a look at Ubunut’s Thin-client documentation.

Before you start the installation, go ahead and symlink /opt, which is where LTSP will be installed, to within you RAID array (ln -s /opt /raid/opt). This will install all the packages on the RAID array instead of the system disk. Finally, what you will want to do is to add a test-user (or a real user – it’s your call). This is done by simply using the user-management tool in the Ubuntu. Note that you probably want to have the home-dir of the users on the RAID array. To achieve this, you can either symlink the entire /home to /raid/home or just set the home-dir to /raid/home/user in the user-creation process.

Desktop
The LTSP setup comes with the most common software used in a corporate environment. This includes:
* FireFox – A great web browser
* Open Office – A Microsoft Office replacement
* Evolution – A Microsoft Exchange replacement
* The Gimp – An Adobe Photoshop replacement (arguably less powerful)
Plus a long line of other applications such as PDF-viewer etc.

You might also want to install is Wine. Wine is a Windows emulator which will run (legally) without any Windows license. Although it does not run all Windows software, many applications work very well.

If you have needs outside of the applications listed above, there’s more available. Any software that runs in a Linux environment (pretty much) will run on these thin clients. Although I haven’t tested it, you should be able to run a fully emulated Windows environment using a virtualization software such as VMWare Workstation or CPU/RAM intense softwares such as MatLab or CAD software.

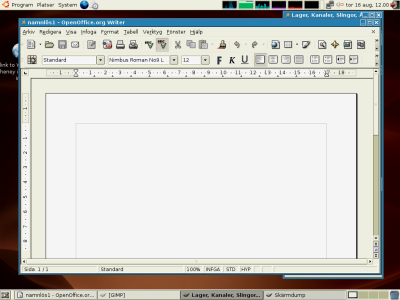
Screenshot of LTSP in Action Running Open Office in Swedish

Here’s a screenshot of LTSP in action (from the client-side) running Open Office and the Gimp in Swedish

The Clients
The last part is to get the clients to actually boot over the network. If you decide to use a different network card than the one specified in the budget above, make sure it supports PXE booting. Many budget NICs don’t support this feature. There are also other ways to boot but I’m not going to cover that in this article (such as floppy, CD etc.).

The Pros and The Cons
Although this approach is a very good way to create an updated desktop environment while at the same time minimizing the administrator’s job, it does come with some drawbacks. Unfortunately many companies today are stuck with custom software that only runs on Windows. Although Wine offers a great emulation software, you might be forced to purchase a license of VMWare Workstation (and Windows) to run some specialized applications. If you’re lucky, your custom software was written in Java, and it will actually run on Linux as well.

Another thing to consider is the transition from the old environment (quite likely from Windows) to this new environment. Although the transition is likely to be smooth for a crew of young people, members of the older generation (40+) are likely to require some training before being able to use the system fully. Both Open Office and Firefox work very similar to their Windows-counterparts, but Evolution is slightly different.

Another pro is the lack of viruses on Linux. Since we’ve left Windows behind, the likeliness of being infected by a virus is almost zero.

In summary, utilizing a solution such as this might or might not suite your needs. If you do have the flexibility to use Open Source software in your organization and are able to run your customized software either emulated or use a web-based interface, this is a great way to reduce costs from the IT budget and spend them in a way that benefits the company better.

Update: I’ve now actually deployed this solution at a company. For information about how it went, go ahead and read “Deploying the sub-$3,000 IT-infrastructure.”

Author: Tags: , , , ,

© 2006-2009 WireLoad, LLC.
Logo photo by William Picard. Theme based on BlueMod © 2005 - 2009 FrederikM.de, based on blueblog_DE by Oliver Wunder.
Sitemap