Introducing YippieMove '09. Easy email transfers. Now open for all destinations.
Mar
28.

In the past I have used MoinMoin Wiki for my wiki needs, with great success . MoinMoin Wiki is very easy to set up and doesn’t have all too fancy requirements on the server side. The other day I was setting up a new wiki, and unlike my previous wiki projects this one would be facing the public. In order to get the syntax, template system and features most people recognize I went with the famous, Wikipedia powering MediaWiki software instead.

MediaWiki requires much more manual work to install than MoinMoin Wiki. Unfortunately, I was unable to find a comprehensive guide detailing how to go from scratch to fully operational wiki. There is the Installation Guide which details the basic server setup. It then redirects you to two pages: one on configuration and one on administration. Most of these documents are fine but at the time of this writing the ‘configuration’ document is fairly empty and I was left wondering about many configuration options. Hence this guide which will try to tie together all the things you need in order to get up and running.

To keep things moving this guide will be written at a fairly advanced level. If you don’t feel comfortable installing server side software you may want to check out some of our other How To’s for inspiration.

These instructions are suitable for FreeBSD 5.3-RELEASE-p37 and MediaWiki 1.9.3, although you will probably find it useful regardless of the platform and MediaWiki version you use.

Basic Installation

This part is covered very well by the Installation page of MediaWiki. Here’s the super condensed FreeBSD take on installation:

To install MediaWiki in FreeBSD,

# cd /usr/ports/www/mediawiki
# make install

This will install MediaWiki into /usr/local/www/mediawiki/, by default. You will probably want to copy this installation to some other folder since MediaWiki changes files in its installation folder during use.

# cp -Rf /usr/local/www/mediawiki /www/mywiki

Then,

  1. Make sure the config folder is writable by the httpd user (www usually).
  2. Set up your web server to serve pages from the location.
  3. Surf to your new wiki. You will be prompted to go through an installation procedure. This part is very straight forward.
  4. Move config/LocalSettings.php to the root of the wiki installation. You can now delete the config folder.

Now that was the easy part. Here comes the stuff that took a little bit longer to figure out. Thanks to Playing With Wire you’ll be able to do it in minutes! :)

Additional Manual Configuration

The installer does some things but not everything. While many online applications such as WordPress come with fancy online configuration tools, MediaWiki uses more traditional configuration files which you’ll be editing by hand.

Here’s what you’ll need to do:

  1. Copy AdminSettings.sample to AdminSettings.php in the base folder. Edit the new file. The config file requires you to configure a database account for maintenance scripts. Presumably you may use the same account you used for the wiki, although I didn’t run any of the maintenance scripts yet to test this.
  2. Edit LocalSettings.php. This file has been created for you by the installer, so it will contain some good defaults.

LocalSettings.php is the primary configuration file of your new wiki. This file contains the actual basic settings for MediaWiki, and it overrides the defaults found in includes/DefaultSettings.php. You shouldn’t edit DefaultSettings.php directly, but it should be your first stop if you’re wondering what variables you can put in LocalSettings.php.

Linking up the Help Pages

By default MediaWiki ships without help pages. Unless you want to write them yourself you have a couple of options. The option I chose is to simply copy all Help sections from the primary MediaWiki site – they’re released into the public domain. Follow the instructions on Help:Copying to do this.

You may wish to export the following pages:

Help:Contents
Help:Navigation
Help:Searching
Help:Tracking_changes
Help:Editing_pages
Help:Starting_a_new_page
Help:Formatting
Help:Links
Help:Categories
Help:Images
Help:Templates
Help:Tables
Help:Variables
Help:Managing_files
Help:Preferences
Help:Skins
Help:Namespaces
Help:Interwiki_linking
Help:Special pages
Template:PD_Help_Page
Template:Meta
Template:Admin_tip
Template:Prettytable
Template:Hl2
Template:Hl3
Template:Thankyou
Image:Example.jpg
Image:Geographylogo.png
Help:Editing
Image:PD-icon.svg

This is the same list as found on the Help:Copying page at the time of this writing, with the addition of the two last entries.

Notice that Template:Languages isn’t included in this list, although it is referenced from Template:PD_Help_Page. You may wish to edit the PD Help Page template and remove the {{Languages}} part towards the end to get rid of this dependency.

You will have to download and upload the images separately by clicking them and finding their respective file downloads. Upload the images using the normal ‘Upload file’ link from your wiki. The .svg image probably won’t upload by default. We’ll tackle the SVG format later.

Nice URLs

At this point the installer script has probably given you URLs that look like,

http://www.yourdomain.com/index.php/My_Page

(Unless your PHP runs as a CGI script in which case things might even look worse. Don’t run as CGI.)

To make your URLs more readable, you’ll need to configure both your web server and MediaWiki to cooperate. Here’s a good resource: Using a very short URL.

Basically you will want to edit your httpd.conf, if you can do that, or an appropriate .htaccess file, if you have to. Remember that a .htaccess file is slower than httpd.conf. If you can use httpd.conf, do that and disable .htaccess support.

Here’s how to set things up within Apache’s httpd.conf. Edit your Directory entry to resemble the following:

<Directory /www/mysite.com/>
        Options Includes FollowSymLinks

        AllowOverride None

        RewriteEngine On
        RewriteCond %{REQUEST_FILENAME} !-f
        RewriteCond %{REQUEST_FILENAME} !-d
        RewriteRule ^(.+)$ /index.php?title=$1 [L,QSA]

Notice the AllowOverride None line. This is the part that turns off .htaccess support. It’ll give you a bit of a speed boost since your web server won’t have to look for a .htaccess file for every request made.

Next, add this line to LocalSettings.php:

$wgArticlePath = "$wgScriptPath/$1";

Change the Wiki Theme or Looks

MediaWiki’s term for themes is ‘skins’. The default skin looks exactly like Wikipedia, so you may want to change this if you’re looking to achieve a spiffy unique look for your public wiki.

To find out what skins came with your MediaWiki installation, look in your skins/ folder. You will see something like,

# ls skins 
Chick.deps.php          Nostalgia.php           common
Chick.php               Simple.deps.php         disabled
CologneBlue.php         Simple.php              htmldump
MonoBook.deps.php       Skin.sample             monobook
MonoBook.php            SkinPHPTal.sample       myskin
MySkin.deps.php         Standard.php            simple
MySkin.php              chick

From this list you can infer the list of available skins. In this case it looks like we have Chick, CologneBlue, MonoBook, MySkin, Nostalgia, Simple and Standard. The folder names (the lower case names) are the skin names.

To make the change, edit your LocalSettings.php file again and alter the line that reads,

$wgDefaultSkin = ...

In our case we might put,

$wgDefaultSkin = 'cologneblue';

If you make a mistake setting the property you will get a default skin.

You can find more skins here. Each skin is accompanied by instructions for how to set it up. Normally this involves downloading a zip file and unzipping it into the skins/ folder. You may also have to edit theme files to set up proper paths.

Changing User Access Levels

If you want to disable anonymous editing, you can add something like the following to LocalSettings.php:

$wgGroupPermissions['*'    ]['createaccount']   = true; 
$wgGroupPermissions['*'    ]['read']            = true;
$wgGroupPermissions['*'    ]['edit']            = false;
$wgGroupPermissions['*'    ]['createpage']      = false;
$wgGroupPermissions['*'    ]['createtalk']      = true;

For other possible settings, take a look at the defaults provided in includes/DefaultSettings.php. Again, remember not to edit the defaults file: just copy the lines you want to change to LocalSettings.php and make your changes there.

Support for SVG images

The SVG image file format is very useful but turned off by default in MediaWiki. Look in include/DefaultSettings.php and locate the SVG related stuff. For my installation this is what I had to add to LocalSettings.php:

$wgSVGConverter = 'inkscape';
$wgSVGConverterPath = '';
$wgSVGMaxSize = 1024;
$wgMaxImageArea = 1.25e7;
$wgThumbnailEpoch = '20030516000000';
$wgIgnoreImageErrors = false;
$wgGenerateThumbnailOnParse = true;

$wgFileExtensions = array( 'png', 'gif', 'jpg', 'jpeg', 'svg' );

You will also need to install inkscape. There are options to use rsvg, ImageMagick and others instead but none of those options worked for me. Rsvg and ImageMagick didn’t render gradients right, and I was unable to install the other alternatives on FreeBSD without crashes or other problems. This is unfortunate because inkscape is positively enormous if you also consider all the pre-requirements that you normally wouldn’t have to install on a server. It is the one program that does things right though and SVG is a really nice format to have support for.

Conclusion

That’s it. You are all set. Your next steps will probably be to create your own account and then use the Sysop account to turn your own account into an admin account. Happy writing!

Author: Tags: ,
Introducing YippieMove '09. Easy email transfers. Now open for all destinations.

Until a couple of days ago, my bookshelf was filled with binders with old lecture notes from school. The truth is that I don’t think I ever opened one of these binders after I finished the final for the class. Yet, I didn’t want to throw it all away, since it might come handy some day when I want to refresh my memory.

On the other hand these binders really bothered me. They took up space in the bookshelf that I could use for something more useful. So I thought, why don’t I digitalize these papers?

This solution includes:

  • A scanner (preferably with ADF)
  • A software called PDFLab
  • A staple remover
  • Quite a bit of time

You may want to use this guide for the archiving of old:

  • Bills
  • Financial documents
  • Lecture notes
  • Receipts

1. Preparing your documents

Prepare the documents you want to scan. That means figuring out how you want to group your documents and removing the staples. Since I was scanning lecture notes, the grouping was quite simple. Removing the staples is a boring job, but it needs to be done.


Scanning…
In the process of scanning…

2. Scanning your documents

Finder: Jpegs 
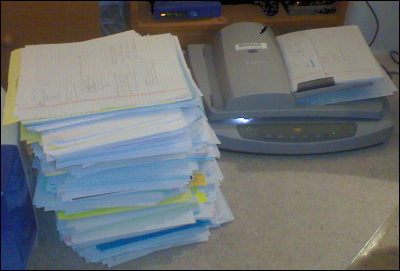
This is the time consuming part. Depending on your hardware, the time the scanning takes varies a lot. With the scanner I was using (HP Scanjet 5590), one paper (front and back) probably took about 35 seconds in 150 DPI. If you have a scanner with ADF, it doesn’t really matter that much if it takes 10 or 40 minutes to scan a pile of papers, since you can go and do something else in the meantime.

Depending on the software you’re using, the file-output might differ. In the software I was using, the name ‘bus-law_0_0.jpg’ turned out to be working quite well. The first ‘0’ is for the sequence. If for some reason the scanning aborts, you can just continue with ‘bus-law_1_0.jpg’, and the files will still sort in order.

3. Preview and delete blanks

When you’ve scanned in one entire group of documents, select them all and drag them to Preview. Use the arrow-keys to browse through all the documents to make sure they look good. You might want to rotate some documents, or delete some blank pages. I found the shortcut ‘Apple + Delete’ very handy in Preview, since then I can delete the file from Preview, without having to go out in Finder.

4. Convert your documents to a PDF


pdflab.png
Screenshot of PDFLab

Up to this point you just have a bunch of jpeg files in a folder somewhere. Since this is not very convenient when you browse notes, I wanted to convert every group to a single PDF-file. When doing my research I found a very handy software called PDFLab. The software is a freeware and works really well.

Download PDFLab and fire it up. Now go to the folder where you saved all those jpeg files. Select them all, and drag them to PDFLab. This might take a couple of minutes, depending on your hardware.

When the files are imported into PDFLab, sort them by name by clicking ‘Name’. Now look through the list. If you have file names that go above 100 (‘bus-law_0_0100.jpg’), the sorting might not be done properly, since the file ‘bus-law_0_0103,jpg’ is sorted before ‘bus-law_0_013.jpg’. If you experience this, you need to move around the files manually until they are in the proper sequence.

When you’re happy with the sorting, hit ‘Create PDF,’ and enter an output file-name in the dialog which appears. If the PDF was generated without any errors, you’re all set.

pdf.png 
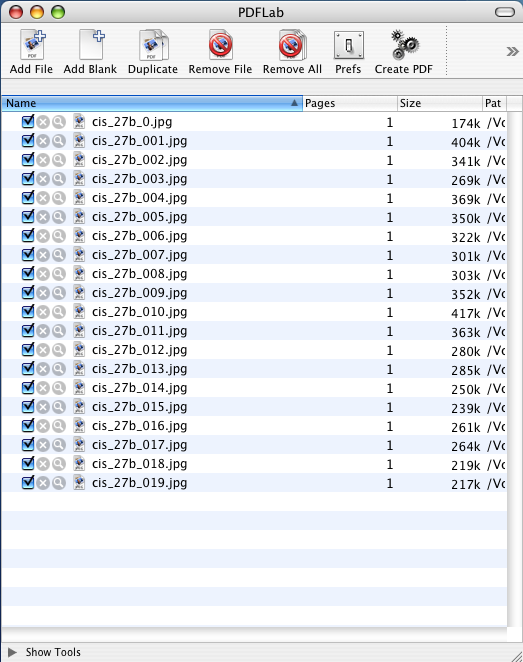
If you get an error message when generating the PDF, just hit OK, and try to create it again. If this doesn’t work, try to restart the software.

5. Delete/Backup the image-files

When you’ve made sure that your PDF is working fine, you can either delete you jpeg files or burn them to a CD just to be safe.

That’s it. You can now throw away all those papers into the recycle bin. The best thing is that you’re never more than a couple of clicks away from your documents.


binders.png
Empty binders

6. Drawbacks

This solution is not perfect, but it’s sure better than having all those binders in the bookshelf or in a box somewhere. The main drawback of this is that the documents are not searchable. This could possibly be solved with OCR, but according to my experience, OCR is still not powerful enough to recognize all handwriting. OCR also tend to mess up documents which mix text and images. However, if I was able to scan these documents into a PDF with OCR recognition, this would be the optimal solution, since it would both be searchable and consume less space.

Author: Tags:
Introducing YippieMove '09. Easy email transfers. Now open for all destinations.
Mar
04.

What is Samba?

For all you new users out there, I just want to let you know that Samba is great piece of Open Source software. It solves many issues for both sysadmins and ordinary users. What it does is to give UNIX users the ability to share files and printers with Windows users. Since Samba is available on most modern platforms, it’s also a great way to share files in a multi-platform environment. Samba can even act PDC (Primary Domain Controller), and BDC (Backup Domain Controller) to handle domain logins from Windows clients. PDCs and BDCs were something that used to required a purchase of a Windows NT or Windows 2000/2003 Server license, but they can now be done fairly simple with Samba under UNIX or Linux.

Now that you know a bit about Samba, lets get started.

Adding a public share to Samba

One of the things I miss as a default feature in OS X is the ability to share folders with Samba. The default configuration of Samba only shares the users’ home directories after authorization. However, since I wanted to share my files with non-Mac users, I simply made some changes to smb.conf (the Samba config-file). After running Samba in various *nix-environment for years, this was a simple modification to do.

First open the Terminal, and type in the following commands:

$ sudo nano /private/etc/smb.conf

Now you’re in a text editor called Nano. A simple, but useful editor. Scroll down to the end of the first part, under the [global] section, and type in the following:

security = share
workgroup = whatever-your-workgroup-is-called
netbios name = Your-computers-name

Note that under Tiger (might be under other versions too), the line “workgroup” already exists. If that is the case, then just replace whatever it was previously set to with your workgroup of choice.

That was the first part. Now you’ve made it possible for everybody to access you public shares.
By default though, Samba isn’t configured to have any public shares. Don’t worry, we’ll take care of that next.

Now it’s time to add the actual sharing to the list of public shares. This is done by adding the following lines to your Samba file. There are different ways to configure a share in Samba, but this is a pretty straight-forward and simple way. At the end of the file, add the following lines (still under the [global] section):

[public]
path = /path/to/the/share
public = yes
only guest = yes
writable = no
printable = no

Nano

Where [public] can be set to whatever name you want for your share, and the path is equal to the path to
the directory you want to share.

Note that you can add as many shares as you’d like. Also, pay attention to the line that says writable: that line determines whether you clients will be able to write files to your share or not. If you want your share to be writable, you want this to say “writable = yes”.

Make sure that there are no typos, and that everything looks proper. Exit Nano and save changes to the file by pressing “ctrl + x” followed by “y” and Enter.

Now we need to set the proper permission to the shared folder. The simplest way to do this is to just type the following command:

$ chmod -R a+rx /path/to/the/share

Note that if you decided to allow write-access to the share, use the command $ chmod -R a+rwx /path/to/share instead of the above command

To verify that your smb.conf is properly configured, we use a command called ‘testparm’. In the Terminal, type:

$ testparm

testparm

Look at the output. If you observe something that doesn’t look right, back up and fix the error in smb.conf.

If everything did work out fine, you’re just one step from getting your share visible. The last step is to fire up samba (or restart it if you already had it running). This is can be done either through the System Preferences, or trough the console. I prefer the latter, and here are the commands:

$ sudo service smbd stop
$ sudo service nmbd stop
$ sudo service smbd start
$ sudo service nmbd start

Connecting to the share(s)

Now you’re supposed to be up and running. The most simple way to test if everything worked is to mount your share locally. Here is how it’s done:

In Finder, go to the menu “Go” and click at “Connect to Server” and type in:

Finder

You will most likely be prompted for username and password now, but just hit “ok” without entering anything. Since it’s a public share, anyone is able to access it without authorization.
Nano

If everything went well, you will find your share mapped in Finder. Now all Windows machines and *nix-machines should be able to browse your files.

This is the beauty with OS X: you are running a commercial desktop OS, but still have all the benefits that a UNIX-environment brings. Running UNIX-programs (as Samba) is done painlessly.

Since Samba is a part of Mac OS X out-of-the-box, Apple has already done half the work for you. The possibilities are many: theoretically, you could make your Mac act as a PDC and replace an entire Windows NT or Windows 2000/2003 Server. I’m not sure about what modifications Apple has done to the source, but if you compile the source code from scratch yourself, it shouldn’t be too hard. Samba simply gives UNIX-users the ability to share files and printers with Windows users.

Please give us feedback if something didn’t work for you.

For further information about Samba, please visit samba.org.

If you have the possibility, please donate to the Samba-team. These guys work for free, and contribute with a lovely piece of software to the Open Source-world. However, they are in need of your donations to be able to invest in new hardware needed to improve Samba further.

Author: Tags: , ,
Introducing YippieMove '09. Easy email transfers. Now open for all destinations.

Here’s a little trick we’ve been using for a long time here at Playing With Wire. Virtual desktops. The idea with a virtual desktop is that it’s like having multiple monitors, except that you don’t have multiple monitors. Instead you have several ‘spaces’ or separate desktops and you can go to them very quickly.

The only way we can really explain how amazing this is is by video (Flash Required):

As you can see I went from checking out Playing With Wire in Safari, to iTunes and then back over Safari and on to to an entirely clean desktop where I could have launched the next program I needed.

Why is this useful? Well, imagine if you’re a person who likes to work in more than one application at the same time (lets face it, that’s pretty much everyone). Well before, you might have been forced to minimize your applications or leaf through them using Exposé in order to go from one to another. With virtual desktops each application can have its own space to live in, and you can get there in the blink of an eye.

Not only does this make us so much more productive, but it also garners plenty of ‘ohhs’ and ‘ahhs’ from our impressed friends. It’s just plain cool to spin to a different desktop as you work. On one desktop I’ll have Safari, perhaps composing my latest Playing With Wire post. On the other desktop I’ll have iTunes. When I want to switch to another track, I can go to the desktop with iTunes and I don’t even have to reach for my mouse. It’s computer wizardry at its best.

Where’s the magic?

A little app called Virtue Desktops. If you have a Mac without an enormous screen you need to have this software. It’s productivity and style in one.

Author: Tags: ,
Introducing YippieMove '09. Easy email transfers. Now open for all destinations.

Continuing our series “Building the Base-camp,” we continue with a CRM-system. In a modern corporation a CRM-system is a crucial element to optimizing your business.

There are a couple of Open Source CRM systems available, but we decided to use a software called SugarCRM, which filled our needs just fine. The user-interface of SugarCRM is really appealing, which certainly is a benefit if you’re working with it several hours per day.

SugarCRM offers a variety of features, including an e-mail client, a bug-tracker and of course, a customer database. It’s also available in 40 different languages.

Installing SugarCRM was really easy. On FreeBSD using the ports, the entire installation probably took less then 15 minutes, where most of the time was spent customizing the installation for our needs.

SugarCRM screenshot

Instead of changing memory_limit in php.ini as the installation document states, we made this change to the local .htaccess file in the sugarcrm directory. By doing so, we didn’t need to raise the memory_limit for the entire server to 32Mb, instead we only applied this to SugarCRM.

/usr/local/www/sugarcrm/.htaccess

php_value memory_limit 32M
php_value session.save_path /tmp

/usr/local/etc/apache/httpd.conf or ssl.conf

Alias /sugarcrm /usr/local/www/sugarcrm
<directory /usr/local/www/sugarcrm>
AllowOverride All
Order allow,deny
Allow from all
</directory>

After changing these files to include the data above, you just surf to http://yourserver/sugarcrm and follow the steps.

For the installation you will need a mysql-account with a database that SugarCRM will be using.

When you’ve finished the installation and try to access SugarCRM, you might receive an error. At least we did. This was caused by the fact that the installation assumed that .htaccess-file was empty, and therefore corrupted the changes we did above. Just go in and edit it by hand, and make sure it all looks proper.

For more screenshots, visit the screen gallery at sugarcrm.com

Author: Tags: ,

© 2006-2009 WireLoad, LLC.
Logo photo by William Picard. Theme based on BlueMod © 2005 - 2009 FrederikM.de, based on blueblog_DE by Oliver Wunder.
Sitemap