Introducing YippieMove '09. Easy email transfers. Now open for all destinations.
Jun
21.

A while back we wrote an article called What’s Your Utilization, Kenneth. In that article we talked about a really cool web-app called Cacti. Today we will take this one step further by describing how to monitor remote servers using SSH tunnels.

In the scope of this article, we assume that you already have one Linux or Unix server configured with Cacti running. Moreover, we also assume that you have another remote server that you want to monitor (why else would you read this article?).

First we start by setting up the remote server. The first thing we need to do is to set up Net-SNMP. If you’re running FreeBSD, chances are that you already have this installed. If so, all you need to do is to change your community string and set up the daemon to bind on port 161/tcp instead of 161/udp. To do this, change/add the following lines in your snmpd.conf (/usr/local/share/snmp/snmpd.conf in FreeBSD):

com2sec local localhost public
agentaddress tcp:161

Once this is done, go on and restart the daemon.

To test that the SNMP daemon is working properly, try to run the following command:

# snmpwalk -v 1 -c public tcp:localhost:161

If your screen gets flooded with information, it worked. If not, please look over your log-files to find out what went wrong.

Next we need to create a secure user which we will be able to use to login from the Cacti-machine onto the remote machine. To maximize security, we suggest that that user has ‘nologin’ as shell and uses public key authentication instead of password. However, we will not cover how to create this user in this guide. Ask Google for help if you need it.

Repeat this for all hosts you want to remotely monitor.

That’s it for the remote server, now let’s move on to the Cacti host.

First we want to create a script that sets up the tunnel to the remote server. We suggest that you create a new user that will be running these tunnels (i.e. snmp). In order to make it easier to manage the tunnel (or tunnels if you have several hosts), we will create a bash-script that initializes the tunnel(s). In the home directory of the the user you created, create a file called tunnels.sh with the following contents:

#!/bin/sh
rm /home/snmp/tunnel.log

# server1.xyz.net
ssh -N -L 16000:127.0.0.1:161 [email protected] >> /home/snmp/tunnel.log &

# server2.xyz.net
ssh -N -L 16001:127.0.0.1:161 [email protected] >> /home/snmp/tunnel.log &

Note that this initalize two tunnels, one to server 1 (on port 16000) and one to server 2 (on port 16001. Also, don’t forget to chmod the file so that you can execute it, by typing chmod +x tunnels.sh.

Next we want to start up the tunnels using the snmp-user we created earlier. To do this run:

#sudo -u snmp /home/snmp/tunnels.sh

If everything went fine, you should now have two tunnels running; one on port 16000 and one on port 16001. Now let’s test the tunnels before we move on to Cacti.

# snmpwalk -v 1 -c public tcp:localhost:16000
# snmpwalk -v 1 -c public tcp:localhost:16001

This should hopefully give you the the same output as you previously received when executing snmpwalk locally on the remote hosts. If this went well, all you need to do now is to add the hosts to Cacti.

First you need to log into Cacti with an administrative account. Then got to “Create Device.” In the Create Device field, as shown in the screenshot bellow.
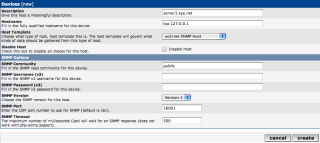
Create Device

Description: server1.xyz.net
Hostname: tcp:127.0.0.1
Host Template: ucd/net SNMP Host
SNMP Community: public
SNMP Version: Version 1
SNMP Port: 16000

After you’ve filled out the proper data, hit ‘Create.’ At the next page, just select the data you want to graph, and then hit ‘Next.’

That should be all you need to graph remote hosts. Now you may want to go ahead and add the host to a tree so that you can display it in the ‘Graph’ tab.

Author: Tags: ,
Introducing YippieMove '09. Easy email transfers. Now open for all destinations.
May
10.

How many times have you made a change to a server to only a couple of days or weeks later discover the change you did broke something? It happened to me a bunch of times. Sure, call me irresponsible, but sometimes I’m in a rush and don’t have time to document the change and write nice comments about it. I try to do so, but sometimes I forget.

For quite some time I’ve thought about a simple way to track the changes to my servers, but without coming up with any perfect solution. My ideas have included everything from wikis to blog-style logging to Tripwire. Sure, a change-blog would work, but it would take quite some extra time to write the entry.

One day when I was working with our development tracker a quite brilliant solution stroke me: why not use CVS/SVN on /etc? It sounds like overkill, but it would do the trick. By using this you would be able to:

* Display when the changes were made
* See what change was made
* Revert to a previous version

There are two different ways to go along using a repository for /etc. One way is to create a CVS/SVN tree on a different server and sync the entire /etc directory to that repository. The benefit with this is that you could have the repository on a different server and be to collect all your servers /etc on the same repository. By combining this with a web-interface, one would be able to easily compare and contrast the configurations of the different servers. Moreover, the change logs would be kept in the repository, and not on the individual servers, creating a cleaner file-structure. Another benefit would be that you could easily sync the /etc filesystem with your local workstation and modify/create your config-files there. The drawback with this solution is that you need to make your local changes first, and then upload the files to the repository. Once you’ve uploaded the files from your local workstation you can go ahead and sync the actual server with the repository to commit the changes.

Another solution would be to use a custom file-system. There are two different filesystem that supports version-tracking: CVSFS and Wayback. Between these two alternatives, Wayback appears to be the most developed alternative. Worth noting though is that both these alternatives only targets the Linux-platform.

The benefit for using such approach is that you don’t need to set up a separate repository to keep the files in, as well as that it enables you to make changes in a traditional way on the server. The drawback is that neither of these two filesystems are very well maintained. It appears that both these programs were last updated back in 2004, rendering them both quite obsolete. The question is if you really want to put the faith of your /etc-folder in a program that no one longer maintain.

Regardless of which one of these two alternatives you find most appealing, the concept is very interesting. I have still not tried to use this myself, but I would certainly argue that having a /etc-folder that allows you to keep track of changes is far superior to the traditional way of keeping /etc.

Edit 1: Since the article was published, I’ve found two more file-systems worth mentioning: CopyFS and ext3cow. Both these filesystems appears to be useful for /etc usage. Out of these two alternatives, ext3cow appears to be more sophisticated. However, CopyFS appears to be easier to set up.

Author: Tags: ,
Introducing YippieMove '09. Easy email transfers. Now open for all destinations.

If you’ve followed us for a while, you might remember our article ‘Selecting an Accounting System’. Not too many things have changed since then. The developers over at Quickbooks are still not competent enough to write an OS independent web-app, and no other major events have occurred. The most interesting thing that have happened since we wrote the article was that SQL-Ledger silently changed license from GPLv2 to SQL-Ledger Open Source License. Although we would rather have seen SQL-Ledger staying GPLv2, we don’t really blame them. The company needs to make some money in order to survive. So, despite the change of license, we still decided to use SQL-Ledger as our accounting system. At least for now.

Enough about that, let’s get started. First time I installed SQL-Ledger I ran into a couple of problems. Even though I spent a fair amount of time doing research on how to set everything up, I still hit a couple of speed bumps. Since I’m quite new to PostgreSQL, some of my problems were related to this. Some other problems were related to the fact that the manuals did not really match what I saw on the screen.

Now, let’s get started. First we start with updating the ports to make sure we’re getting the latest version.

# portsnap fetch; portsnap update

After updating our ports-tree, we need to install PostgrsSQL. When writing this post, the 8.2-series is the latest stable series.

# cd /usr/ports/database/postgres82-server/
# make config

Select the flags you prefer. The only flag I changed from the default was the optimization flag. Not that I know if it makes much of a different, but if you’re compiling it you might as well try to build more optimized binaries.

# make install

Now Postgres is installed. However, in the normal FreeBSDish manner, we need to enable it in rc.conf before we can fire it up.
Edit /etc/rc.conf and add postgresql_enable=”YES”

When you’ve activated Postgres, we first need to initiate the database, and then start the service.

# /usr/local/etc/rc.d/postgresql.sh initdb
# /usr/local/etc/rc.d/postgresql.sh start

Voila, now we have Postgres initiated and up running.

Let’s take a look at the package we’re actually interested in installing: SQL-Ledger.

We’re just going to use a simple ports-installation of SQL-Ledger.

# cd /usr/ports/finance/sql-ledger
# make install

After installing the package, we need to make changes to Apache in order to enable SQL-Ledger. Simply add the following line at the appropriate location in your httpd.conf or ssl.conf:

Include /usr/local/etc/sql-ledger-httpd.conf

To make sure our Apache-file is intact, we run:

# apachectl -t

And if that went well, we run:

# apachectl restart

The only step remaining now is some database-related stuff.
Since I’m not an expert at Postgres, I might not be explaining this in the best way. Anyways, I’m just trying to share my experience, since this was the step where I ran into some speed bumps when first setting up SQL-Ledger. The problems I was facing was that the prompts I received differed quite a bit from the ones found in the various manuals I read before installing.

First, log into the Postgres user

# su - pgsql

When you’re logged in, we need to create a user for SQL-Ledger:

# createuser -d -P sql-ledger
Enter password for new role:
Enter it again:
Shall the new role be a superuser? (y/n) n
Shall the new role be allowed to create more new roles? (y/n) y

Note that if you remove the -P, you won’t be prompted for password. However, I personally prefer setting a password here.

Lastly, we need to copy the template.

#createlang plpgsql template1

Hopefully that went without any problems. Now it’s time to surf into SQL-Ledger to make the final configurations. Open your browser and surf into http:///sql-ledger/admin.pl. Log in without any password.

SQL-Ledger Login

Note that I’ve already set up a password when taking this screenshot.

SQL-Ledger - PG database
Select the “Database Administration” link.

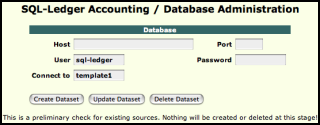
Use the user ‘sql-ledger’ and the password you assigned when creating it. For ‘connect to,’ use ‘template1.’ When you’re done filling that out, hit ‘create dataset.’

SQL-Ledger - DB admin

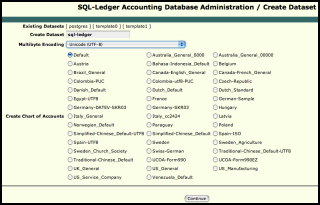
The next screen that will pop up is the Create Dataset-screen. Here you need to set the name of your dataset. Use only lower-case letters. I’d suggest the name ‘sql-ledger’ to keep things from being complicated later on. For ‘encoding,’ select UTF8. As for the ‘chart of accounts,’ it really depends on what business you’re setting up SQL-Ledger for.

SQL-Ledger - Create Dataset

You’re done! All you need to do now is to set up the users. Since this is quite straight forward, I’m not going to cover that.

For more information, please visit sql-ledger.org. You might also want to take a look at this ‘unofficial’ manual (the official one costs $190).

Edit 1: Dieter Simader, the founder of SQL-Ledger, e-mailed me to point out that the only non-GPL’d version of SQL-Ledger is the 2.8-series. The 2.6-series used by FreeBSD ports is still under GPL.

Author: Tags: , ,
Introducing YippieMove '09. Easy email transfers. Now open for all destinations.

The articles here at PWW tend to be a bit more in depth than this, but I thought this might be a good tips that many would benefit from. As you’ve probably figured out by now, both Alex and I are Mac users, and just adore the design of Apple’s products. As a result of this, both Alex and I bought the Wireless Mighty Mouse to use with our laptops. A couple of days ago my Mighty Mouse stopped scrolling up. It was weird, because I could still scroll down and horizontally. Since this was very annoying, it became the first thing on my priority list to fix.

After some googlin’ and reading on a couple of Mac forums, I found the solution. Press down the ‘scroll ball’ hard. This sounds like a weird thing to do, but after checking some other sites that said the same thing, I tried it. After pressing the ‘scroll ball’ down quite hard the scroll feature started working again.

Author: Tags: , ,
Introducing YippieMove '09. Easy email transfers. Now open for all destinations.
Apr
20.
Comments Off
Comments
Category: Uncategorized

I’ve been using Windows Vista on occasion recently. When I used it for the first time, I was expecting to see the now infamous ‘Cancel or allow?’ dialog boxes popping up left and right. To my surprise there was nothing of the sort. It took me a moment and to realize that the default account that had been created for me in Vista was an ‘administrator’ account, which allows you to do anything.

I’m not really sure why this is the default account. It’s like your Linux box would log you in as root by default. But fair enough, if that’s the Vista way, that’s the Vista way. I went ahead and created a normal account for myself and logged into that account instead.

Everything was well until I restarted my Vista machine the next time. I found myself right back in the administrator account. Apparently Vista insists that Administrator is the right account to be in.

To make a long story short, it took me just about forever to figure out how to make Vista not log me in automatically this way. I’m going to post it here to help other people with the same problem.

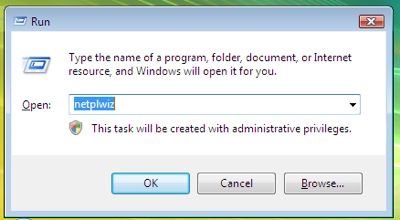
  1. Pull up the Run… menu (Windows + R on the keyboard)
  2. Enter “netplwiz” and click “Ok”.Windows Vista Run Menu.
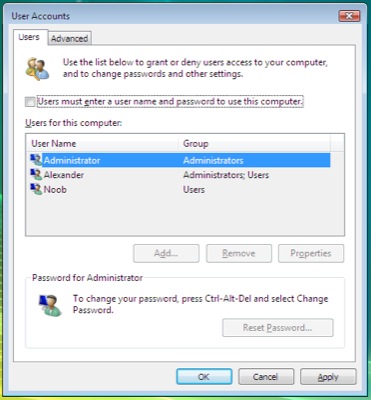
  3. Check the “Users must enter a user name and password to use this computer” checkbox.Advanced User controls in Windows Vista.

Hope that helps someone. It’s hard to find for sure. You can also check the box, and then click on another account name in the list, thus selecting it. Then uncheck the box again and you’ll be asked for the password for that account – now the selected account is your new default account. If you make this a non administrator account you should have increased your security a little bit during day to day computer use.

Author: Tags: ,

© 2006-2009 WireLoad, LLC.
Logo photo by William Picard. Theme based on BlueMod © 2005 - 2009 FrederikM.de, based on blueblog_DE by Oliver Wunder.
Sitemap