

A while back we wrote an article called What’s Your Utilization, Kenneth. In that article we talked about a really cool web-app called Cacti. Today we will take this one step further by describing how to monitor remote servers using SSH tunnels.
In the scope of this article, we assume that you already have one Linux or Unix server configured with Cacti running. Moreover, we also assume that you have another remote server that you want to monitor (why else would you read this article?).
First we start by setting up the remote server. The first thing we need to do is to set up Net-SNMP. If you’re running FreeBSD, chances are that you already have this installed. If so, all you need to do is to change your community string and set up the daemon to bind on port 161/tcp instead of 161/udp. To do this, change/add the following lines in your snmpd.conf (/usr/local/share/snmp/snmpd.conf in FreeBSD):
com2sec local localhost public
agentaddress tcp:161
Once this is done, go on and restart the daemon.
To test that the SNMP daemon is working properly, try to run the following command:
# snmpwalk -v 1 -c public tcp:localhost:161
If your screen gets flooded with information, it worked. If not, please look over your log-files to find out what went wrong.
Next we need to create a secure user which we will be able to use to login from the Cacti-machine onto the remote machine. To maximize security, we suggest that that user has ‘nologin’ as shell and uses public key authentication instead of password. However, we will not cover how to create this user in this guide. Ask Google for help if you need it.
Repeat this for all hosts you want to remotely monitor.
That’s it for the remote server, now let’s move on to the Cacti host.
First we want to create a script that sets up the tunnel to the remote server. We suggest that you create a new user that will be running these tunnels (i.e. snmp). In order to make it easier to manage the tunnel (or tunnels if you have several hosts), we will create a bash-script that initializes the tunnel(s). In the home directory of the the user you created, create a file called tunnels.sh with the following contents:
#!/bin/sh
rm /home/snmp/tunnel.log# server1.xyz.net
ssh -N -L 16000:127.0.0.1:161 [email protected] >> /home/snmp/tunnel.log &# server2.xyz.net
ssh -N -L 16001:127.0.0.1:161 [email protected] >> /home/snmp/tunnel.log &
Note that this initalize two tunnels, one to server 1 (on port 16000) and one to server 2 (on port 16001. Also, don’t forget to chmod the file so that you can execute it, by typing chmod +x tunnels.sh.
Next we want to start up the tunnels using the snmp-user we created earlier. To do this run:
#sudo -u snmp /home/snmp/tunnels.sh
If everything went fine, you should now have two tunnels running; one on port 16000 and one on port 16001. Now let’s test the tunnels before we move on to Cacti.
# snmpwalk -v 1 -c public tcp:localhost:16000
# snmpwalk -v 1 -c public tcp:localhost:16001
This should hopefully give you the the same output as you previously received when executing snmpwalk locally on the remote hosts. If this went well, all you need to do now is to add the hosts to Cacti.
First you need to log into Cacti with an administrative account. Then got to “Create Device.” In the Create Device field, as shown in the screenshot bellow.
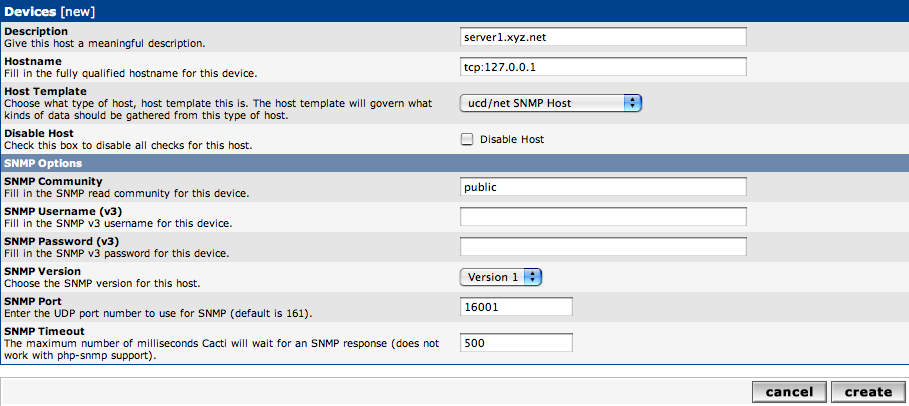
Description: server1.xyz.net
Hostname: tcp:127.0.0.1
Host Template: ucd/net SNMP Host
SNMP Community: public
SNMP Version: Version 1
SNMP Port: 16000
After you’ve filled out the proper data, hit ‘Create.’ At the next page, just select the data you want to graph, and then hit ‘Next.’
That should be all you need to graph remote hosts. Now you may want to go ahead and add the host to a tree so that you can display it in the ‘Graph’ tab.


Nice article! But I don’t really understand why you need the SSH tunnels! Anyhow, a clear connection will be made from the cacti server to the remote server on the 161 port. So, why don’t you configure cacti with those informations:
Description: server1.xyz.net
Hostname: server1.xyz.net
Host Template: ucd/net SNMP Host
SNMP Community: public
SNMP Version: Version 1
SNMP Port: 161
Here, you need neither changing udp to tcp nor ssh tunnels. It seems a lot easier to me but I may have missed something…
François,
The reason why we utilize SSH-tunnels in this article is to avoid opening up ports in the firewall. Since you most likely already have port 22 opened for SSH, this setup requires a minimal amount of work.
Note that assumes that you connect between two machines over an non-secured network (ex. the Internet). If both your servers are on the same LAN, you might as well use a plain UDP connection (unless you want to make it more secure).