Introducing YippieMove '09. Easy email transfers. Now open for all destinations.

Finally! Ever since I bought my P990i about 7 months ago, I’ve been struggling with keeping my contacts and calendars in sync. Since there is no native support for the P990i in iSync (blame both Apple and Sony Ericsson, since none of them seems to care to solve the problem), I’ve been spending hours on the web trying to find nifty hacks to bypass this problem.

Until a couple of days ago, the most successful solution was to use Goosync to synchronize my calendar with my Google Calendar, and then simply import and export vCards back and forth to keep the address book in sync (note that you must use vCard v2.1 to achieve this). However, as you might imagine this gets tiresome quite quickly.

A benefit with GooSync was that I could synchronize anytime and anywhere as long as I had access to WiFi. The downside however was that I needed to remember to sync the phone every day. Another downside was that I needed to use Google Calendar instead of my personal preference, Apple’s Calendar. (Although it is possible to configure Apple’s Calendar to access Google Calendar in a read-only fashion when offline.)

Ok, lets cut to the chase: how to get your P990i to work with iSync. The solution to the problem is found here. The solution is a plugin written by ‘mate,’ who posted the plugin at My-Symbian.com. The plugin is still quite buggy, and neither we nor the author of the plugin should be held liable for any problems that might occur to your P990i or your data. It can be quite a bit of headache to get the plugin to work properly, so please follow the following steps carefully.

  • Back up your data
  • Make sure you back up all your data. If you have access to a Windows PC (which you will need in the next step anyways), use Sony Ericsson’s Backup-software from the PC Suite. Also, use the phone’s internal backup-software to perform a backup to the Memory Stick on the Calendar (Calendar -> Calendar Manager -> Backup) and the Contacts (Contacts -> Contact Manager -> Backup).

  • Update the phone to the latest firmware
  • In order to get this plugin to work, your phone need to run the latest firmware. Unfortunately there’s no way to do this on a Mac (maybe using Parallel’s might work, but I didn’t try this), so you need to have a PC running Windows to do this update. Just download the latest version of Sony Ericsson Update Service and install it on your PC. Since you’ve already backed up all your data, you can just go ahead and run the update right away. Note that the update takes quite some time, and that it will wipe all the data off your phone.

  • Restore your data from your Memory Stick
  • Assuming that the update went fine, you can just go ahead and restore your Calendar (Calendar -> Calendar Manager -> Restore) and the Contacts (Contacts -> Contact Manager -> Restore) from your Memory Stick. Don’t recover the data using Sony Ericsson’s backup utility, since you won’t be able to perform a sync if you do. We only took that backup to make sure that we have an additional backup in case something goes wrong.

  • Delete your old bluetooth pairing
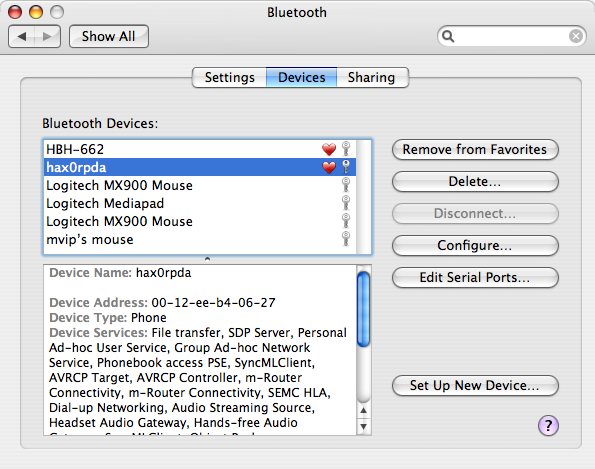
  • Now let’s move over to the Mac to connect the phone with your Mac. The first thing we want to do is to delete the (possible) prior pairing with the phone. To do this go “Apple” -> “System Preferences” -> “Bluetooth” and Select the Devices tab. Now select your phone and press the delete button.
    bluetooth_thumb.png

  • Install the plugin
  • It’s finally time to install the plugin. Download the file from here (or our local mirror). When the download is completed, just go ahead and click on the dmg-file and run the installation.

    bt-add_device_thumb.png

  • Pair the phone with your Mac
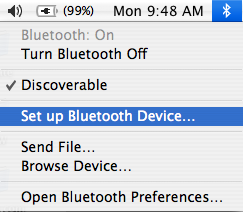
  • The first thing you need to do is to enable bluetooth on your phone. Click Menu (far lower left corner) -> Connections -> Bluetooth -> “Bluetooth On”. Now let’s move over to the Mac and click on the Bluetooth icon up in the very right corner and select “Setup new bluetooth device.” In the wizard, select Phone and select your phone from the list. In the very last step, deselect Dial Up Networking, and just leave Address Book and Contacts selected.

  • Perform your first sync
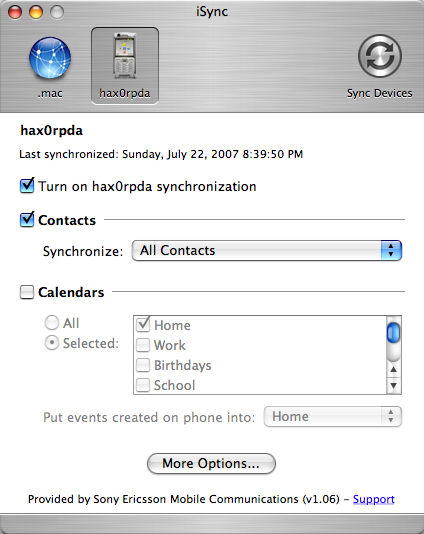
  • Now, before you hit that sync button in iSync, you should make some changes to the settings. First, go ahead and deselect Calendar, and just perform a Contact sync for the initial sync. If your sync is successful, start by selecting one calendar, and then two calendars in the next sync. I’ve personally had problems with syncing more then one calendar, so you may or may not be able to sync several calendars.

properties_thumb.png
Congratulations, you should now finally be able to sync your P990i with you Mac. As you might notice, the plugin is still in early beta, so it’s not unlikely that you’ll receive some weird error messages or have some failed syncs. Regardless, this is by far the best solution that I’ve run across. If you however do run in to some trouble, I’ve compiled a small troubleshooting guide that you might find useful.

    Troubleshooting

  • My phone crashes and reboots when I try to sync
  • There’s a couple of ways this might happen. I actually ran into this myself, but was able to solve it. If you do run into this problem, try these things:

    * Make sure that you’re running the latest firmware.

    * Deselect the calendar-sync and only sync the Contacts.

    * If you can’t even perform a Contact-sync, you should try to make a Master Reset on your phone. After you’ve performed the Master Reset, try to sync before you restore any data.

  • My phone restarts when I try to sync more than one calendar
  • I actually experienced this too. For some reason some of my calendars won’t sync. At this point I really don’t know why some of my calendars won’t sync, but fortunately my most important calendars synced without problems. What you want to do if your phone crashes when syncing calendars is to select the calendars one by one, and see which calendar(s) cause the sync to fail.

For more troubleshooting ideas, please see the forum over at My-Symbian.com where the plugin was originally posted.

    Other useful tools to make the P990i more Mac friendly

  • USB File mode enabler
  • This little kernel-patch enables you to use the USB cable to connect your P990i to your Mac. Previously I was forced to either use bluetooth or a Memory Stick-reader to transfer data to the P990i. With this nifty tool you are not only able to access the files on the Memory Stick, but the cable also charges the phone.

  • iTunesMyWalkman
  • iTunesMyWalkman is a really nifty tool that works well with the USB enabler mentioned above. The software enables you to easily sync both photos and music to your phone. It also comes with some handy Apple Scripts that you can access from inside iTunes to make your phone act almost like an iPod.

That’s it. Hopefully this article is enough to help making your P990i more Mac friendly. Welcome to the world of synchronized data =)

As a side note I should probably mention that the guide above should be enough to get the m600, P1 and the w950 to get up running with iSync. The only difference (as far as I know) is that you use this plugin for the m600, this plugin for the w950 and this plugin for the P1.

Update: I guess I underestimated Sony Ericsson. As it turns out, the patch/driver mentioned in the article actually turns out to be made by Sony Ericsson (and only leaked, and possibly modified by ‘mate’). Sony Ericsson has now released the driver, which can be found here. The official download offers a new version which is also more stable.

Author: Tags: , , ,
Introducing YippieMove '09. Easy email transfers. Now open for all destinations.

Parallels makes a virtual PC type of software for the Mac which allows you to run Windows on the Mac. Great software, but the company has a little bit of a history of quality control problems. Today the company launched a new design of their website. Unfortunately the company forgot about supporting the default Mac browser, Safari!

Parallels website shows a dropdown in the wrong place in Safari.

Nothing big: a drop down menu is showing out of place. The site actually seems to start working after you resize it for the first time, or click a single link. It’s likely to be fixed by the time many people read this, but it’s still a little bit ironic that a company with a major Mac market would not check their site in Safari.

Author: Tags: , ,
Introducing YippieMove '09. Easy email transfers. Now open for all destinations.

The articles here at PWW tend to be a bit more in depth than this, but I thought this might be a good tips that many would benefit from. As you’ve probably figured out by now, both Alex and I are Mac users, and just adore the design of Apple’s products. As a result of this, both Alex and I bought the Wireless Mighty Mouse to use with our laptops. A couple of days ago my Mighty Mouse stopped scrolling up. It was weird, because I could still scroll down and horizontally. Since this was very annoying, it became the first thing on my priority list to fix.

After some googlin’ and reading on a couple of Mac forums, I found the solution. Press down the ‘scroll ball’ hard. This sounds like a weird thing to do, but after checking some other sites that said the same thing, I tried it. After pressing the ‘scroll ball’ down quite hard the scroll feature started working again.

Author: Tags: , ,
Introducing YippieMove '09. Easy email transfers. Now open for all destinations.
Mar
04.

What is Samba?

For all you new users out there, I just want to let you know that Samba is great piece of Open Source software. It solves many issues for both sysadmins and ordinary users. What it does is to give UNIX users the ability to share files and printers with Windows users. Since Samba is available on most modern platforms, it’s also a great way to share files in a multi-platform environment. Samba can even act PDC (Primary Domain Controller), and BDC (Backup Domain Controller) to handle domain logins from Windows clients. PDCs and BDCs were something that used to required a purchase of a Windows NT or Windows 2000/2003 Server license, but they can now be done fairly simple with Samba under UNIX or Linux.

Now that you know a bit about Samba, lets get started.

Adding a public share to Samba

One of the things I miss as a default feature in OS X is the ability to share folders with Samba. The default configuration of Samba only shares the users’ home directories after authorization. However, since I wanted to share my files with non-Mac users, I simply made some changes to smb.conf (the Samba config-file). After running Samba in various *nix-environment for years, this was a simple modification to do.

First open the Terminal, and type in the following commands:

$ sudo nano /private/etc/smb.conf

Now you’re in a text editor called Nano. A simple, but useful editor. Scroll down to the end of the first part, under the [global] section, and type in the following:

security = share
workgroup = whatever-your-workgroup-is-called
netbios name = Your-computers-name

Note that under Tiger (might be under other versions too), the line “workgroup” already exists. If that is the case, then just replace whatever it was previously set to with your workgroup of choice.

That was the first part. Now you’ve made it possible for everybody to access you public shares.
By default though, Samba isn’t configured to have any public shares. Don’t worry, we’ll take care of that next.

Now it’s time to add the actual sharing to the list of public shares. This is done by adding the following lines to your Samba file. There are different ways to configure a share in Samba, but this is a pretty straight-forward and simple way. At the end of the file, add the following lines (still under the [global] section):

[public]
path = /path/to/the/share
public = yes
only guest = yes
writable = no
printable = no

Nano

Where [public] can be set to whatever name you want for your share, and the path is equal to the path to
the directory you want to share.

Note that you can add as many shares as you’d like. Also, pay attention to the line that says writable: that line determines whether you clients will be able to write files to your share or not. If you want your share to be writable, you want this to say “writable = yes”.

Make sure that there are no typos, and that everything looks proper. Exit Nano and save changes to the file by pressing “ctrl + x” followed by “y” and Enter.

Now we need to set the proper permission to the shared folder. The simplest way to do this is to just type the following command:

$ chmod -R a+rx /path/to/the/share

Note that if you decided to allow write-access to the share, use the command $ chmod -R a+rwx /path/to/share instead of the above command

To verify that your smb.conf is properly configured, we use a command called ‘testparm’. In the Terminal, type:

$ testparm

testparm

Look at the output. If you observe something that doesn’t look right, back up and fix the error in smb.conf.

If everything did work out fine, you’re just one step from getting your share visible. The last step is to fire up samba (or restart it if you already had it running). This is can be done either through the System Preferences, or trough the console. I prefer the latter, and here are the commands:

$ sudo service smbd stop
$ sudo service nmbd stop
$ sudo service smbd start
$ sudo service nmbd start

Connecting to the share(s)

Now you’re supposed to be up and running. The most simple way to test if everything worked is to mount your share locally. Here is how it’s done:

In Finder, go to the menu “Go” and click at “Connect to Server” and type in:

Finder

You will most likely be prompted for username and password now, but just hit “ok” without entering anything. Since it’s a public share, anyone is able to access it without authorization.
Nano

If everything went well, you will find your share mapped in Finder. Now all Windows machines and *nix-machines should be able to browse your files.

This is the beauty with OS X: you are running a commercial desktop OS, but still have all the benefits that a UNIX-environment brings. Running UNIX-programs (as Samba) is done painlessly.

Since Samba is a part of Mac OS X out-of-the-box, Apple has already done half the work for you. The possibilities are many: theoretically, you could make your Mac act as a PDC and replace an entire Windows NT or Windows 2000/2003 Server. I’m not sure about what modifications Apple has done to the source, but if you compile the source code from scratch yourself, it shouldn’t be too hard. Samba simply gives UNIX-users the ability to share files and printers with Windows users.

Please give us feedback if something didn’t work for you.

For further information about Samba, please visit samba.org.

If you have the possibility, please donate to the Samba-team. These guys work for free, and contribute with a lovely piece of software to the Open Source-world. However, they are in need of your donations to be able to invest in new hardware needed to improve Samba further.

Author: Tags: , ,
Introducing YippieMove '09. Easy email transfers. Now open for all destinations.

Ever tried to write a web page and make it work in all major browsers?

In this video I make a change to Cuzimatter. Then I test it in Safari, Firefox, Internet Explorer 7 and Internet Explorer 6 in a row. Warning: trying this at home may melt your RAM chips. And your brain.

What’re we looking at?

It’s the fix of a spelling error in our Cuzimatter, which by the way is written using symfony. The software used is TextMate to edit, Virtue Desktop to do virtual desktops, and two instances of Parallels – one running Windows XP and the other running Windows Vista in Coherence mode.

We wrote a slightly negative article about Parallels last week, but we gotta hand it to them. They write some pretty solid virtualization software.

Music is Marooned by Zale. This video is licensed under a Creative Commons Attribution-Share Alike 3.0 License.

Author: Tags: , , ,

© 2006-2009 WireLoad, LLC.
Logo photo by William Picard. Theme based on BlueMod © 2005 - 2009 FrederikM.de, based on blueblog_DE by Oliver Wunder.
Sitemap