

If you’re in the initial phases of setting up a new software project, one of the first things you should be thinking about is a project collaboration site. A good project site enables you to do at least two things:
- Collect design documents and documentation in one place
- Track and assign tasks/bugs/issues to developers
If used correctly, the project site can become a focal point for everyone working on a particular project. Ideas, research and design documents can all be collected in one place and collaborated over. At the same time the site is a management tool enabling assignment and tracking of tasks to a team of workers. This is surprisingly important even for small teams: if your project is a two man thing, there is still great benefit to knowing what the other person is working on and being able to see his or her progress.
A simple solution for your project site is to pick different kinds of software for different tasks. For example, you may choose to use Eventum for bug and issue tracking, with a separate MediaWiki installation set up for the documentation and design collaboration. But wouldn’t it be better to combine all of this functionality into a single piece of software?
Trac is one such piece of software. It gives you issue tracking, complete with SVN integration and wiki functionality, built into a single application. An added bonus of having everything in a single application is that you can make linked references to tickets, milestones and wiki entries pretty much anywhere you want within the application.

This changeset references ticket #3.
You also get a timeline which concisely summarizes what’s happening within the project, be it wiki edits or source code commits. This can be a very popular feature for project developers – it gives everyone a chance to see what’s happening in the project, and also to get a feeling for the ‘aliveness’ of the project.
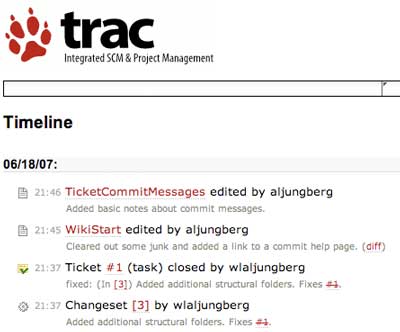
Timeline showing both edits, source code commits and ticket updates.
Installing Trac
Here’s Playing With Wire’s accelerated setup guide for Trac.
- Install the basic trac package using your preferred method (ports, emerge, rpms etc).
- Create a new folder for the trac website on your server.
cd /www/
mkdir mytrac - Use trac-admin to create the instance:
cd /www/mytrac
trac-admin `pwd` initenv - Answer the questions asked by trac-admin.
- Once the questions have been answered, trac will give you some instructions similiar to what’s below:
Project environment for ‘MyProject’ created.
You may now configure the environment by editing the file:
/www/mytrac/conf/trac.ini
If you’d like to take this new project environment for a test drive, try running the Trac standalone web server `tracd`:
tracd –port 8000 /www/mytrac
Then point your browser to http://localhost:8000/mytrac. There you can also browse the documentation for your installed version of Trac, including information on further setup (such as deploying Trac to a real web server).
The latest documentation can also always be found on the project website:
http://trac.edgewall.org/
- If you use SQLite, give +rw permissions to www for the database:
chown -R :www db
chmod -R g+rwX db - If you need to install new graphics, e.g. a new logo file you will want to copy it into the actual htdocs folder:
/usr/local/share/trac/htdocs
Httpd Setup
How to configure your web server depends on both what server you’re running and what method you want to use for serving trac (cgi, fast cgi or mod python). If you’re going to run trac using CGI, you’ll basically want to link to the main trac cgi file, and also set up serving of the supporting html documents. Here’s a sample config file for how it may look like with using Apache and CGI:
Alias /trac/chrome/common /usr/local/share/trac/htdocs
<Directory “/usr/local/share/trac/htdocs”>
Order allow,deny
Allow from all
</Directory>
ScriptAlias /trac /usr/local/share/trac/cgi-bin/trac.cgi
<Location “/trac”>
SetEnv TRAC_ENV “/www/mytrac”
AuthType Basic
AuthName “WireLoad Protected Area”
AuthUserFile /www/mytrac/.htpasswd
Require valid-user
</Location>
<Directory /usr/local/share/trac/cgi-bin>
Options -Indexes +ExecCGI
AllowOverride None
Allow from all
AuthType Basic
AuthName “WireLoad Protected Area”
AuthUserFile /www/mytrac/.htpasswd
Require valid-user
</Directory>
This is fairly straight forward. The most imporant part is,
ScriptAlias /trac /usr/local/share/trac/cgi-bin/trac.cgi
which sets up trac as a cgi script accessible by going to the /trac address of the webhost.
For performance reasons, we don’t want the CGI script to serve every trac file. The following alias will override the /trac URL for the theme related files:
Alias /trac/chrome/common /usr/local/share/trac/htdocs
This has to go before the ScriptAlias line.
User Accounts
Trac’s login scheme is based on basic http authentication, which is why we added a the AuthType sections in the config file above. In fact, to log in to trac you simply authenticate with the web server using a user name and password from the .htaccess file.
Every user you define in the .htaccess file (using htpasswd) will be able to log in with some basic permissions. To configure the permissions more precisely, use the trac-admin command. For instance, to make the user with login ‘aljungberg’ an admin:
cd /www/mytrac
trac-admin `pwd` permission add aljungberg admin
trac-admin `pwd` permission add admin TRAC_ADMIN
This assigns the user ‘aljungberg’ to an admin group and gives the admin group the TRAC_ADMIN permission set.
Notice that everyone who logs in gets the ‘authenticated’ group permissions which are by default pretty useful. You can find what they are by running this command:
trac-admin `pwd` permission list authenticated
It’ll say something like:
User Action
——————————
authenticated BROWSER_VIEW
authenticated CHANGESET_VIEW
authenticated FILE_VIEW
authenticated LOG_VIEW
authenticated MILESTONE_VIEW
authenticated REPORT_SQL_VIEW
authenticated REPORT_VIEW
authenticated ROADMAP_VIEW
authenticated SEARCH_VIEW
authenticated TICKET_APPEND
authenticated TICKET_CHGPROP
authenticated TICKET_CREATE
authenticated TICKET_MODIFY
authenticated TICKET_VIEW
authenticated TIMELINE_VIEW
authenticated WIKI_CREATE
authenticated WIKI_MODIFY
authenticated WIKI_VIEWAvailable actions:
BROWSER_VIEW, CHANGESET_VIEW, CONFIG_VIEW, FILE_VIEW, LOG_VIEW, MILESTONE_ADMIN, MILESTONE_CREATE, MILESTONE_DELETE, MILESTONE_MODIFY, MILESTONE_VIEW, REPORT_ADMIN, REPORT_CREATE, REPORT_DELETE, REPORT_MODIFY, REPORT_SQL_VIEW, REPORT_VIEW, ROADMAP_ADMIN, ROADMAP_VIEW, SEARCH_VIEW, TICKET_ADMIN, TICKET_APPEND, TICKET_CHGPROP, TICKET_CREATE, TICKET_MODIFY, TICKET_VIEW, TIMELINE_VIEW, TRAC_ADMIN, WIKI_ADMIN, WIKI_CREATE, WIKI_DELETE, WIKI_MODIFY, WIKI_VIEW
To find out which permissions are available, check out the TracPermissions documentation page.
Setting up the SVN hook
To allow SVN commits to close tickets using cool syntax like ‘Fixes #1′ in commit messages, an SVN hook has to be installed. Hook scripts in SVN are described in the SVN documentation.
Enter a post-commit script in the hooks/ folder of your SVN repository:
REPOS=”$1″
REV=”$2″
LOG=`/usr/local/bin/svnlook log -r $REV $REPOS`
AUTHOR=`/usr/local/bin/svnlook author -r $REV $REPOS`
TRAC_ENV=’/www/mytrac/’
TRAC_URL=’http://mytrac.wireload.net/trac/’
/usr/local/bin/python /www/mytrac/trac-post-commit-hook \
-p “$TRAC_ENV” \
-r “$REV” \
-u “$AUTHOR” \
-m “$LOG” \
-s “$TRAC_URL”
You may have to download the actual script from the repository. Make sure you get the right version. I initially accidentally got the latest version since I grabbed it from the SVN, and it wasn’t compatible with trac 0.10.3 which I had installed.
Finally make sure the script can be run,
chmod a+rx post-commit
chmod a+x /www/mytrac/trac-post-commit-hook
The users who run the script must also be able to read and write to the trac database. You can make sure this works by test submitting some change set for analysis:
su -m wlaljungberg post-commit /home/mysvn/myproject/ 4
If the database isn’t accessible you’ll get an error message similar to this one:
trac.core.TracError: The user root requires read _and_ write permission to the database file /www/mytrac/db/trac.db and the directory it is located in.
The hook is nice. Here’s a description of what it does, quoted from the actual script:
# It searches commit messages for text in the form of:
# command #1
# command #1, #2
# command #1 & #2
# command #1 and #2
#
# You can have more then one command in a message. The following commands
# are supported. There is more then one spelling for each command, to make
# this as user-friendly as possible.
#
# closes, fixes
# The specified issue numbers are closed with the contents of this
# commit message being added to it.
# references, refs, addresses, re
# The specified issue numbers are left in their current status, but
# the contents of this commit message are added to their notes.
# A fairly complicated example of what you can do is with a commit message
# of:
#
# Changed blah and foo to do this or that. Fixes #10 and #12, and refs #12.
#
# This will close #10 and #12, and add a note to #12.
If you run into any trouble, take a look at the excellent Trac documentation. Good luck with your new project!


You may wish to also have a look at redMine. It is an alternative to Trac and written in Ruby on Rails. It supports pretty much all of Tracs current functionality, plus support for multiple projects, Gantt charts, and lots more.