Introducing YippieMove '09. Easy email transfers. Now open for all destinations.

I was reading on Pronet Advertising that URL’s Matter. Basically the article states that because Pronet Advertising had three different URLs to the same thing listed in del.icio.us they didn’t hit the top of the ‘popular list’. If all the del.icio.us bookmarks had used the same URL, Pronet Advertising would have been much more successful.

The article does a good job describing the problem. More than 3,000 people bookmarked the site but three distinct addresses were used. The article suggests using redirection to make sure that all users see the same page. So for example, if the visitor comes in on http://playingwithwire.com, he or she should be redirected to http://www.playingwithwire.com.

This is sensible but it isn’t enough. Imagine if you have a blog like we do. The article you are reading right now actually appears in three different places, each with a differnt URL! For a while it will be on our front page. It will also be in our archive page for this month. And finally it has its own post page.

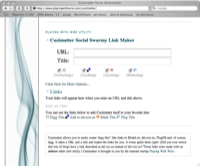
Cuzimatter Social LinkmakerUltimately you want everyone to bookmark your posting page because that’s where the article ‘really’ lives. Enter Cuzimatter. By using our clever social bookmarking utility you can ensure that most users bookmark exactly the same page URL, regardless of if they read it from your front page, your archive, your post page, your alternative URL, someone else’s mirror – anything. The Cuzimatter links happily follow your blog post around and make sure bookmark happy users end up bookmarking your page.

If you want a live demonstration just bookmark this page using our Cuzimatter links below. You know you want to. :)

Author: Tags: , ,
Introducing YippieMove '09. Easy email transfers. Now open for all destinations.
Nov
21.

A while back I decided to use Mambo as CMS for a company that I was given the responsibility to develop a ‘website with webshop.’ As you might have read in the article Choosing a CMS – Part 1, I recommended Joomla!, but yet I went for Mambo myself. The reason for this is that I wrote the article after I developed the website. In my initial research, I thought Mambo was the better choice, but after using it for a while, I became quite disappointed. For instance, the Mambo-team released a major update release as stable, and two days later withdrew the release, and changed it to unstable. This is quite unacceptable. Sure, they’re just humans, and working for free. But still, it’s really not professional behavior. This caused many sysadmins/webdevelopers (including myself) to spend numerous hours to first upgrade (which was a mess) and then downgrade back to the prior stable release.

I was now in a position where I had a fully working CMS running on Mambo with a webshop full with inventory, and plenty of documents in the CMS. However, I had lost my faith in Mambo, and wanted to switch away from it. Luckily, this turned out to be quite simple.

As the topic reveals, I decided to switch to Joomla!, which is basically just a modified Mambo. The good thing is that many things (such as the config-file) are very similar. Because of this the migration process was quite painless.

At this point I was running Mambo 4.5.4 with the latest service packs. I also had numerous components/modules installed, including VirtueMart. Because of this, my biggest concern was that something would happen with VirtueMart and its inventory.

  1. I guess this goes without even mentioning, but make sure you have at least one set of backups of both the files and the database. I know it’s a hassle making backups if you only have ftp-access, but believe me, it’s worth the effort if something happens.
  2. Download the latest version of Joomla! (which is 1.0.11 when writing this). Download the ‘full’ version and nothing else.
  3. Make sure to inform everyone who needs to know (other admins etc.) that you will be performing an upgrade, so they won’t be accessing the server at the same time.
  4. Log into the admin-interface on Mambo and set the site as offline.
  5. Double check your backups.
  6. (if you only have FTP-access), extract the Joomla! files locally
  7. Upload/overwrite all the files you just extracted to your Mambo-directory on the server
  8. Run the SQL-commands in ‘migrate_Mambo4523_to_Joomla_100.sql’ which you’ll find in the installation/sql directory in you Joomla! directory.
  9. Go to your administration-interface and set the site as online again.
  10. Look through all your components/modules to make sure they’re working properly.

If everything works, be happy. It did for me. If not, you might want to take a look at your configuration.php-file (which was not overwritten by the upgrade). In particular, you want to look at ‘$mosConfig_absolute_path’ to make sure you don’t have any slash at the end, as well as the ‘$mosConfig_lang’ to make sure your language is specified as ‘english’ and not ‘EN’.

Before I upgraded I did quite a bit of research on the Mambo/Joomla forums to see what people said about the migration. Some migration guides were really complex, while other people just overwrote the files and ran the sql-commands (as described above). The guide I wrote above might not be a perfect solution, but rather a ‘quick and dirty’-solution to migrate.

The downside with this guide is that you might end up with files that are no longer used by Joomla!, and then will just take up space on your server, and make your folders look very unorganized. There might also be components/modules that will malfunction after such update. In my migration however, I had no problems with any of my components/modules after the upgrade.

If you followed this guide, please post a comment about your experience (both good and bad).

Author: Tags: , ,
Introducing YippieMove '09. Easy email transfers. Now open for all destinations.

I was reading Lifehacker’s blog about resizr this morning. Turns out that if you have a Mac, there is a much easier and faster way. No need for big bloated software, just the Automator and Preview. This is how you do it:

  1. Put your image on your Desktop. Or wherever you can find it. In our example here, the picture is called ‘Picture 1.png’.
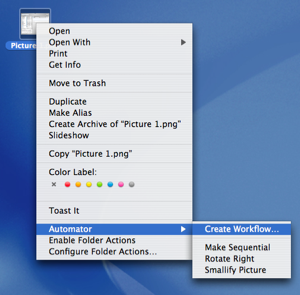
  2. Right click the image. Go to ‘Automator’ and select ‘Create Workflow…’. (In the screenshot I have some previously created Workflows you might not have. That’s okay.)
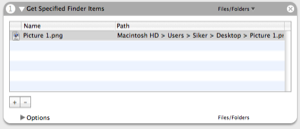
  3. This will bring up the Automator screen. Sweet. On the right hand side in the Automator you will see your picture preselected in an ‘Action’ called ‘Get Specified Finder Items.’ This tells Automator to load the picture you right clicked on in the second step.
  4. Now go into the Library on the left side and select ‘Preview’ as your Application. Preview has an action called ‘Scale Images’. Just what we need! So double click that action to add it. Automator will ask you if you want to add an action to make a copy of the picture before resizing it, so that you can keep your original. If you want to do this, click ‘Add’, but make sure you are not trying to copy the image from the Desktop to the Desktop. For some reason this doesn’t work.
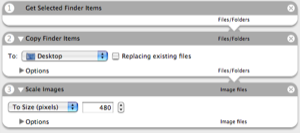
  5. You will find the ‘Scale Images’ Action in your list of actions now. Go ahead and set the desired size you want. I’m setting it to 480 pixels, meaning the image will be 480 pixels wide once the Automation has run.
  6. Click the big ‘Run’ button and you’re done! Preview will automatically load your picture, optionally make a copy of it, and then scale it to the size you wanted.

Not bad for a couple of clicks, huh? Now the cool thing with the Automator is that you can save this Automation. Then you can access it by just right clicking an image and selecting your image scaling action from the Automator drop down. Before you save your Automation, make sure to change the first action in the list to ‘Get Selected Finder Items’. Otherwise your Automation will try to resize the same picture every time you run it. Your final Automation should look like this:

Note that in this version your original picture needs to be in a different folder than the Desktop or the copy action will fail, as I mentioned in 4.

Happy resizing!

You can download the final action as an archive here: ScaleTo480px.zip.

Author: Tags: ,
Introducing YippieMove '09. Easy email transfers. Now open for all destinations.
Nov
17.
Comments Off
Comments
Category: Uncategorized

Cuzimatter, our social swarmy link maker has been updated! We pulled out all the stops this time and added these new features:

  • Icon Images – Use fancy icons with your social bookmarks!
  • More Options – The new ‘More Options’ menu allows you to fiddle around with the Cuzimatter settings until you’re blue in the face.
  • Better Links – The code generated is now cleaner and works in more situations!

But that’s not it. Today we are also revealing PlugIM support. PlugIM is a new up and coming Digg like site. There are lots of sites like those but PlugIM is one of the few actually making it. Wired wrote about them recently in a blog entry, and Google has picked up on more than 600 pages from their site.

So we’re very happy to let you know that Cuzimatter is the very first Social Bookmarker Utility to add PlugIM support. If you want that sweet ‘Plug This’ link in your blog posting, this is the place to be.

Why are we doing this? Why are we giving you amazing utilities instead of working on our business? Well, that leads me to the final new feature. Every Cuzimatter link set now features a cute little back link to us by default. This link is entirely optional but we hope some people do the right thing and leave our tiny icon in there. We’re hoping this will help establish our online presence before our big product launch. But of course you can leave it out and we’ll still keep giving you the fantastic utility that Cuzimatter is.

Author: Tags: , , ,
Introducing YippieMove '09. Easy email transfers. Now open for all destinations.
Nov
15.
Comments Off
Comments
Category: Uncategorized

Yey! Today PWW celebrates one month online. Happy B-Day to you…Happy B-day to you..

We’re going to celebrate this by feeding our web-server cake…some downtime might occur.

So far we’ve manage to publish 31 posts, so we did reach our goal to write one post a day. In my opinion we’ve managed to write some really good articles.

If you haven’t been with us from the start, here’s a list of some my favorites so far:

That’s just a few of the good articles we’ve published. Feel free to browse our archive for more goodies.

Author: Tags: ,

© 2006-2009 WireLoad, LLC.
Logo photo by William Picard. Theme based on BlueMod © 2005 - 2009 FrederikM.de, based on blueblog_DE by Oliver Wunder.
Sitemap