Introducing YippieMove '09. Easy email transfers. Now open for all destinations.

Did Expose/Spaces stop working all of the sudden? This happens to me almost every day. Most of this time this is when I resume my MacBook Pro at home. I assume this has something to do with the fact that I have an external monitor connected at the office, and that somehow messes with Expose/Spaces. Luckily there is a quite simple solution.

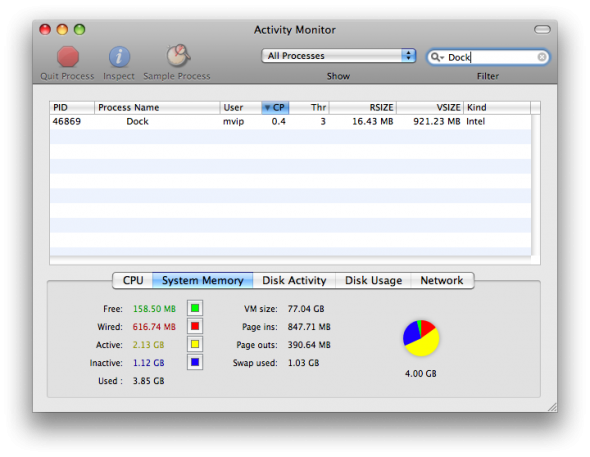
  • Fire up Activity Monitor (/Applications/Utilities/Activity Monitor)
  • Filter the results for ‘Dock’
  • Click on ‘Dock’ and ‘Quit Process’
Filter for 'Dock' in Activity Monitor

Filter for 'Dock' in Activity Monitor

Unfortunately this will collect all windows into a single ‘space,’ but you will be able to once again use Expose/Spaces. Enjoy!

Author: Tags:
Introducing YippieMove '09. Easy email transfers. Now open for all destinations.

I know, I know, this topic has been covered a billion times before. Everyone has got their own idea of what the perfect multimedia system is. But hear me out, I think you’ll like what I have to say. Since you’re probably in the process of upgrading to Snow Leopard, perhaps now is a good time to reorganize your media.

When we’re done you will have the following:

  • Central iPhoto and iMovie libraries
  • Your central iPhoto library accessible in Front Row
  • All your music, movies and TV shows, organized and accessible directly from your remote control
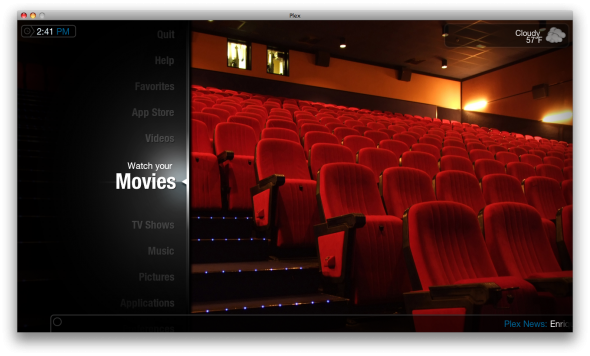
Have all your media accessible with your remote control.

Have all your media accessible with your remote control.

The requirements

Like all solutions, there are some requirements. However, I would consider these requirements pretty basic. For most gadgeteers out there, these are things you already got in your possession:

  • A Network Attached Storage (eg. Drobo, ReadyNAS, or an old Linux box). Preferably something with some redundancy (RAID1, RAID5, RAID-Z etc.)
  • Two or more Macs with Leopard or later (perhaps a Mac Mini to the TV/Projector and an iMac as a desktop)
  • A lot of media (picture, music, movies, TV shows etc).
  • Sounds too good to be true? Well, it isn’t. Best of all, you won’t have to spend a single dime on software. So what’s the secret? Good ‘ol UNIX symlinks and a software called Plex. That’s it.

    Configuring the NAS

    Since I have no idea what kind of NAS you’ve got (and it doesn’t really matter), all I’ll say is that I recommend that you create the following shares:

    • ‘pictures’ – for the iPhoto library
    • ‘videos’ – for the iMovie library
    • ‘movies’ – for all your movies
    • ‘tvshows’ – for all your TV shows
    • ‘music’ – for all your music

    If your NAS supports AFP, that’s great, but SMB will do just fine too.

Copying the media to the NAS

While I’m not going to cover how you copy your movies, TV shows and music (as I assume you know that), I will however cover how you copy your iPhoto and iMovie libraries.

Start by connecting to your network shares ‘pictures’ and ‘videos’ (or equivalent). You can do that either by browsing to them in Finder, or use Finder’s ‘Connect to server’ feature (available under ‘Go’ -> ‘Connect to server’).

If you’re a power user, skip the next four paragraphs.

Let’s start with the iPhoto library. Open up your home directory and go into the ‘Pictures’ folder. Now copy the ‘iPhoto Library’ folder over to the share ‘pictures’. Depending on the size of your archive and the speed of your network, this can take a while. Once done, rename the folder ‘iPhoto Library’ on your local computer to ‘iPhoto Library.old’ or something similar.

Now, this is the important part. Go over to the ‘picture’ share on the NAS and drag the iPhoto Library back to the local folder while pressing Command and Option. An arrow will show up under the icon you are dragging. Release the mouse button. If the files start to copy, you did not successfully press Command and Option.

We’re now done with iPhoto. You should now be able to fire up iPhoto and it will access the photos directly from the NAS. To do the same for another computer, all you need to do is to rename the local ‘iPhoto Library’ into something else, and create a link as we just did above.

Next up is the iMovie library (if you use it). Start by opening up the two folders (‘videos’ on the NAS and Movies in your home directory). Now copy the ‘iMovie Projects’ from the local Movies folder onto ‘videos’ on the NAS. Next, rename ‘iMovie Projects’ on the local machine to ‘iMovie Projects.old’ and create a link to the NAS (by dragging it from the ‘videos’ folder to the local ‘Movies’ folder with Command and Option held down). Repeat the same thing with the folder ‘iMovie Events’.

For the power-users out there, there is an easier way to do all this. Simply fire up the Terminal and run the following commands:
$ rsync -aP "~/Pictures/iPhoto Library" /Volumes/pictures/
$ mv "~/Pictures/iPhoto Library" "~/Pictures/iPhoto Library.old"
$ ln -s "/Volumes/pictures/iPhoto Library" ~/Pictures/
$ rsync -aP ~/Movies/iMovie* /Volumes/videos/
$ mv "~/Movies/iMovie Events" "~/Movies/iMovie Events.old"
$ mv "~/Movies/iMovie Projects" "~/Movies/iMovie Projects.old"
$ ln -s "/Volumes/videos/iMovie Events" ~/Movies/
$ ln -s "/Volumes/videos/iMovie Projects" ~/Movies/

For additional computers, just run the same commands, but leave out the rsync.

Automounting the shares

While you would imagine this to be very easy on a UNIX based system, it’s surprisingly difficult on Mac OS. Perhaps there is a better way, but this is the most straight-forward solution I’ve found. If you know of a better way of doing this, please let me know!
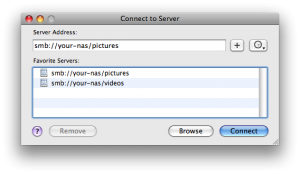
Finder -> 'Go' -> 'Connect to Server'
From Finder, navigate to the ‘Go’ menu and select ‘Connect to Server’. Once it opens up, you need to enter the address to your NAS (complete with the names of the share). That is, if you NAS is named FOO, enter ‘smb://foo/pictures’ and press the plus icon. Repeat this for the share ‘videos’.

Next we need to open up the folder ‘Library/Favorites’ in your home directory. Within this folder, you will see the two shares you just created in the step above. Leave this Finder window open while you click on ‘Apple’ -> ‘System Preferences’ -> ‘Accounts.’ Then select ‘Login Items.’ Now drag the two shares from Favorites into the list of Login Items.
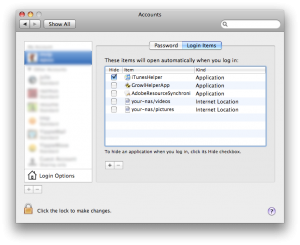
The Items list after dragging in the two shares.

The Items list after dragging in the two shares.

The two shares will now automatically mount upon login for the current user. As noted above, this is not a great way to automatically mount shares, but as far as I know, this is the most convenient way. Keep in mind that, if you do not automatically mount the shares, you will not be able to access your iPhoto/iMovie library until you’ve manually mounted the shares.

Moving on to the other media

With iPhoto and iMovie moved to the central storage, it’s time to move on to the other media. Luckily this is much easier.

The cornerstone in managing all the remaining media is a software called Plex. If you never heard of it, Plex is basically a Mac OS version of the popular media center solution XBMC for Xbox. In its look and feel, Plex is quite similar to Front Row, but it offers a plethora of features that is missing in Front Row. Not only are you able to watch your Movies and TV Shows, you will also be able to install apps within Plex which allow you to stream media directly from sources such as Hulu and BBC.
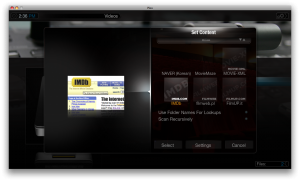
Plex ContentAssuming you’ve already downloaded and installed Plex, just launch it and head to ‘Watch your Videos’ -> ‘Add Source’ -> ‘Browse’ -> ‘Windows Network (SMB)’ -> Locate your NAS and select the share ‘movies’ and press ‘OK.’ Now go to ‘Set Content,’ select ‘Movies,’ ‘imdb,’ and then press ‘Select’. Plex will now scan through the folder and all its sub-folders and run it against imdb to try to figure out what it is. If the movies are properly named, Plex will fetch the description of the movie, the cover as well as the full name and year. It will then take all of that data and present them neatly organized under ‘Watch your Movies’
Now repeat the same thing for ‘tvshows’ and ‘music,’ but select the content accordingly.

The whole process is pretty straight forward, but since the Plex Wiki already does a great job of describing this process in greater detail, I will simply recommend that you read more about that there.

There you go, that’s it really. While there is a whole lot of things that can be added to this article, such as iPhoto integration etc., I’ve intentionally left that out to keep the article a bit briefer. You might also wonder why I didn’t move the iTunes library over to the NAS. The reason for this is that I think that it might get corrupted if multiple users access it simultaneously. That’s why I instead suggested that you simply move the music-files itself to the network, and play them directly in Plex.

One obvious expansion of this setup is to include Plex Media Server. Perhaps I will cover that in a ‘Part 2′

Author: Tags: , , , ,
Introducing YippieMove '09. Easy email transfers. Now open for all destinations.
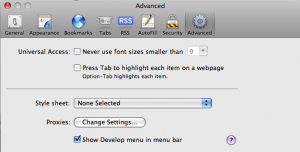
Activate the Developer menu in Safari 4's preferences.

Activate the Developer menu in Safari 4's preferences.

Apple’s Safari web browser was upgraded to version 4 yesterday and with it came an update to the developers tools first introduced in Safari 3.1. The new version is set to give Firefox’s FireBug plugin some very serious competition. Not only does the Development environment look and perform very well, it’s also very full featured.

In the toolset we find inspection of HTML and CSS, JavaScript debugging, page load profiling tools and a Databases inspection tool presumably for HTML 5’s offline storage support. There are also tools to disable caching, spoof user agents and more from the handy Develop menu.

Inspecting Pages

When designing a new web page frequently plenty of time is spent making minor changes, updating the server and then checking the results in the web browser. This three stage process slows down the design process and hampers the creative flow. Page inspection tools allow you to review and edit your page live in the browser, allowing you to easily try out different CSS rules or HTML edits until you know what you want. And what you see is literally what you get – your preview is the actual web browser.

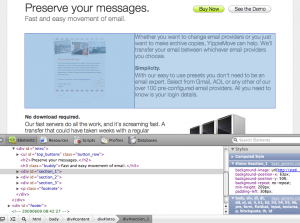
A line of HTML highlighted in the rendering.

A line of HTML highlighted in the rendering.

Safari 4’s “Web Inspector”, shown with Develop / Show Web Inspector, is Apple’s take on page inspection. Reminiscent of Firebug’s equivalent, the inspector area attaches to the bottom of the Safari window. On the left hand you get the HTML for the page and on the right hand you get the full hierarchy of CSS affecting the currently selected element. By choosing the magnifier icon you can click on any element in the page – a headline, an image, a paragraph – and bring it into focus in the HTML view. The same can be done by selecting tags in the HTML source code directly.

When an element is selected it is outlined in blue in the page. A light blue box shows the dimensions of the element itself and a darker blue box behind it outlines the element with margins included. This is helpful when an element is not positioned where you want it or it’s the wrong size. The blue boxes will let you know if the problem is with the margins or if there is something else going on.

Once you have a theory of what you’d like to change you can go in and edit the effective CSS directly using the Styles panel on the right hand side. For instance you could tweak the font-size by double clicking the font-size value and typing in a new number. A set of checkboxes also allow you to toggle individual CSS rules on or off to see how that affects the page as a whole. A great tool for hunting down what CSS rule is doing what. For each section in the Styles panel you also get the responsible selector and the CSS file it comes from, making it easy to copy your changes back to the original style sheet when you are done with your edits.

The CSS editor is well designed but it does not seem to allow adding new CSS rules live, a feature available in FireBug.

What’s Taking so Long?

Another important consideration when designing a website is the page load time. Safari 4 boosts a slick looking Resources inspector which gives the developer a breakdown not only of how long each JavaScript, CSS or image file took to load but also when each download started. All of this is shown in the context of the whole page load from the first millisecond to the last.

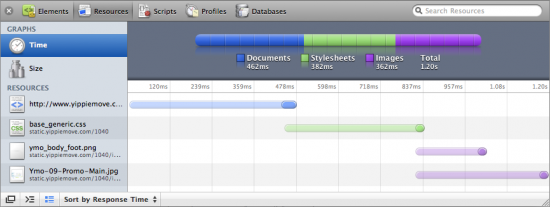
Timing the bits and pieces of a web page.

Timing the bits and pieces of a web page.

By laying the load time out in a timeline various sources of delay can be tracked. For example in the screenshot above the main document takes just short of half a second to load. We can also see that the CSS file request goes out even before the main HTML is finished loading, as Safari finds the CSS link in the header almost immediately. For each bar the semitransparent section is the latency – the time until the first byte of the response. So in the above case we can see that the latency makes up the majority of the load time. We can also see that the two images used on the page are loaded concurrently and that they start loading immediately when the CSS has been retrieved. Finally the colorful bar on top breaks the total load time down by type and lets us know the whole page finished loading in 1.2 seconds.

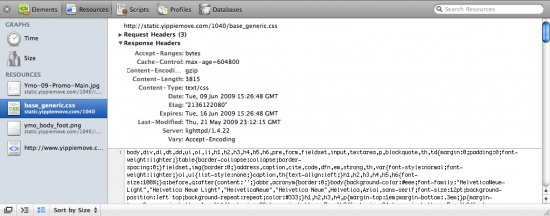
Individual resources can be inspected, allowing the developer to review the size and contents of each resource. In the same section the request and response headers can be reviewed. This is useful for the web server administrator in order to determine compression status and cache expiration headers. Strangely enough POST parameters don’t seem to show up which could be a serious problem for debugging.

This CSS file was gzipped and comes with a far future expires header. Great!

This CSS file was gzipped and comes with a far future expires header. Great!

Breaking Into the Source

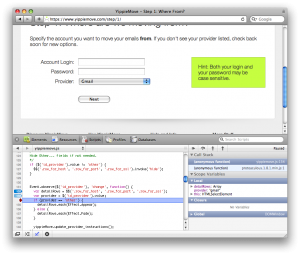
Tracing the execution of JavaScript.

Tracing the execution of Javascript.

In the web 2.0 age, JavaScript is almost as important as the HTML and CSS that make up a page. Luckily Safari 4’s JavaScript debugging facilities give you a window into your code as it runs. You can set breakpoints, step through source code and inspect the call stack and variables as you go along.

When a page has been loaded the Scripts tab shows the various JavaScript resources available on the page, by source filename. When a file has been selected the JavaScript is displayed with syntax highlighting and line numbers. Clicking on a source line number sets a breakpoint. Once the targeted code executes Safari automatically launches into single step mode, allowing for the usual controls: Step Over, Step Into and return (called Step Out). At each step you can also inspect the values of the variables available in the scope.

There is also a Console feature which not only shows console messages and errors generated by your JavaScript during runtime but allows you to run commands live. Need to see what happens if a certain variable has a different value? Just set it using the console and watch the results unfold in the active web page.

Executing a JavaScript command in a live page.

Executing a JavaScript command in a live page.

Step Behind the Scenes

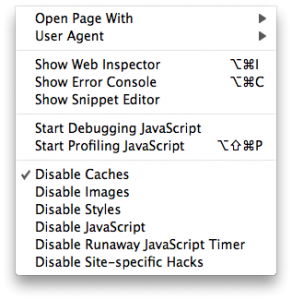
Safari 4's Develop Menu.

Safari 4's Develop Menu.

Safari 4’s Develop menu reveals additional tools and utilities useful for debugging and inspecting a web page. Enable or disable caches, images, CSS or JavaScript to see what the page looks like in a degraded state. This allows you to make sure the web page looks good even without images for instance, a great utility for making sure your website is accessible for persons with disabilities. Toggling JavaScript is also an obvious boon when you need to make sure your software runs in text browsers or where JavaScript has been disabled for security or performance reasons. There is also a “Snippet Editor” which seems to allow easy previewing of HTML snippets.

There are some flaws. Two were mentioned above: there does not seem to be a way to inspect POST data, important especially when debugging AJAX, and it does not seem possible to add new CSS rules dynamically as you could in FireBug.

There is also a selection bug: when the Web Inspector is revealed, selecting any text on the page causes the window to immediately scroll to the bottom. This subsequently selects all text on the page below where you started to select. Another bug is that if an element is selected such that the blue outline boxes show up, switching tabs sometimes left the outline hanging around in the other tabs too, now not highlighting anything in particular. Finally the JavaScript debugger seems to freeze up JavaScript in every Safari page – not just the one you are working with. This makes it hard to work with say an online reference in a different window.

A more minor flaw is a missing feature. There is no page optimization analysis tool such as Yahoo’s YSlow or Google’s Page Speed. These tools help analyze pages for performance problems. For example they check for additional compressibility in images and for correct headers.

These flaws aside the Development tools found in Safari leave little to be desired. All the features you expect are there and the package is polished far beyond what’s ordinary for web development. Apple has clearly been looking to FireBug when picking their features and that’s a good thing. FireBug has for a long time been setting the standard for these kinds of tools, but has been suffering from engineers’ syndrome: heaps of features but with little mind to UI design and detail polish. Safari 4’s development environment meets nearly all the same requirements and does it in style, bringing an excellent choice to the web developer’s toolbox.

Read more about the new developer tools at Apple’s What’s New page.

Author: Tags: , , , , , , , , , , ,
Introducing YippieMove '09. Easy email transfers. Now open for all destinations.
Jan
13.
Comments Off
Comments
Category: Uncategorized

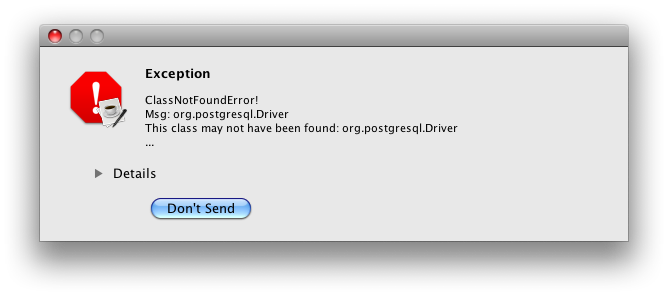
Shortly after getting iReport running using the fix described in this article, we ran into a new problem — the Postgresql support. After some Googeling, it became clear that one had to add the the driver for Postgresql by hand from here. If not, you will encounter this error message:

Error: java.lang.ClassNotFoundException: org.postgresql.Driver

When adding the driver, beware of what version you’re selecting. After banging our heads in the wall for a while, we realized that we picked the wrong version. On Mac OS X 10.5.6 (with all latest updates installed) the version you’re looking for is the ‘JDBC3′ branch (assuming you’re using the java version that comes with OS X). Once we figured this out, the installation was easy. First, download this file. Then you need to move it into the ‘lib’ folder in iReport.

If you’re a console user like us, here are the steps:

cd iReport-3.0.0/lib
wget http://jdbc.postgresql.org/download/postgresql-8.3-604.jdbc3.jar

Easy as pie.

Author: Tags: , , ,
Introducing YippieMove '09. Easy email transfers. Now open for all destinations.
Jan
12.
Comments Off
Comments
Category: Uncategorized

If you’ve never heard of iReport and Jasper before, you really ought to take a look at it. It’s a really impressive suite of reporting tools that can generate reports from pretty much any data source out there.

Almost exactly a year ago, we wrote a similar article on how to fix the launcher in version 2.0.x. While I’m sure Jasper improved iReport a lot during this time, they also managed to break the launcher in new ways with version 3.0.0.

This is how you can get it working (assuming you’ve downloaded it):

tar xvfz iReport-3.0.0.tar.gz
cd iReport-3.0.0/bin
awk ‘{ sub(“r$”, “”); print }’ startup.sh > startup2.sh
chmod +x startup2.sh
./startup2.sh

The commands above fixes two problems with the launcher. First we convert the line feed from DOS format to UNIX format (the awk-part). The second problem was that the launcher was not executable. If you just make the original launcher executable (chmod +x startup.sh), you will end up with this:

-bash: ./startup.sh: /bin/sh^M: bad interpreter: No such file or directory

Good luck, and have fun generating all those new cool reports.

Author: Tags: , ,

© 2006-2009 WireLoad, LLC.
Logo photo by William Picard. Theme based on BlueMod © 2005 - 2009 FrederikM.de, based on blueblog_DE by Oliver Wunder.
Sitemap