When we’re done you will have the following:
- Central iPhoto and iMovie libraries
- Your central iPhoto library accessible in Front Row
- All your music, movies and TV shows, organized and accessible directly from your remote control

Have all your media accessible with your remote control.
The requirements
Like all solutions, there are some requirements. However, I would consider these requirements pretty basic. For most gadgeteers out there, these are things you already got in your possession:
- A Network Attached Storage (eg. Drobo, ReadyNAS, or an old Linux box). Preferably something with some redundancy (RAID1, RAID5, RAID-Z etc.)
- Two or more Macs with Leopard or later (perhaps a Mac Mini to the TV/Projector and an iMac as a desktop)
- A lot of media (picture, music, movies, TV shows etc).
- ‘pictures’ – for the iPhoto library
- ‘videos’ – for the iMovie library
- ‘movies’ – for all your movies
- ‘tvshows’ – for all your TV shows
- ‘music’ – for all your music
Sounds too good to be true? Well, it isn’t. Best of all, you won’t have to spend a single dime on software. So what’s the secret? Good ‘ol UNIX symlinks and a software called Plex. That’s it.
Configuring the NAS
Since I have no idea what kind of NAS you’ve got (and it doesn’t really matter), all I’ll say is that I recommend that you create the following shares:
If your NAS supports AFP, that’s great, but SMB will do just fine too.
Copying the media to the NAS
While I’m not going to cover how you copy your movies, TV shows and music (as I assume you know that), I will however cover how you copy your iPhoto and iMovie libraries.
Start by connecting to your network shares ‘pictures’ and ‘videos’ (or equivalent). You can do that either by browsing to them in Finder, or use Finder’s ‘Connect to server’ feature (available under ‘Go’ -> ‘Connect to server’).
If you’re a power user, skip the next four paragraphs.
Let’s start with the iPhoto library. Open up your home directory and go into the ‘Pictures’ folder. Now copy the ‘iPhoto Library’ folder over to the share ‘pictures’. Depending on the size of your archive and the speed of your network, this can take a while. Once done, rename the folder ‘iPhoto Library’ on your local computer to ‘iPhoto Library.old’ or something similar.
Now, this is the important part. Go over to the ‘picture’ share on the NAS and drag the iPhoto Library back to the local folder while pressing Command and Option. An arrow will show up under the icon you are dragging. Release the mouse button. If the files start to copy, you did not successfully press Command and Option.
We’re now done with iPhoto. You should now be able to fire up iPhoto and it will access the photos directly from the NAS. To do the same for another computer, all you need to do is to rename the local ‘iPhoto Library’ into something else, and create a link as we just did above.
Next up is the iMovie library (if you use it). Start by opening up the two folders (‘videos’ on the NAS and Movies in your home directory). Now copy the ‘iMovie Projects’ from the local Movies folder onto ‘videos’ on the NAS. Next, rename ‘iMovie Projects’ on the local machine to ‘iMovie Projects.old’ and create a link to the NAS (by dragging it from the ‘videos’ folder to the local ‘Movies’ folder with Command and Option held down). Repeat the same thing with the folder ‘iMovie Events’.
For the power-users out there, there is an easier way to do all this. Simply fire up the Terminal and run the following commands:
$ rsync -aP "~/Pictures/iPhoto Library" /Volumes/pictures/

$ mv "~/Pictures/iPhoto Library" "~/Pictures/iPhoto Library.old"

$ ln -s "/Volumes/pictures/iPhoto Library" ~/Pictures/

$ rsync -aP ~/Movies/iMovie* /Volumes/videos/

$ mv "~/Movies/iMovie Events" "~/Movies/iMovie Events.old"

$ mv "~/Movies/iMovie Projects" "~/Movies/iMovie Projects.old"

$ ln -s "/Volumes/videos/iMovie Events" ~/Movies/

$ ln -s "/Volumes/videos/iMovie Projects" ~/Movies/
For additional computers, just run the same commands, but leave out the rsync.
Automounting the shares
While you would imagine this to be very easy on a UNIX based system, it’s surprisingly difficult on Mac OS. Perhaps there is a better way, but this is the most straight-forward solution I’ve found. If you know of a better way of doing this, please let me know!

From Finder, navigate to the ‘Go’ menu and select ‘Connect to Server’. Once it opens up, you need to enter the address to your NAS (complete with the names of the share). That is, if you NAS is named FOO, enter ‘smb://foo/pictures’ and press the plus icon. Repeat this for the share ‘videos’.
Next we need to open up the folder ‘Library/Favorites’ in your home directory. Within this folder, you will see the two shares you just created in the step above. Leave this Finder window open while you click on ‘Apple’ -> ‘System Preferences’ -> ‘Accounts.’ Then select ‘Login Items.’ Now drag the two shares from Favorites into the list of Login Items.

The Items list after dragging in the two shares.
Moving on to the other media
With iPhoto and iMovie moved to the central storage, it’s time to move on to the other media. Luckily this is much easier.
The cornerstone in managing all the remaining media is a software called Plex. If you never heard of it, Plex is basically a Mac OS version of the popular media center solution XBMC for Xbox. In its look and feel, Plex is quite similar to Front Row, but it offers a plethora of features that is missing in Front Row. Not only are you able to watch your Movies and TV Shows, you will also be able to install apps within Plex which allow you to stream media directly from sources such as Hulu and BBC.
 Assuming you’ve already downloaded and installed Plex, just launch it and head to ‘Watch your Videos’ -> ‘Add Source’ -> ‘Browse’ -> ‘Windows Network (SMB)’ -> Locate your NAS and select the share ‘movies’ and press ‘OK.’ Now go to ‘Set Content,’ select ‘Movies,’ ‘imdb,’ and then press ‘Select’. Plex will now scan through the folder and all its sub-folders and run it against imdb to try to figure out what it is. If the movies are properly named, Plex will fetch the description of the movie, the cover as well as the full name and year. It will then take all of that data and present them neatly organized under ‘Watch your Movies’
Now repeat the same thing for ‘tvshows’ and ‘music,’ but select the content accordingly.
The whole process is pretty straight forward, but since the Plex Wiki already does a great job of describing this process in greater detail, I will simply recommend that you read more about that there.
There you go, that’s it really. While there is a whole lot of things that can be added to this article, such as iPhoto integration etc., I’ve intentionally left that out to keep the article a bit briefer. You might also wonder why I didn’t move the iTunes library over to the NAS. The reason for this is that I think that it might get corrupted if multiple users access it simultaneously. That’s why I instead suggested that you simply move the music-files itself to the network, and play them directly in Plex.
One obvious expansion of this setup is to include Plex Media Server. Perhaps I will cover that in a ‘Part 2′
]]>
Scalix Admin
Ok, let’s get started.
First, install CentOS 5.3 as normal. In the software selection, we only selected ‘Server’ and deselect everything else (why people run X-windows on a server is beyond me). The only other thing to keep in mind is to use a static IP and a fully qualified domain name (FQDN).
Once you got your system up and running, we need to make a few changes to the default setup. Login using SSH or the console and run:
# system-config-securitylevel-tui
You will need to disable ‘SELinux’ as well as configuring the firewall according to your needs.
Next we need to trick Scalix into believing that you are running RHEL instead of CentOS. This is pretty easy:
# cp /etc/redhat-release /etc/redhat-release.orig
# echo ‘Red Hat Enterprise Linux Server release 5 (Tikanga)’ > /etc/redhat-release
We also need to make sure your hostname is listed in /etc/hosts under its IP (and not under 127.0.0.1). An example of a proper line is :
xxx.yyy.zzz.nnn server.example.org server
Now, let’s get started with installing Scalix. We start by upgrading the system and installing a few dependencies.
# yum -y upgrade
# yum install -y tk cyrus-sasl-md5 cyrus-sasl-plain sendmail-cf postgresql-server postgresql-libs mx compat-libstdc++-296
Assuming you’ve already downloaded Scalix onto the machine, all you need to launch the installer
# chmod +x scalix-11.4.4-GA-enterprise-redhat-intel.bin && ./scalix-11.4.4-GA-enterprise-redhat-intel.bin
After you are done answering all the questions, you should be able to access your brand new Scalix installation from your browser.
Good Luck!
Update: As Michael points out, the step of ‘tricking Scalix that you are running RHEL’ is not necessary. Thanks Michael.
Update 2: If you want to take Scalix for a spin without actually having to install it, we have created a Virtual Machine with Scalix installed that can be downloaded here.
]]>Unfortunately early versions of WordPress did not specify UTF-8 encoding for the tables created in the database. After the upgrade, UTF-8 was in WordPress but our tables were still in Latin 1 and we got quite a collection of funny characters in some of our postings. Examples include “’” instead of a quotation mark, or  in the middle of some whitespace.
After searching for a while we found the solution at bawdo2001’s blog:
mysqldump -u root -p --opt --default-character-set=latin1 --skip-set-charset DBNAME > DBNAME.sql

sed -e 's/latin1/utf8/g' -i ./DBNAME.sql

mysql -p --default-character-set=utf8 DBNAME < DBNAME.sql
In other words, just dump the database in latin1, swap out latin1 for utf8 in the output SQL and then reimport in utf8. Just make sure you get a good backup of your database in a separate file before you start reimporting.
]]>
When adding the driver, beware of what version you’re selecting. After banging our heads in the wall for a while, we realized that we picked the wrong version. On Mac OS X 10.5.6 (with all latest updates installed) the version you’re looking for is the ‘JDBC3′ branch (assuming you’re using the java version that comes with OS X). Once we figured this out, the installation was easy. First, download this file. Then you need to move it into the ‘lib’ folder in iReport.
If you’re a console user like us, here are the steps:
cd iReport-3.0.0/lib
wget http://jdbc.postgresql.org/download/postgresql-8.3-604.jdbc3.jar
Easy as pie.
]]>Almost exactly a year ago, we wrote a similar article on how to fix the launcher in version 2.0.x. While I’m sure Jasper improved iReport a lot during this time, they also managed to break the launcher in new ways with version 3.0.0.
This is how you can get it working (assuming you’ve downloaded it):
tar xvfz iReport-3.0.0.tar.gz
cd iReport-3.0.0/bin
awk ‘{ sub(“r$”, “”); print }’ startup.sh > startup2.sh
chmod +x startup2.sh
./startup2.sh
The commands above fixes two problems with the launcher. First we convert the line feed from DOS format to UNIX format (the awk-part). The second problem was that the launcher was not executable. If you just make the original launcher executable (chmod +x startup.sh), you will end up with this:
-bash: ./startup.sh: /bin/sh^M: bad interpreter: No such file or directory
Good luck, and have fun generating all those new cool reports.
]]>While the setup we described in these article worked out great, there were a few things that we didn’t really like about the setup:
- We connected with SSH from the Cacti server to the server we wanted to monitor (security issue).
- We were using regular SSH tunnels. While these are great, they do have a tendency to die (reliability issue).
- Due to security and portability, we wanted to isolate Cacti to a separate server (or VM).
1. Turning the tunneling around
The reason why we didn’t like to have the Cacti server connecting to the servers was simply that we needed one more user account on the remote servers. If these are production servers, it’s desirable to keep the publicly accessible user accounts to a minimum.
As it turned out, replacing the ‘-L’ with a ‘-R’ in the tunneling command turns the tunnel around. Instead of opening a port on the local machine, it opens a forwarded port on the remote server. By doing this, we can connect from the remote server to the Cacti server and still fulfilling the same purpose (but without creating an additional user on the remote server).
2. Creating more reliable tunnels
One of the major problems we were having with the setup was that the tunnels died for one reason or another. We initially solved this by writing a bash-loop that automatically reloaded the tunnel if that occurred. However, we were still experiencing some problems with dead tunnels.
The solution to the problem was autossh, a simple front-end to SSH that keeps the tunnel alive.
With autossh, we could simply launch the tunnels at boot-time on the remote server (in rc.local) without having to worrying about them dying. As we were implementing this on a number of servers, we wrote a small bash-script that launches autossh with the server-specific settings. The script looks like this:
#!/bin/sh
REMOTEPORT=2001
MONITORPORT=29001
/usr/bin/autossh -M $MONITORPORT -q -f -N -R
127.0.0.1:$REMOTEPORT:127.0.0.1:161 [email protected]
This script creates a tunnel on port 2001 ($REMOTEPORT) on the Cacti host (cacti.server.tld) that goes to port 161 on the local machine (in this case, the server we want to monitor).
Isolate Cacti
In order to make our monitoring both more secure and portable, we felt that we wanted to isolate the monitoring to a separate Virtual Machine. This was easily done by creating a new VM under VMware Server. If you’re lazy, there are ready-to-use VMware images to download on the Cacti forum.
Bonus: Monitor several hosts with one tunnel
While reading the Cacti forum the other day, I ran across this article that talks about SNMP Proxies. By adding an extra entry in the SNMP config file, it’s possible for a single host to relay SNMP information about the other hosts on the network. This is very useful if you’re trying to monitor more than one host on the same network, as you don’t need one tunnel per server (beware that this creates a single-point-of-failure though).
Conclusion
After implementing these changes, we feel much more comfortable with our Cacti setup. Not only is it more reliable with more robust tunnels, but it’s also more secure.
The next Cacti-related task we will be looking at is to design custom plug-ins to monitor our own apps.
]]>Go to YippieMove. Fill in your UCSD username and your password in Step 1 and select “Other…” as provider. As Host enter your ACS Server as listed below:
- sdcc3.ucsd.edu
- iacs5.ucsd.edu
- ieng6.ucsd.edu
- ieng9.ucsd.edu
- sdcc12.ucsd.edu
- sdcc13.ucsd.edu
- sdcc15.ucsd.edu
- sdcc17.ucsd.edu
- sdcc21.ucsd.edu
- popmail.ucsd.edu
- ucsd-exchange.ad.ucsd.edu
- mail.ucsd.edu
- icogsci1.ucsd.edu
- sgva-serv1.ucsd.edu
- man104-1.ucsd.edu
- imusic1.ucsd.edu
- phcomp.ucsd.edu
- bioinf.ucsd.edu
Check the check SSL and click next
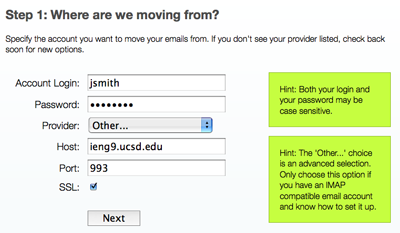
That’s it, Step 2 and Step 3 will be as normal.
]]>
Stryker:iReport-2.0.3 2 siker$ chmod a+x iReport.sh

Stryker:iReport-2.0.3 2 siker$ ./iReport.sh

Exception in thread "main" java.lang.NoClassDefFoundError: 2
I fooled around with the script for a while. Seeing that it was trying to generate its class path using creative uses of dirname on the first script argument, I figured that maybe it’d help to run the program with the full path specified like so:
Stryker:iReport-2.0.3 2 siker$ "`pwd`/iReport.sh"
That didn’t do it though. After looking at the script some more I realized they were pretty lax with quoting. That was it. Moving the software to a location without spaces in the path solved the problem and made iReport start up just fine.
Stryker:iReport-2.0.3 2 siker$ cd ..

Stryker:Downloads siker$ mv iReport-2.0.3 2 ~/iReport

Stryker:Downloads siker$ cd ~/iReport/

Stryker:iReport siker$ ./iReport.sh
Hope that helps someone running into the same problem. I would post a bug report but I saw someone was two steps ahead already and had created a clickable Mac application and submitted a build file. That’s clearly the preferable solution.
]]>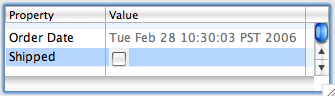
An unsightly gray checkbox background.
I came up with this hack to hack the hack to work.
private Image makeShot(Control control, boolean type)
{
	// Hopefully no platform uses exactly this color
	// because we'll make it transparent in the image.
	Color greenScreen = new Color(control.getDisplay(),
		222, 223, 224);

	Shell shell = new Shell(control.getShell(),
		SWT.NO_TRIM);

	// otherwise we have a default gray color
	shell.setBackground(greenScreen);

	Button button = new Button(shell, SWT.CHECK);
	button.setBackground(greenScreen);
	button.setSelection(type);

	// otherwise an image is located in a corner
	button.setLocation(1, 1);
	Point bsize = button.computeSize(SWT.DEFAULT,
		SWT.DEFAULT);

	// otherwise an image is stretched by width
	bsize.x = Math.max(bsize.x - 1, bsize.y - 1);
	bsize.y = Math.max(bsize.x - 1, bsize.y - 1);
	button.setSize(bsize);
	shell.setSize(bsize);

	shell.open();
	GC gc = new GC(shell);
	Image image = new Image(control.getDisplay(),
		bsize.x, bsize.y);
	gc.copyArea(image, 0, 0);
	gc.dispose();
	shell.close();

	ImageData imageData = image.getImageData();
	imageData.transparentPixel = imageData
		.palette.getPixel(greenScreen.getRGB());

	return new Image(control.getDisplay(), imageData);
}
The result now looks like the picture below.
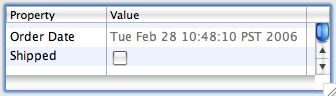
It’s not pixel perfect but closer.
It’s based on Florian Potschka’s version of makeShot as found in the comments to the original post. Replacing your makeShot method with the one above makes the background of the checkbox transparent. It’s not perfect: we use a random near white background color as our ‘green screen’ color in order to get the right antialias color in the edges. But this will also make any pixels with exactly this color inside of the widget shine through. Hopefully there won’t be many. Given enough time somebody will add checkbox support to arbitrary table cells in SWT and this hack will be made obsolete.
Here’s the complete snippet (untested):
package de.fhmracing.glasseye.canexplorer.gui.transmit;

import org.eclipse.jface.resource.JFaceResources;
import org.eclipse.jface.viewers.ColumnLabelProvider;
import org.eclipse.jface.viewers.ColumnViewer;
import org.eclipse.swt.SWT;
import org.eclipse.swt.graphics.Color;
import org.eclipse.swt.graphics.GC;
import org.eclipse.swt.graphics.Image;
import org.eclipse.swt.graphics.Point;
import org.eclipse.swt.widgets.Button;
import org.eclipse.swt.widgets.Control;
import org.eclipse.swt.widgets.Shell;

public abstract class EmulatedNativeCheckBoxLabelProvider extends
    ColumnLabelProvider {
  private static final String CHECKED_KEY = "CHECKED";
  private static final String UNCHECK_KEY = "UNCHECKED";

  public EmulatedNativeCheckBoxLabelProvider(ColumnViewer viewer) {
    if (JFaceResources.getImageRegistry().getDescriptor(CHECKED_KEY) == null) {
      JFaceResources.getImageRegistry().put(UNCHECK_KEY,
          makeShot(viewer.getControl(), false));
      JFaceResources.getImageRegistry().put(CHECKED_KEY,
          makeShot(viewer.getControl(), true));
    }
  }

  private Image makeShot(Control control, boolean type)
  {
    // Hopefully no platform uses exactly this color because we'll make
    // it transparent in the image.
    Color greenScreen = new Color(control.getDisplay(), 222, 223, 224);

    Shell shell = new Shell(control.getShell(), SWT.NO_TRIM);

    // otherwise we have a default gray color
    shell.setBackground(greenScreen);

    Button button = new Button(shell, SWT.CHECK);
    button.setBackground(greenScreen);
    button.setSelection(type);

    // otherwise an image is located in a corner
    button.setLocation(1, 1);
    Point bsize = button.computeSize(SWT.DEFAULT, SWT.DEFAULT);

    // otherwise an image is stretched by width
    bsize.x = Math.max(bsize.x - 1, bsize.y - 1);
    bsize.y = Math.max(bsize.x - 1, bsize.y - 1);
    button.setSize(bsize);
    shell.setSize(bsize);

    shell.open();
    GC gc = new GC(shell);
    Image image = new Image(control.getDisplay(), bsize.x, bsize.y);
    gc.copyArea(image, 0, 0);
    gc.dispose();
    shell.close();

    ImageData imageData = image.getImageData();
    imageData.transparentPixel = imageData.palette.getPixel(greenScreen
        .getRGB());

    return new Image(control.getDisplay(), imageData);
  }

  public Image getImage(Object element) {
    if (isChecked(element)) {
      return JFaceResources.getImageRegistry().get(CHECKED_KEY);
    } else {
      return JFaceResources.getImageRegistry().get(UNCHECK_KEY);
    }
  }

  protected abstract boolean isChecked(Object element);
}
Hope it’ll help somebody.
]]>The good news is that Leopard comes with PHP 5 built in. The bad news is that PEAR is not included, which is needed to install symfony in the most convenient way.
My first attempt to remedy the situation was to run the darwin ports package manager to install pear:
Unfortunately there were two problems. First of all, the version of pear that comes with darwin ports does not use the OS X version of PHP by default, but rather looks for the PHP darwin port. This was easily remedied by adding export PHP_PEAR_PHP_BIN=`which php` to /etc/profile but unfortunately that’s not enough. The second problem is that a few files seems to be missing in the darwin port of PEAR and you’ll get the following error when you try to install symfony:
PEAR_Downloader::require_once(Structures/Graph.php): failed to open stream: No such file or directory in Downloader.php on line 1230
Indeed, even running pear install Structures_Graph results in this error message.
The Solution
This blog suggested go-pear.php as an alternative way to install PEAR on the Mac and it does work. So with no further ado, this is how to install symfony on Leopard:
pear channel-discover pear.symfony-project.com pear install symfony/symfony
Good luck with your Leopard powered symfony hacking.
]]>