Introducing YippieMove '09. Easy email transfers. Now open for all destinations.

I think it’s fair to say that few people outside of Google have more experience of working with Google’s IMAP implementation (GIMAP) than we have. Since we launched YippieMove more than six months ago, we’ve performed a lot of transfers to Google using IMAP. Truth be told, we’ve spent a lot of time trying to find workarounds for bugs in Gmail IMAP implementation. In this brief blog-post, we will explore two bugs that we’ve reported to Google, but which Google seems to have little interest in fixing.

Inconsistency between SELECT and CREATE

The first bug might not be very juicy but it took us a while to recognize it. What we first thought was a bug in our system turned out to be a bug in GIMAP. As it turns out, in GIMAP, SELECT is case sensitive, while CREATE is not. Here’s a brief example to illustrate the bug:


0001 SELECT "INBOX/Sales Invoices"
0001 NO Unknown Mailbox: INBOX/Sales Invoices (Failure)
0002 CREATE "INBOX/Sales Invoices"
0002 NO Folder name conflicts with existing folder name. (Failure)

In this case, there is already a folder named ‘INBOX/Sales invoices’, but since SELECT is case sensitive, and CREATE is not, we were unable to select the folder and with an upper case ‘I’ and at the same time unable to create the folder.

We first encountered this bug when a user migrated from a case sensitive IMAP server to Gmail. Hence we could have two folders named ‘foo’ and ‘Foo’ without it being any problem until we tried to copy those to Gmail.

Rejection of random messages

The next bug is of far more serious nature and it is a bug that we run into everyday. We’ve spent a significant amount of time trying to narrow down this problem, but almost entirely without luck. What happens is that GIMAP decides to reject certain emails. Sometimes the upload works when retrying later, sometimes not. To make this even more interesting, GIMAP can reject emails that it just gave us. For instance, let’s say we’re copying messages from [email protected] to [email protected]. Even that a GIMAP just gave us a particular email, another GIMAP server rejects the same email. Strange, isn’t it?

When I said that we’ve spent a serious amount of time trying to narrow down the problem, I was not kidding. We’ve done statistical analysis on tens of thousands of messages trying to find some kind of pattern (including trying to find a correlation between the content in the header and the body), and still no luck.

That said, the failure rate is quite low. Out of all the messages we upload, only a small fraction gets rejected (a quick database query reveals that it’s currently at 0.04%). And if a message gets rejected, we clearly state what message we failed to upload in the Transfer Report that we send out to our customers upon completion.

In Google’s defense, they do state that they do not officially support ‘upload of messages,’ but that is a quite weak argument, as pretty much any other IMAP-enabled service on the market supports this. Not to mention that without APPEND, simple drag and drop operations may fail in email programs.

For the curious geeks reading this article, our software does comply with RFC 3501, as well as other related RFCs.

As a side note, we’re not the only ones experiencing the APPEND bug. The Google Group discussion for Gmail IMAP and POP is full with threads regarding this. The only official-looking response given multiple times by wár17 § is to upload in small batches as you otherwise is likely to hit the bandwidth limit. However, we can testify that this is not the case as the number of messages and the size of the mailbox seem to have little effect. We’ve had this problem with small mailboxes (<10 messages and only a few hundred bytes) and at the same time had mailboxes that exceed several Gigabytes running through flawlessly.

Update: While it seems like the rejection of emails is somewhat random, there are certain emails that are more likely to get rejected. The other day we ran a transfer of a folder including 600-something bounced messages. They were all rejected.

Author: Tags: , , ,
Introducing YippieMove '09. Easy email transfers. Now open for all destinations.
Jan
28.
Comments Off
Comments
Category: Technology

We recently had to decide on a configuration format for one of our internal utilities. In this post I’ll talk a little about why we picked YAML as the format and the reasoning behind it.

WireLoad has a couple of servers, each running a number of different services. For a long time we had almost one backup script per service, all hand hacked in bash to fit the requirements of the application. This wasn’t great because it meant we repeated a lot of work. To make the situation a little more manageable we developed BackupWire, a simple backup utility in a single file with a minimal number of dependencies.

The design goals of BackupWire were,

  • Minimal footprint: BackupWire shouldn’t be much heavier than the bash scripts we already had. Why? Because if it was huge and difficult to deploy we might end up writing little bash scripts instead!
  • Minimal dependencies: BackupWire should not have many dependencies. This is for the same reason as in the previous point. BackupWire needs to be easy to install.
  • Readable configuration: One of the problems with bash scripts is that once they’re a little complicated it gets hard to see what’s happening. BackupWire’s real purpose is to alleviate that headache by distilling most backup jobs down to a few lines of configuration.

In order to make everything dead simple the configuration was stored in the BackupWire script itself. This would make it easier to relocate the script, and it would decrease the chance that a config file was not found due to things such as the cron environment being sparse. However, this design decision made it hard to update the script with new versions. In addition, the configuration format became a little cumbersome because it was just a set of Python class instantiations. Hence this feature went against the third design goal of BackupWire. The latest version now uses a configuration file instead.

Thinking that the world really doesn’t need another arbitrary configuration syntax, I wanted to pick a standardized configuration format. So I read up on Wikipedia’s entry on configuration files and found the top three contenders: Lua, XML and YAML.

Lua, being a programming language these days, looked like it would add too many dependencies to BackupWire. BackupWire is written in Python, which we already have on all servers, but Lua we don’t use for anything else so it would be a new requirement which would have to be installed on each server. Also, it just struck me as a little excessive to have a full blown second programming language as a configuration format unless the application was really complex.

The other problem with Lua was that googling Lua config tutorial didn’t really give that many good results, making me think that perhaps the focus of the language has shifted from configuration to something else over time.

XML was immediately off the table, perhaps obviously to some of our readers. Most importantly XML is not a very readable language with it’s abundance of symbols and markup. But also, it’s not very easy to write for the same reason. The people behind Django’s documentation put it best when they said, “Making humans edit XML is sadistic!”

YAML is readable and easy to write both. There is also a light weight Python module called PyYAML to read the format. Using YAML the new BackupWire configuration files are definitely to the point and concise without being complicated to edit. Here is an example of the new configuration format we developed in YAML syntax:

name:       "Sample Backup"         
to:         "/backup/"                   
frequency:  "daily"                 

tasks:
 - run: 
   command: 'df -h'
   log_output: True
 - archive:
   name: "etc.tbz"
   contents: ["/etc/", "/opt/etc/"]
 - archive:
   name: "tmp.tbz"
   contents: [ "/tmp/" ]
# Dump a database using a run task with 
# %(targetFolder)s to locate the destination.
 - run:
   command: 'mysqldump --quick --extended-insert 
     --compact --single-transaction 
     -u backup --databases sample 
     | bzip2 >%(targetFolder)s/mysql-sample.sql.bz2'
---

Not too bad as far as readability goes and all standardized YAML to spare the world from yet one more syntax.

Author: Tags:
Introducing YippieMove '09. Easy email transfers. Now open for all destinations.

If you’re a regular here at Playing With Wire, you’ve probably already read our articles about Cacti. While Cacti does do a great job on visualizing load on your servers, it does not provide (by default) alerts when a server goes down.

When we launched YippieMove we quickly realized that we needed a reliable 3rd party that could ping our servers from several locations across the globe to ensure that we were not experiencing any problems with the access to our site. As we are quite tech-savvy here at WireLoad, we had a hard time justifying paying more than a few bucks per months for a service like this, since the service is so easy to write (we actually did write our own uptime-monitor with alerts a few years back using Curl, Crontab and some other tools, but would rather outsource this service).

So the search began. We required a few thing for this service:

  • Several servers across the globe that ping our servers.
  • Cheap. Preferably free (we don’t mind some ads).
  • Decent statistics showing response-times etc.
  • Reliable alert system by e-mail (luckily most US Cell providers allow you to send email to your phone, using [email protected].)
  • Must allow monitoring of both SSL and non-SSL servers.
  • A minimum of 4 monitors (we needed to monitor playingwithwire.com, wireload.net, yippiemove.com [with and without SSL]), but it would also be great if we could monitor our mail-server.
  • The more frequent the pings the better.
  • No back-links required.

One of the most impressive sites we found was Pingdom, a small Swedish firm that is trusted by companies such as IBM, Loopt and Twitter (wow, they must spend more bandwidth on alerts than pings with Twitter for sure). What we really liked about Pingdom was the general look and feel of their site. It feels fresh, responsive and reliable. The pricing is definitely within reason: they charge $9.95 for their Basic plan, which includes 5 checks and 20 SMS.

The next site we stumbled upon was SiteUptime. The site has a decent look and feel (but does not come close to Pingdom). After examining their pricing, we realized that we needed their Advanced plan, since none of their lower plans allowed SSL monitoring. The price for this plan is $10 per month. While their site and visualization does not come close to Pingdom, they do give you 10 monitors, as apposed to 5 monitors with Pingdom, with their Advanced plan.

Another site we found was Pingability. The general look and feel of the site is OK, but the service offered was not great. The free plan requires a back-link (which we think is unacceptable for a professional site). At the same time the premium service, for $9.95, only offers one monitor.

Next up for review is Wormly. Priced at $9 per month, their Bronze-plan seems to be a reasonable alternative. The plan includes 5 monitors and they ping your server 5 times every 5 minutes, which is good enough. Unfortunately there’s a big ‘but’ — no SSL monitoring (at least as far as we can tell). That’s a deal-breaker. To Wormly’s defense though, they do offer something that sets them apart from the competition, namely the ‘Server Health Monitor.’ This service is something similar to Cacti (it definitely looks RRDTool-based), that visualizes server-load. However, they will probably have a hard time selling this service to security-concerned organizations, as they require a monitoring-client to be installed on the server (it’s hard to get this data otherwise).

Basicstate is the final service we will cover in this article. A lot can be said about Basicstate’s web design (it’s _really_ bad). However, they do offer a very competitive service. They ping every 15 minutes and allows you monitor as many sites as you want (including SSL). While it might not be a very pleasing site to browse, they do offer sufficient statistics (with graphs) on their site. In addition to that, they also send you daily reports about all your monitored sites (with time data for dns, connect, request, ttfb, ttlb). The only drawback we discovered with Basicstate is that you cannot monitor the same domain-name with SSL and non-SSL (sub-domains is fine though). This may or may not be an issue for you.

The verdict? We settled for Basicstate. Later on, as we grow, we might consider switching to Pingdom. We’re happy with Basicstate for now. Although we did experiencing some false alerts, the guy who runs the site (I assume), Spenser, did a great job on providing an in-depth explanation to the alerts by email. So if you’re on a tight budget, Basicstate is our recommendation. If you have more money to spend, go for Pingdom.

Author: Tags: ,
Introducing YippieMove '09. Easy email transfers. Now open for all destinations.

Over the last few days, iPhone unlocking has seen a couple of sharp turns. First iPhoneSimFree promised to deliver a commercial solution to unlock your iPhone. Then they hesitated and decided to become a wholesale only company, further delaying their release. Ultimately, they missed the train and the hacking community stepped in (Free iPhone unlock supposedly pending (Updated x2)), and released a free hack: iUnlock by the iPhone Dev Team (no association with Apple).

The box for a 4GB iPhone.Since vendor lock-in is never a good thing for the customer, the release of this software is great news. And as fans of the free market may be aware, cell phone unlocking is legal. But does it work? Playing With Wire decided to find out. We picked up a 4GB Apple iPhone, headed out on the internet and soon found a great unlocking tutorial at modmyiPhone. The guide is Mac specific, but we also stumbled across unlock.no which appears to offer a guide for Windows users – we didn’t try it though.

The Unlock Process

The process is a little bit lengthy but everything is done using simple graphical tools. For starters, you need to make sure your iPhone is entirely up to date. iTunes does this for you after you trigger the ‘recovery mode’ of your iPhone, by pressing Sleep and Home for 25 seconds.

iPhone in recovery mode.
The iPhone in recovery mode.

Once you’re in recovery mode you can just connect the iPhone to your computer and iTunes will offer you the option of restoring the phone. Prepare yourself for the first of a couple of lengthy downloads – for us iTunes downloaded 96 MB of software updates (we used iTunes 7.4.0 and iPhone Firmware 1.0.2 for this article). When it’s all done, iTunes will tell you so and you can close down the application.

So now we had an updated but not yet activated iPhone. The Mac application “iNdependence” makes activation a breeze, but this is where the second lengthy download comes into the picture as you have to download the firmware a second time. We did run into a minor snag: when we followed the instructions on the page we couldn’t get the activation to work on our first attempt. Disconnecting the phone, restarting iNdependence and then reconnecting the phone took care of it though – iNdependence unlocked the phone without complaint. Voila, now we had an iPhone that was basically like Apple’s latest iPod, the iTouch: it could play music and video, but it couldn’t make phone calls.

iNdependence activating an iPhone.
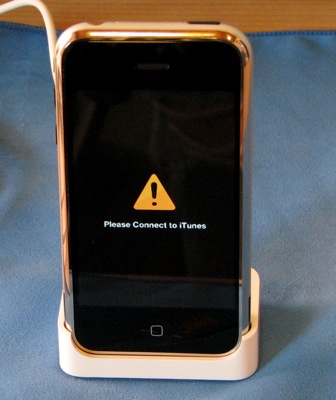
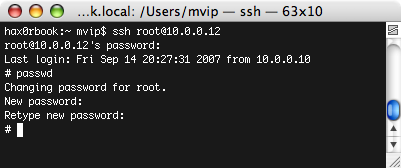
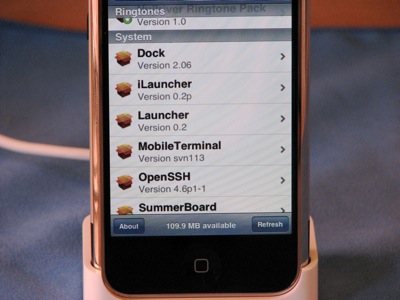
This is where the Unlock application comes into play. To actually get it onto the phone, you need SSH installed though. Just like the guide says, the AppTapp application allows you to install third party software on your iPhone. We ran into trouble here though: when we ran AppTapp we got an indefinite progress bar. We waited a good 15 minutes for the application to finish, but it never did. What’s worse, our iPhone locked up in ‘recovery mode’ and could no longer be started. We realized that we had left iNdependence running from the previous step, and perhaps this application conflicted with the AppTapp installer. Regardless of the reason, the iPhone was dead at this point.

AppTapp making no progress.
AppTapp never got any further than this for us.

We restarted the iPhone and connected it to iTunes to restore it to factory settings. We were horrified as iTunes crashed very early on in the process. We mentally readied ourselves for creating our own Will It Blend episode, thinking the phone was a goner. Luckily after a full reboot of both the computer and the phone, the software reset went through.

We were back to square one, and had to go ahead and again activate the phone with iNdependence and then go for a second attempt at installing AppTapp. To be on the safe side, we downloaded the most recent version of AppTapp from its homepage. We made sure iNdependence was turned off.

This time we got an error message instead – something about a boot strapping process failing and a reference to the console. So we pulled up Console.app (/Applications/Utilites/Console) and took a look. To our surprise, the iPhone installer software was still working despite the error message.

AppTapp is reporting stuff in the Console.
Look! Something is still installing.

A couple of minutes later the phone restarted and all was well. The Installer icon appeared on the iPhone desktop and we could install the required software as described in the guide.

Installer.app on the iPhone.
Some of the applications the AppTapp Installer can install.

An activated iPhone with it’s SIM card removed.In the final part of the guide, the actual Unlock software is installed using SFTP. The guide recommends transferring the application bundle using Cyberduck, but we figured any SFTP client would do it. We had Panic’s Transmit installed, which worked just fine. After copying the files as instructed, and restarting the phone one more time, we finally had the Unlock icon on the iPhone desktop. It was time to install our T-Mobile SIM card and hope for the best.

25 minutes later we were making T-Mobile phone calls.

Notes and Observations

During the above process SSH was installed on the iPhone. This allows anyone who knows the default root password to log into your iPhone and do anything they want, as long as the phone is on a wireless network. We strongly recommend that you change your password as soon as possible using the ‘passwd’ from an SSH session.

With the same IP as before, SSH in using Terminal and run ‘passwd’ to change the root password.
Using SSH to change the default password (dottie).

So far, our iPhone has worked very well with T-Mobile. Initially there was an artifact ‘missed call’ icon hanging around over the Phone icon – a red circle in the upper right corner of the phone. Obviously, visual voice mail isn’t enabled as that’s an Apple and AT&T special feature, but the voice mail indicator works. When you press the icon, the phone calls your voice mail like a regular cell phone would.

Verdict

The Unlock application works just as advertised. Including the time it took us to take photographs and the time we spent resolving our few problems, the whole unlocking process took no longer than 2 hours. At no point was a non graphical tool needed, which surely will come as a relief to some users.

Unfortunately, the process is not entirely simple even with the graphical tools, since there are several opportunities to brick the phone or otherwise get tripped up. Still, if you feel confident with your technical abilities, and you don’t feel confident in AT&T’s cell phone abilities, this is the tool you’ve been waiting for. The iPhone is free.

Author: Tags: , ,
Introducing YippieMove '09. Easy email transfers. Now open for all destinations.

At least in my personal opinion, one of the strongest trends seen at the LinuxWorld expo in San Francisco over the last years has been virtualization. This year many exhibitors had taken the next step and were actually using VMware products on their exhibit computers to simulate a number of servers in a network. For instance, Hyperic demoed their systems management software with a set of virtual servers.

Whenever virtualization comes up, the idea of grid computing isn’t far away as enterprises wish to maximize server utilization by turning their data centers into grids that each deliver the ‘services’ of CPU, memory, ports and so on. But in this brave new world of virtual machines and grid processing there is an element missing. If you’re moving your computing over to a grid computing model, why is there no corresponding grid storage model?

The commercial open source startup Cleversafe has that corresponding model. By employing a mathematical algorithm known as an Information Dispersal Algorithm, found in the cryptographic field of research, Cleversafe separates data into slices that can be distributed to different servers, even across the world. But it’s much more than just slicing and dicing: the algorithm adds redundancy and security as it goes about its task. When the algorithm is done, each individual slice is useless in isolation, and yet not all slices are needed to reconstruct the original data. In other words, your data is safer both in terms of security and in terms of reliability.

Cleversafe is not the first entity to come up with such a scheme. The idea of an Information Dispersal Algorithm is known from Adi Shamir’s paper ‘How to Share a Secret’ and other publications. When we met up with Cleversafe’s Chairman and CTO Chris Gladwin at LinuxWorld, he mentioned that the Information Dispersal Algorithm had been used in many applications before – even to store launch codes for nuclear weapons securely.

The scheme is different from a simple parity scheme in that you can configure how many redundant pieces you want. With parity as found in common RAID setups, you can lose any one storage unit in the set. With an Information Dispersal Algorithm, you can make your system resistant to failure or corruption of any one, two or indeed any number of units in the set. If there’s a strike in your data center in Texas, and your German data center is on fire, your data will still be fully accessible through the remaining servers provided you began with a sufficient number of servers. And as opposed to the brute force solution of multiple mirrors of the data, the dispersal algorithm has a much smaller overhead.

Google is a well known proponent of the brute force solution: the Google File System implementation suggests that the best method to keep your data continuously available is to keep three copies of it at all times. Cleversafe is a smarter system. If you have 16 slice servers (known as pillars in Cleversafe terminology) with a redundancy of 4 slices (known as the threshold) you can lose up to four servers simultaneously and still retain your data. At the same time the total overhead in storage space is only 4/12 – 33% of the space. The advantage as compared to Google’s three copies method is clear: with three copies you only protect yourself against the failure of any two servers and yet you pay a much greater price with a total of 200% storage and bandwidth overhead. And that’s not all. While you’re storing two additional copies of your data, you have effectively tripled the risk of that data being stolen. When a careless system administrator forgets the backup tapes in his car over night and the car gets stolen, all those credit card numbers or what have you will be out in the wild, even that only one out of three locations was compromised. In our Cleversafe example, 12 separate servers would have to simultaneously be compromised – quite unlikely by comparison.

Cleversafe is not alone and there are other actors on the software market such as the PASIS system. PASIS’ home page describes functionality very similar to Cleversafe’s: “PASIS is a survivable storage system. Survivable storage systems can guarantee the confidentiality, integrity, and availability of stored data even when some storage nodes fail or are compromised by an intruder.” None the less, Cleversafe appears to be a step ahead of its competitors at this time and is poised to be the first to deliver grid storage to a wider market.

While the Cleversafe software is developed as open source through the Cleversafe Open Source Community at cleversafe.org, there is a commercial company behind Cleversafe: Cleversafe, Inc. Cleversafe, Inc. plans to generate revenue by offering a storage grid for rent based on the Cleversafe technology. “The market for a more secure, more cost effective storage solution is enormous,” says Jon Zakin, CEO of Cleversafe in a press release issued in May.

The Cleversafe project is available as Open Source under the GPL 2.0 License. The version online is apparently an early alpha version and is not ready for production use. According to Mr. Gladwin, there will most likely be a new version within a month, and sometime in the beginning of the next year Cleversafe may be ready for production use. In the meantime, you can download the current alpha version of the software at the Cleversafe Open Source Website. You can read more about the algorithm at Cleversafe.org’s wiki, and there’s also a flash video describing the idea available.

Author: Tags: , , , ,

© 2006-2009 WireLoad, LLC.
Logo photo by William Picard. Theme based on BlueMod © 2005 - 2009 FrederikM.de, based on blueblog_DE by Oliver Wunder.
Sitemap