Introducing YippieMove '09. Easy email transfers. Now open for all destinations.

Writing a business plan is an important step in founding your business. Not only is it a required part if you’re going to raise capital, but it’s also very useful since it forces you to research your competitors and the environment you will operate in. As you may or may not know, the by far most important part of you business plan is the Executive Summary. Document

Recently I attended a seminar about executive summaries, delivered by Steve Foster, Partner at Texas Pacific Group Ventures with long experience from the VC industry. The focus of the seminar was executive summaries, but Foster also shared an insider’s view on what VCs actually value when they chose what company to invest in.

Most people with some business experience have some idea of what goes into an executive summary. Although the information that goes into the executive summary might slightly differ between industries, the main objective is always to summarize your business idea in such way that an investor will be enticed to invest in your company.

So how long is an executive summary supposed to be? Traditionally most people say that it’s supposed to be about one page. According to Foster, he would rather see a three to four pages long executive summary, since it’s too hard to summarize all the information in a single page.

How do you get a VC to choose your company over the rest in the huge pile they’re reading through? Well, let’s face it, it’s very unlikely that an investor will get through even your executive summary and much less the rest of your business plan. If you fail to grab the attention of the person reading the executive summary within the first five seconds, it’s quite likely that he or she will stop right there and move on to the next project. One of the more interesting ideas that Foster suggested was to not to play by the rules. Imagine if you were personally going through maybe hundred executive summaries per day: it’d become quite boring with the typical layout and design. Therefore, it’s crucial to find ways to stand out from the crowd. Here it’s more important to use your imagination than what’s considered standard. Don’t only use blocks of text, but rather combine it with quotes, graphs, tables, bullet points and so on.

Now let’s just assume that you managed to get a person at the VC firm to read through your executive summary. When they read through your executive summary, there are a couple of things that they will look for:

References

Who referred you? This is the single most important element. If you have a personal recommendation from someone within the VC’s network, you’re far more likely to be considered than if you just cold call.

Don’t e-mail

We in the tech industry have a tendency to do all kind of communication through e-mail. However, when it comes to sending your executive summary, this is simply a big no no. You’re up to tough competition, and the fact that it takes more energy to open up an attached document than it is to briefly skim over a piece of paper plays an important role here.

Is there a market?

Is there a significant market for your product or service?

Is there room for a VC-backed venture in the market?

This relates to the previous point, and relates to the size of the market. Is the market really large enough to hold a VC backed company?

Is there urgency?

What is the team composition?

According to the presenter, the optimal team composition in the tech industry consists of one programming/tech genius and one business person who knows how to apply the technology to the market.

Ok, so now you know what to include in your executive summary and how to increase your odds of being selected. Next you might wonder if there’s any good or bad time to submit your executive summary to a VC firm. The answer is yes. Generally you should try to avoid the summer, since many VCs are out of town. Also try to avoid submitting before a major holiday. Conversely, it’s a plus if you get your executive summary read the day after major holidays, since people tend to be in a better mood then. Another time to target is January, since that’s when people come back from their long Christmas break with more energy than when they left.

This was part one in the series “Raising Capital.” In the next part we will dive deeper in how to write your actual business plan. Stay tuned…

Author: Tags: ,
Introducing YippieMove '09. Easy email transfers. Now open for all destinations.
Mar
28.

In the past I have used MoinMoin Wiki for my wiki needs, with great success . MoinMoin Wiki is very easy to set up and doesn’t have all too fancy requirements on the server side. The other day I was setting up a new wiki, and unlike my previous wiki projects this one would be facing the public. In order to get the syntax, template system and features most people recognize I went with the famous, Wikipedia powering MediaWiki software instead.

MediaWiki requires much more manual work to install than MoinMoin Wiki. Unfortunately, I was unable to find a comprehensive guide detailing how to go from scratch to fully operational wiki. There is the Installation Guide which details the basic server setup. It then redirects you to two pages: one on configuration and one on administration. Most of these documents are fine but at the time of this writing the ‘configuration’ document is fairly empty and I was left wondering about many configuration options. Hence this guide which will try to tie together all the things you need in order to get up and running.

To keep things moving this guide will be written at a fairly advanced level. If you don’t feel comfortable installing server side software you may want to check out some of our other How To’s for inspiration.

These instructions are suitable for FreeBSD 5.3-RELEASE-p37 and MediaWiki 1.9.3, although you will probably find it useful regardless of the platform and MediaWiki version you use.

Basic Installation

This part is covered very well by the Installation page of MediaWiki. Here’s the super condensed FreeBSD take on installation:

To install MediaWiki in FreeBSD,

# cd /usr/ports/www/mediawiki
# make install

This will install MediaWiki into /usr/local/www/mediawiki/, by default. You will probably want to copy this installation to some other folder since MediaWiki changes files in its installation folder during use.

# cp -Rf /usr/local/www/mediawiki /www/mywiki

Then,

  1. Make sure the config folder is writable by the httpd user (www usually).
  2. Set up your web server to serve pages from the location.
  3. Surf to your new wiki. You will be prompted to go through an installation procedure. This part is very straight forward.
  4. Move config/LocalSettings.php to the root of the wiki installation. You can now delete the config folder.

Now that was the easy part. Here comes the stuff that took a little bit longer to figure out. Thanks to Playing With Wire you’ll be able to do it in minutes! :)

Additional Manual Configuration

The installer does some things but not everything. While many online applications such as WordPress come with fancy online configuration tools, MediaWiki uses more traditional configuration files which you’ll be editing by hand.

Here’s what you’ll need to do:

  1. Copy AdminSettings.sample to AdminSettings.php in the base folder. Edit the new file. The config file requires you to configure a database account for maintenance scripts. Presumably you may use the same account you used for the wiki, although I didn’t run any of the maintenance scripts yet to test this.
  2. Edit LocalSettings.php. This file has been created for you by the installer, so it will contain some good defaults.

LocalSettings.php is the primary configuration file of your new wiki. This file contains the actual basic settings for MediaWiki, and it overrides the defaults found in includes/DefaultSettings.php. You shouldn’t edit DefaultSettings.php directly, but it should be your first stop if you’re wondering what variables you can put in LocalSettings.php.

Linking up the Help Pages

By default MediaWiki ships without help pages. Unless you want to write them yourself you have a couple of options. The option I chose is to simply copy all Help sections from the primary MediaWiki site – they’re released into the public domain. Follow the instructions on Help:Copying to do this.

You may wish to export the following pages:

Help:Contents
Help:Navigation
Help:Searching
Help:Tracking_changes
Help:Editing_pages
Help:Starting_a_new_page
Help:Formatting
Help:Links
Help:Categories
Help:Images
Help:Templates
Help:Tables
Help:Variables
Help:Managing_files
Help:Preferences
Help:Skins
Help:Namespaces
Help:Interwiki_linking
Help:Special pages
Template:PD_Help_Page
Template:Meta
Template:Admin_tip
Template:Prettytable
Template:Hl2
Template:Hl3
Template:Thankyou
Image:Example.jpg
Image:Geographylogo.png
Help:Editing
Image:PD-icon.svg

This is the same list as found on the Help:Copying page at the time of this writing, with the addition of the two last entries.

Notice that Template:Languages isn’t included in this list, although it is referenced from Template:PD_Help_Page. You may wish to edit the PD Help Page template and remove the {{Languages}} part towards the end to get rid of this dependency.

You will have to download and upload the images separately by clicking them and finding their respective file downloads. Upload the images using the normal ‘Upload file’ link from your wiki. The .svg image probably won’t upload by default. We’ll tackle the SVG format later.

Nice URLs

At this point the installer script has probably given you URLs that look like,

http://www.yourdomain.com/index.php/My_Page

(Unless your PHP runs as a CGI script in which case things might even look worse. Don’t run as CGI.)

To make your URLs more readable, you’ll need to configure both your web server and MediaWiki to cooperate. Here’s a good resource: Using a very short URL.

Basically you will want to edit your httpd.conf, if you can do that, or an appropriate .htaccess file, if you have to. Remember that a .htaccess file is slower than httpd.conf. If you can use httpd.conf, do that and disable .htaccess support.

Here’s how to set things up within Apache’s httpd.conf. Edit your Directory entry to resemble the following:

<Directory /www/mysite.com/>
        Options Includes FollowSymLinks

        AllowOverride None

        RewriteEngine On
        RewriteCond %{REQUEST_FILENAME} !-f
        RewriteCond %{REQUEST_FILENAME} !-d
        RewriteRule ^(.+)$ /index.php?title=$1 [L,QSA]

Notice the AllowOverride None line. This is the part that turns off .htaccess support. It’ll give you a bit of a speed boost since your web server won’t have to look for a .htaccess file for every request made.

Next, add this line to LocalSettings.php:

$wgArticlePath = "$wgScriptPath/$1";

Change the Wiki Theme or Looks

MediaWiki’s term for themes is ‘skins’. The default skin looks exactly like Wikipedia, so you may want to change this if you’re looking to achieve a spiffy unique look for your public wiki.

To find out what skins came with your MediaWiki installation, look in your skins/ folder. You will see something like,

# ls skins 
Chick.deps.php          Nostalgia.php           common
Chick.php               Simple.deps.php         disabled
CologneBlue.php         Simple.php              htmldump
MonoBook.deps.php       Skin.sample             monobook
MonoBook.php            SkinPHPTal.sample       myskin
MySkin.deps.php         Standard.php            simple
MySkin.php              chick

From this list you can infer the list of available skins. In this case it looks like we have Chick, CologneBlue, MonoBook, MySkin, Nostalgia, Simple and Standard. The folder names (the lower case names) are the skin names.

To make the change, edit your LocalSettings.php file again and alter the line that reads,

$wgDefaultSkin = ...

In our case we might put,

$wgDefaultSkin = 'cologneblue';

If you make a mistake setting the property you will get a default skin.

You can find more skins here. Each skin is accompanied by instructions for how to set it up. Normally this involves downloading a zip file and unzipping it into the skins/ folder. You may also have to edit theme files to set up proper paths.

Changing User Access Levels

If you want to disable anonymous editing, you can add something like the following to LocalSettings.php:

$wgGroupPermissions['*'    ]['createaccount']   = true; 
$wgGroupPermissions['*'    ]['read']            = true;
$wgGroupPermissions['*'    ]['edit']            = false;
$wgGroupPermissions['*'    ]['createpage']      = false;
$wgGroupPermissions['*'    ]['createtalk']      = true;

For other possible settings, take a look at the defaults provided in includes/DefaultSettings.php. Again, remember not to edit the defaults file: just copy the lines you want to change to LocalSettings.php and make your changes there.

Support for SVG images

The SVG image file format is very useful but turned off by default in MediaWiki. Look in include/DefaultSettings.php and locate the SVG related stuff. For my installation this is what I had to add to LocalSettings.php:

$wgSVGConverter = 'inkscape';
$wgSVGConverterPath = '';
$wgSVGMaxSize = 1024;
$wgMaxImageArea = 1.25e7;
$wgThumbnailEpoch = '20030516000000';
$wgIgnoreImageErrors = false;
$wgGenerateThumbnailOnParse = true;

$wgFileExtensions = array( 'png', 'gif', 'jpg', 'jpeg', 'svg' );

You will also need to install inkscape. There are options to use rsvg, ImageMagick and others instead but none of those options worked for me. Rsvg and ImageMagick didn’t render gradients right, and I was unable to install the other alternatives on FreeBSD without crashes or other problems. This is unfortunate because inkscape is positively enormous if you also consider all the pre-requirements that you normally wouldn’t have to install on a server. It is the one program that does things right though and SVG is a really nice format to have support for.

Conclusion

That’s it. You are all set. Your next steps will probably be to create your own account and then use the Sysop account to turn your own account into an admin account. Happy writing!

Author: Tags: ,
Introducing YippieMove '09. Easy email transfers. Now open for all destinations.

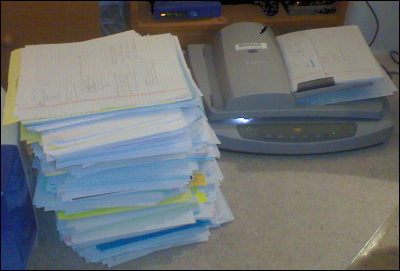
Until a couple of days ago, my bookshelf was filled with binders with old lecture notes from school. The truth is that I don’t think I ever opened one of these binders after I finished the final for the class. Yet, I didn’t want to throw it all away, since it might come handy some day when I want to refresh my memory.

On the other hand these binders really bothered me. They took up space in the bookshelf that I could use for something more useful. So I thought, why don’t I digitalize these papers?

This solution includes:

  • A scanner (preferably with ADF)
  • A software called PDFLab
  • A staple remover
  • Quite a bit of time

You may want to use this guide for the archiving of old:

  • Bills
  • Financial documents
  • Lecture notes
  • Receipts

1. Preparing your documents

Prepare the documents you want to scan. That means figuring out how you want to group your documents and removing the staples. Since I was scanning lecture notes, the grouping was quite simple. Removing the staples is a boring job, but it needs to be done.


Scanning…
In the process of scanning…

2. Scanning your documents

Finder: Jpegs This is the time consuming part. Depending on your hardware, the time the scanning takes varies a lot. With the scanner I was using (HP Scanjet 5590), one paper (front and back) probably took about 35 seconds in 150 DPI. If you have a scanner with ADF, it doesn’t really matter that much if it takes 10 or 40 minutes to scan a pile of papers, since you can go and do something else in the meantime.
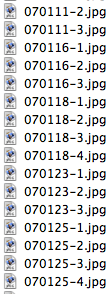
Depending on the software you’re using, the file-output might differ. In the software I was using, the name ‘bus-law_0_0.jpg’ turned out to be working quite well. The first ‘0’ is for the sequence. If for some reason the scanning aborts, you can just continue with ‘bus-law_1_0.jpg’, and the files will still sort in order.

3. Preview and delete blanks

When you’ve scanned in one entire group of documents, select them all and drag them to Preview. Use the arrow-keys to browse through all the documents to make sure they look good. You might want to rotate some documents, or delete some blank pages. I found the shortcut ‘Apple + Delete’ very handy in Preview, since then I can delete the file from Preview, without having to go out in Finder.

4. Convert your documents to a PDF


pdflab.png
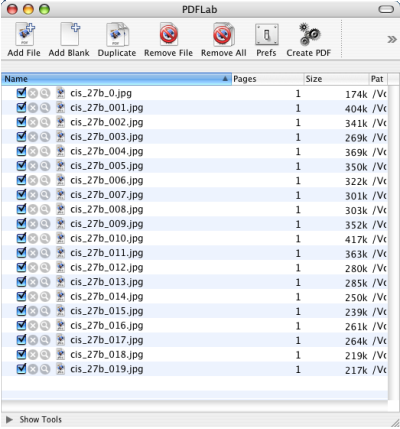
Screenshot of PDFLab

Up to this point you just have a bunch of jpeg files in a folder somewhere. Since this is not very convenient when you browse notes, I wanted to convert every group to a single PDF-file. When doing my research I found a very handy software called PDFLab. The software is a freeware and works really well.

Download PDFLab and fire it up. Now go to the folder where you saved all those jpeg files. Select them all, and drag them to PDFLab. This might take a couple of minutes, depending on your hardware.

When the files are imported into PDFLab, sort them by name by clicking ‘Name’. Now look through the list. If you have file names that go above 100 (‘bus-law_0_0100.jpg’), the sorting might not be done properly, since the file ‘bus-law_0_0103,jpg’ is sorted before ‘bus-law_0_013.jpg’. If you experience this, you need to move around the files manually until they are in the proper sequence.

When you’re happy with the sorting, hit ‘Create PDF,’ and enter an output file-name in the dialog which appears. If the PDF was generated without any errors, you’re all set.

pdf.png If you get an error message when generating the PDF, just hit OK, and try to create it again. If this doesn’t work, try to restart the software.

5. Delete/Backup the image-files

When you’ve made sure that your PDF is working fine, you can either delete you jpeg files or burn them to a CD just to be safe.

That’s it. You can now throw away all those papers into the recycle bin. The best thing is that you’re never more than a couple of clicks away from your documents.


binders.png
Empty binders

6. Drawbacks

This solution is not perfect, but it’s sure better than having all those binders in the bookshelf or in a box somewhere. The main drawback of this is that the documents are not searchable. This could possibly be solved with OCR, but according to my experience, OCR is still not powerful enough to recognize all handwriting. OCR also tend to mess up documents which mix text and images. However, if I was able to scan these documents into a PDF with OCR recognition, this would be the optimal solution, since it would both be searchable and consume less space.

Author: Tags:
Introducing YippieMove '09. Easy email transfers. Now open for all destinations.

Picture of The Definitive Guide to symfony.Symfony is a PHP web development framework, similar to Ruby on Rails. The framework is currently gaining in popularity; a few months ago it was announced that it is used by Yahoo! Bookmarks, for instance. Recently, version 1.0 of symfony was released. A print manual, “The Definitive Guide to symfony” by François Zaninotto and Fabien Potencier, was prepared in conjunction with this major update of symfony.

As the title suggests, the Definitive Guide to symfony is a guide book. Every chapter explores a certain component or part of symfony, ordered in such a manner that someone who hasn’t touched symfony before can easily get started. The book is not a tutorial; even that the chapters are sensibly ordered, the book does not take the reader through the process of developing an application.

The sections of the guide are,

  1. The Basics: An introduction to symfony, who made it and why, and a primer to the underlying technologies used by symfony including PHP itself. Later chapters in the first part delve into an overview of how symfony works and how to set up an application in the framework.
  2. The Core Architecture: This part of the book is essentially a description of the MVC pattern and how it is employed in symfony. The chapters talk about how the Control, View and Model layers work in symfony.
  3. Special Features: If the previous parts are about the foundation of symfony, the Special Features part of the book is really about the bells and whistles of the framework. The routing system, the form helpers, Ajax, caching and internationalization are described here.
  4. Development Tools: A description of the tools and mechanisms in symfony used during the development tools, just like the name would imply. Generators, unit testing and other important tools are described here. Towards the end there is an oddly placed chapter about extending symfony.
  5. Becoming a symfony Expert: This is a very interesting section which gets into performance optimization for symfony. The authors pool some very valuable practical experience about deploying symfony applications into this part of the book.

The book places almost no requirements on the reader. Obviously you will need to know PHP 5, but apart from that the book carefully introduces almost every concept used in the framework. At the same time I don’t think that a more experienced programmer would find the hand-holding excessive – the 450 or so pages went by quickly when I read the book, and I have worked with symfony before.

The book also features a good selection of sample code and examples. This is in line with the general pragmatic feeling of the book. There is no key concept left without an illustrative code sample. Anyone who has worked with symfony and its developers before will recognize this. The official website is absolutely brimming over with code samples, and Mr. Zaninotto in fact even wrote ‘snipeet’, a code snippet repository. The book is right in line with this demonstrate-by-code philosophy.

The book has some shortcomings. The chapter about Generators feels incomplete for one. Ostensibly the chapter is about the automatic generation of code, called scaffolding, that is a common feature for many modern web development frameworks. This kind of generation makes it faster to develop web applications since it creates a foundation (hence the term scaffolding) for building the web application. But the Generators chapter is really hijacked by the automatic admin generation feature of symfony. While this is a very powerful and impressive feature, the very strong focus on this feature may leave the reader wondering about the ordinary, non admin, scaffolding functionality. For example, it is not at all clear how to customize what generated scaffolding should look like. With such a lengthy description about how to customize the generation of the admin interface, the omission of a corresponding general section is conspicuous.

(For the record, this is how to theme or customize the generated scaffolding:

  1. Copy the default theme from

    $sf_symfony_data_dir/generator/sfPropelCrud/default/theme

    to

    data/generator/sfPropelCrud/default/theme

  2. Edit the files in data/generator/sfPropelCrud/default/theme/templates as you would with an admin template.
  3. Generate like usual: symfony propel-generate-crud <app> <module> <base>.

The generated code will be built to specification.)

Another shortcoming of the book is that there are a few instances of bugs in the provided source code. It might have been useful if the authors had taken a day to test-run their code. For example, in the database section, page 156, the following sample databases.yml listing can be found:


all:
  propel:
    class:                sfPropelDatabase
    param:
[...]
      encoding:           utf-8     # Default charset [...]
[...]

When I tested this code I got an error message: Unknown character set: 'utf'. Turns out that “utf-8″ is not the correct identifier – “utf8″ is correct.

These shortcomings are minor though. A few typos are to be expected, and with so much to cover omissions may accidentally be made. All in all the book is a friendly and pragmatic one. The material is described in a light and fluffy way – there is no ‘academic’ dead weight or terse theoretical descriptions, but rather a hands on description about what symfony programming is like. The book can be used both as a primer and as a reference for a person who is not yet a symfony expert.

If you want to know more about the book, you can actually finds its whole contents online. At the time of this writing, the online edition is available at The Definitive Guide to symfony. This is very generous and a great aid when you want to quickly search for something. Curiously enough Apress, the publisher of the book, has a full page ad for an eBook version in the print edition. They charge $10 for this pleasure, which is a bit odd.

Update 1: The original article credited Mr. Potencier with the Snippeet application. Snippeet was in fact written by Mr. Zaninotto. I apologize for the mistake.
Update 2: Jason Gilmore, the book’s editor, wrote to let us know that Apress sells the $10 ebook as an additional means to support GFDL work. Take a look at the comments section below for the full clarification.

Author: Tags: , ,
Introducing YippieMove '09. Easy email transfers. Now open for all destinations.
Feb
11.

For a quite a while I’ve been into the whole GTD movement. I must admit that I never got around to read the actual book which started the whole thing, but I have read a lot about GTD.

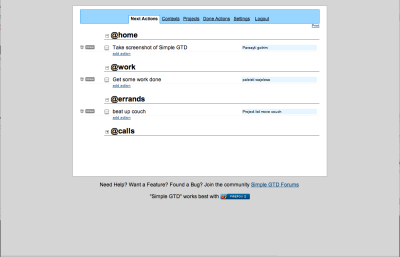
Until recently I used a GTD-plugin to OmniOutliner, which worked quite well. However, I was tired of having to have OmniOutliner running all the time, so I started looking for alternatives. Since we currently live in the ‘Web-based era,’ I looked around for some Web 2.0 GTD web-app. As it turns out, there’s a couple of them, but the one I really liked was Simple GTD. This software is a really clean Web 2.0-looking web-app with a simple user interface. First time you visit the site, you just create you user account, and you’re set. Now you can just start adding you items.
Simple GTD Screenshot
If you’re curious about how Simple GTD works, take a look a this screencast.

Author: Tags:

© 2006-2009 WireLoad, LLC.
Logo photo by William Picard. Theme based on BlueMod © 2005 - 2009 FrederikM.de, based on blueblog_DE by Oliver Wunder.
Sitemap