Introducing YippieMove '09. Easy email transfers. Now open for all destinations.

Over the last few days, iPhone unlocking has seen a couple of sharp turns. First iPhoneSimFree promised to deliver a commercial solution to unlock your iPhone. Then they hesitated and decided to become a wholesale only company, further delaying their release. Ultimately, they missed the train and the hacking community stepped in (Free iPhone unlock supposedly pending (Updated x2)), and released a free hack: iUnlock by the iPhone Dev Team (no association with Apple).

The box for a 4GB iPhone.Since vendor lock-in is never a good thing for the customer, the release of this software is great news. And as fans of the free market may be aware, cell phone unlocking is legal. But does it work? Playing With Wire decided to find out. We picked up a 4GB Apple iPhone, headed out on the internet and soon found a great unlocking tutorial at modmyiPhone. The guide is Mac specific, but we also stumbled across unlock.no which appears to offer a guide for Windows users – we didn’t try it though.

The Unlock Process

The process is a little bit lengthy but everything is done using simple graphical tools. For starters, you need to make sure your iPhone is entirely up to date. iTunes does this for you after you trigger the ‘recovery mode’ of your iPhone, by pressing Sleep and Home for 25 seconds.

iPhone in recovery mode.
The iPhone in recovery mode.

Once you’re in recovery mode you can just connect the iPhone to your computer and iTunes will offer you the option of restoring the phone. Prepare yourself for the first of a couple of lengthy downloads – for us iTunes downloaded 96 MB of software updates (we used iTunes 7.4.0 and iPhone Firmware 1.0.2 for this article). When it’s all done, iTunes will tell you so and you can close down the application.

So now we had an updated but not yet activated iPhone. The Mac application “iNdependence” makes activation a breeze, but this is where the second lengthy download comes into the picture as you have to download the firmware a second time. We did run into a minor snag: when we followed the instructions on the page we couldn’t get the activation to work on our first attempt. Disconnecting the phone, restarting iNdependence and then reconnecting the phone took care of it though – iNdependence unlocked the phone without complaint. Voila, now we had an iPhone that was basically like Apple’s latest iPod, the iTouch: it could play music and video, but it couldn’t make phone calls.

iNdependence activating an iPhone.This is where the Unlock application comes into play. To actually get it onto the phone, you need SSH installed though. Just like the guide says, the AppTapp application allows you to install third party software on your iPhone. We ran into trouble here though: when we ran AppTapp we got an indefinite progress bar. We waited a good 15 minutes for the application to finish, but it never did. What’s worse, our iPhone locked up in ‘recovery mode’ and could no longer be started. We realized that we had left iNdependence running from the previous step, and perhaps this application conflicted with the AppTapp installer. Regardless of the reason, the iPhone was dead at this point.
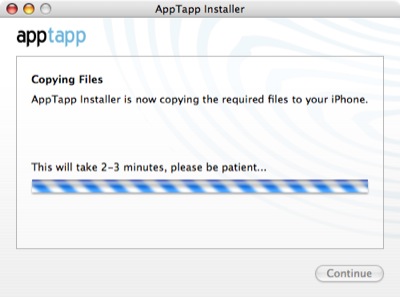
AppTapp making no progress.
AppTapp never got any further than this for us.

We restarted the iPhone and connected it to iTunes to restore it to factory settings. We were horrified as iTunes crashed very early on in the process. We mentally readied ourselves for creating our own Will It Blend episode, thinking the phone was a goner. Luckily after a full reboot of both the computer and the phone, the software reset went through.

We were back to square one, and had to go ahead and again activate the phone with iNdependence and then go for a second attempt at installing AppTapp. To be on the safe side, we downloaded the most recent version of AppTapp from its homepage. We made sure iNdependence was turned off.

This time we got an error message instead – something about a boot strapping process failing and a reference to the console. So we pulled up Console.app (/Applications/Utilites/Console) and took a look. To our surprise, the iPhone installer software was still working despite the error message.
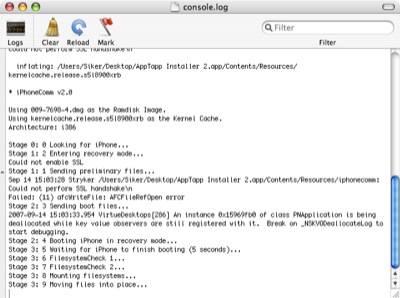
AppTapp is reporting stuff in the Console.
Look! Something is still installing.

A couple of minutes later the phone restarted and all was well. The Installer icon appeared on the iPhone desktop and we could install the required software as described in the guide.
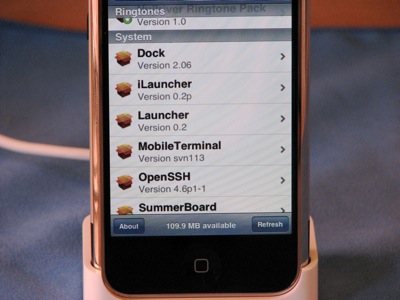
Installer.app on the iPhone.
Some of the applications the AppTapp Installer can install.

An activated iPhone with it’s SIM card removed.In the final part of the guide, the actual Unlock software is installed using SFTP. The guide recommends transferring the application bundle using Cyberduck, but we figured any SFTP client would do it. We had Panic’s Transmit installed, which worked just fine. After copying the files as instructed, and restarting the phone one more time, we finally had the Unlock icon on the iPhone desktop. It was time to install our T-Mobile SIM card and hope for the best.

25 minutes later we were making T-Mobile phone calls.

Notes and Observations

During the above process SSH was installed on the iPhone. This allows anyone who knows the default root password to log into your iPhone and do anything they want, as long as the phone is on a wireless network. We strongly recommend that you change your password as soon as possible using the ‘passwd’ from an SSH session.
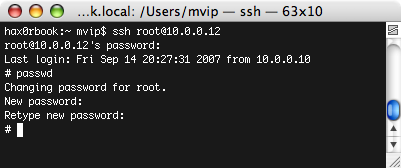
With the same IP as before, SSH in using Terminal and run ‘passwd’ to change the root password.
Using SSH to change the default password (dottie).

So far, our iPhone has worked very well with T-Mobile. Initially there was an artifact ‘missed call’ icon hanging around over the Phone icon – a red circle in the upper right corner of the phone. Obviously, visual voice mail isn’t enabled as that’s an Apple and AT&T special feature, but the voice mail indicator works. When you press the icon, the phone calls your voice mail like a regular cell phone would.

Verdict

The Unlock application works just as advertised. Including the time it took us to take photographs and the time we spent resolving our few problems, the whole unlocking process took no longer than 2 hours. At no point was a non graphical tool needed, which surely will come as a relief to some users.

Unfortunately, the process is not entirely simple even with the graphical tools, since there are several opportunities to brick the phone or otherwise get tripped up. Still, if you feel confident with your technical abilities, and you don’t feel confident in AT&T’s cell phone abilities, this is the tool you’ve been waiting for. The iPhone is free.

Author: Tags: , ,
Introducing YippieMove '09. Easy email transfers. Now open for all destinations.

Introduction
No way! That’s impossible.” Well, actually it’s not. Using Open Source technology, it’s actually possible to create a competitive IT infrastructure at very low costs. Not only does Open Source software enable you to create more customized solutions to better fit your needs, but it also means that you can spend your budget on hardware – not software.

Last month I was asked by a company to figure out how to ‘modernize‘ their IT infrastructure with a minimal (almost non-existing) budget. After plenty of thinking and research, I came to realize that the only way to do this was to use some kind of thin-client solution. The solution that I found to fit my needs the best was Linux Terminal Server Project (LTSP). LTSP utilizes network boot (we will use PXE) to boot the clients directly from the server. Therefore, we can use obsolete clients without hard drives (to reduce the noise) as thin clients. The only thing we need on all the clients is a fast network adapter with PXE-support.

Some of the widest adoption of LTSP has been within K12 the education field. Since many educational institutions are working with very tight budgets, LTSP has a strong advantage. It is a way to save costs without having to compromise too much on usability. Edubuntu is a Linux distribution that targets educational institution. What makes Edubuntu very interesting is that it comes out-of-box with LTSP support, which enables system administrators with limited knowledge of Linux to get a thin-client setup running with little effort. Since Edubuntu is closely related to the regular Ubuntu, it’s not very hard to get Ubuntu up and running as an LTSP server.

Infrastructure

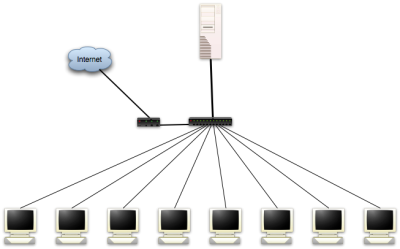
This layout is quite typical for a LTSP setup. You might also want to add a couple of network printers.

The Hardware
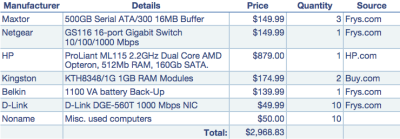
With a very limited budget, I realized that a thin-client solution would be the most realistic approach. As the name implies, the clients are thin and most of the load will be on the server. Therefore we will spend most of the money on a solid server. After a good amount of research to find a cheap, yet powerful and expandable server, I found the HP ProLiant ML115. The server comes with a 64 bit 2.2GHz Dual Core AMD Opteron CPU, which will serve our needs well. However, it only comes with 512Mb of RAM, which is insufficient for the number of users we intend to have. Therefore we’ll need to purchase some additional RAM. The RAM consumption estimates varies across different LTSP projects, ranging from 256Mb + 32Mb per client to 1024Mb + 64Mb per client. However, since I’d rather be on the safe side, I’d recommend that you purchase another 2Gb of RAM (total 2.5Gb) and put in the server (1024Mb + 150Mb per client).

The next thing we need to add is a Gigabit switch to reduce the possibility of having the network as a possible bottleneck (note that I’m not sure if a 10/100 Mbit network would actually create a bottleneck in this setup, but I rather be safe than sorry). Since Gigabit is cheap today, going Gigabit all the way seems like a reasonable move. Therefore, I’ve budgeted for 10 Gigabit network adapters (with PXE support) and a 16 ports Gigabit switch (the HP server comes with Gigabit network adapter).

Now we need somewhere to store the users’ data with high security and performance. Since we’re on a limited budget, we will use a software RAID solution rather than a high-end hardware RAID solution. A RAID-5 setup on three SATA disks using Linux’s software RAID is probably the cheapest and most reliable for the price. This will allow us to increase performance while we also gain protection against loss of any one drive without loss of any data. Moreover, we also use a separate OS disk to reduce the I/O load.

Because everything is both stored and running on the server, it’s crucial that we protect the equipment from power failures and spikes (the server by itself is a single point of failure). Therefore I’ve added an UPS to the budget (1100 VA) that will not only protect our hardware but also reduce server downtime.

The last thing we need to add is the clients. It’s quite likely that you have a many retired PCs (preferably P2>). If not, you’re likely to find a many of these computers for sale (or for free) in your local classified adds section. If Craigslist is available where you live, this is a great source to find this kind of hardware. Even though many of you will get these computers for free, I’ve budgeted $50 per client.

Budget

Here’s the complete budget for the project. As you can see, the total is just below $3,000

The Software
I’ve divided this section into two parts: Server and Desktop. Although all software will be running on the server, the users will only see the software on the Desktop side, which is why I have separated them.

Server
As already touched upon, the server will be running Linux. To be more precise, I’ve decided to use Ubuntu Server 6.06.1 LTS Server (64-bit). The reason why I didn’t chose to use the most recent version (7.04) is to minimize the administrative effort. Since 6.06 is the Long Time Support (LTS) version, the Ubuntu team will supply this version with security patches and updates for a longer period than the 7.04 release (6.06 LTS Server will be supported until 2011).

Installing Ubuntu is very straight forward. The only thing to consider in this setup is to make sure we install the system on the hard drive that came with the server and not the RAID-5 array.

Configuring the RAID 5 can be done though a couple of different ways. You can either do this during the installation (with Ubuntu’s graphical utility), or wait and set it up afterward in the console (see the Software RAID HOWTO for details). After setting up the RAID, go ahead and mount it to /raid or something similar.

Now it’s time to set up LTSP, which is the foundation of our cost-saving solution. There are a couple of different ways to do this, but the one I found to be most useful was to follow a guide from Novell (strangely enough) available here. You might also want to take a look at Ubunut’s Thin-client documentation.

Before you start the installation, go ahead and symlink /opt, which is where LTSP will be installed, to within you RAID array (ln -s /opt /raid/opt). This will install all the packages on the RAID array instead of the system disk. Finally, what you will want to do is to add a test-user (or a real user – it’s your call). This is done by simply using the user-management tool in the Ubuntu. Note that you probably want to have the home-dir of the users on the RAID array. To achieve this, you can either symlink the entire /home to /raid/home or just set the home-dir to /raid/home/user in the user-creation process.

Desktop
The LTSP setup comes with the most common software used in a corporate environment. This includes:
* FireFox – A great web browser
* Open Office – A Microsoft Office replacement
* Evolution – A Microsoft Exchange replacement
* The Gimp – An Adobe Photoshop replacement (arguably less powerful)
Plus a long line of other applications such as PDF-viewer etc.

You might also want to install is Wine. Wine is a Windows emulator which will run (legally) without any Windows license. Although it does not run all Windows software, many applications work very well.

If you have needs outside of the applications listed above, there’s more available. Any software that runs in a Linux environment (pretty much) will run on these thin clients. Although I haven’t tested it, you should be able to run a fully emulated Windows environment using a virtualization software such as VMWare Workstation or CPU/RAM intense softwares such as MatLab or CAD software.

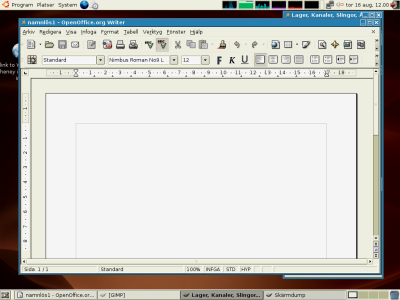
Screenshot of LTSP in Action Running Open Office in Swedish

Here’s a screenshot of LTSP in action (from the client-side) running Open Office and the Gimp in Swedish

The Clients
The last part is to get the clients to actually boot over the network. If you decide to use a different network card than the one specified in the budget above, make sure it supports PXE booting. Many budget NICs don’t support this feature. There are also other ways to boot but I’m not going to cover that in this article (such as floppy, CD etc.).

The Pros and The Cons
Although this approach is a very good way to create an updated desktop environment while at the same time minimizing the administrator’s job, it does come with some drawbacks. Unfortunately many companies today are stuck with custom software that only runs on Windows. Although Wine offers a great emulation software, you might be forced to purchase a license of VMWare Workstation (and Windows) to run some specialized applications. If you’re lucky, your custom software was written in Java, and it will actually run on Linux as well.

Another thing to consider is the transition from the old environment (quite likely from Windows) to this new environment. Although the transition is likely to be smooth for a crew of young people, members of the older generation (40+) are likely to require some training before being able to use the system fully. Both Open Office and Firefox work very similar to their Windows-counterparts, but Evolution is slightly different.

Another pro is the lack of viruses on Linux. Since we’ve left Windows behind, the likeliness of being infected by a virus is almost zero.

In summary, utilizing a solution such as this might or might not suite your needs. If you do have the flexibility to use Open Source software in your organization and are able to run your customized software either emulated or use a web-based interface, this is a great way to reduce costs from the IT budget and spend them in a way that benefits the company better.

Update: I’ve now actually deployed this solution at a company. For information about how it went, go ahead and read “Deploying the sub-$3,000 IT-infrastructure.”

Author: Tags: , , , ,
Introducing YippieMove '09. Easy email transfers. Now open for all destinations.

At least in my personal opinion, one of the strongest trends seen at the LinuxWorld expo in San Francisco over the last years has been virtualization. This year many exhibitors had taken the next step and were actually using VMware products on their exhibit computers to simulate a number of servers in a network. For instance, Hyperic demoed their systems management software with a set of virtual servers.

Whenever virtualization comes up, the idea of grid computing isn’t far away as enterprises wish to maximize server utilization by turning their data centers into grids that each deliver the ‘services’ of CPU, memory, ports and so on. But in this brave new world of virtual machines and grid processing there is an element missing. If you’re moving your computing over to a grid computing model, why is there no corresponding grid storage model?

The commercial open source startup Cleversafe has that corresponding model. By employing a mathematical algorithm known as an Information Dispersal Algorithm, found in the cryptographic field of research, Cleversafe separates data into slices that can be distributed to different servers, even across the world. But it’s much more than just slicing and dicing: the algorithm adds redundancy and security as it goes about its task. When the algorithm is done, each individual slice is useless in isolation, and yet not all slices are needed to reconstruct the original data. In other words, your data is safer both in terms of security and in terms of reliability.

Cleversafe is not the first entity to come up with such a scheme. The idea of an Information Dispersal Algorithm is known from Adi Shamir’s paper ‘How to Share a Secret’ and other publications. When we met up with Cleversafe’s Chairman and CTO Chris Gladwin at LinuxWorld, he mentioned that the Information Dispersal Algorithm had been used in many applications before – even to store launch codes for nuclear weapons securely.

The scheme is different from a simple parity scheme in that you can configure how many redundant pieces you want. With parity as found in common RAID setups, you can lose any one storage unit in the set. With an Information Dispersal Algorithm, you can make your system resistant to failure or corruption of any one, two or indeed any number of units in the set. If there’s a strike in your data center in Texas, and your German data center is on fire, your data will still be fully accessible through the remaining servers provided you began with a sufficient number of servers. And as opposed to the brute force solution of multiple mirrors of the data, the dispersal algorithm has a much smaller overhead.

Google is a well known proponent of the brute force solution: the Google File System implementation suggests that the best method to keep your data continuously available is to keep three copies of it at all times. Cleversafe is a smarter system. If you have 16 slice servers (known as pillars in Cleversafe terminology) with a redundancy of 4 slices (known as the threshold) you can lose up to four servers simultaneously and still retain your data. At the same time the total overhead in storage space is only 4/12 – 33% of the space. The advantage as compared to Google’s three copies method is clear: with three copies you only protect yourself against the failure of any two servers and yet you pay a much greater price with a total of 200% storage and bandwidth overhead. And that’s not all. While you’re storing two additional copies of your data, you have effectively tripled the risk of that data being stolen. When a careless system administrator forgets the backup tapes in his car over night and the car gets stolen, all those credit card numbers or what have you will be out in the wild, even that only one out of three locations was compromised. In our Cleversafe example, 12 separate servers would have to simultaneously be compromised – quite unlikely by comparison.

Cleversafe is not alone and there are other actors on the software market such as the PASIS system. PASIS’ home page describes functionality very similar to Cleversafe’s: “PASIS is a survivable storage system. Survivable storage systems can guarantee the confidentiality, integrity, and availability of stored data even when some storage nodes fail or are compromised by an intruder.” None the less, Cleversafe appears to be a step ahead of its competitors at this time and is poised to be the first to deliver grid storage to a wider market.

While the Cleversafe software is developed as open source through the Cleversafe Open Source Community at cleversafe.org, there is a commercial company behind Cleversafe: Cleversafe, Inc. Cleversafe, Inc. plans to generate revenue by offering a storage grid for rent based on the Cleversafe technology. “The market for a more secure, more cost effective storage solution is enormous,” says Jon Zakin, CEO of Cleversafe in a press release issued in May.

The Cleversafe project is available as Open Source under the GPL 2.0 License. The version online is apparently an early alpha version and is not ready for production use. According to Mr. Gladwin, there will most likely be a new version within a month, and sometime in the beginning of the next year Cleversafe may be ready for production use. In the meantime, you can download the current alpha version of the software at the Cleversafe Open Source Website. You can read more about the algorithm at Cleversafe.org’s wiki, and there’s also a flash video describing the idea available.

Author: Tags: , , , ,
Introducing YippieMove '09. Easy email transfers. Now open for all destinations.

Yahoo! recently released a new Firefox extension called YSlow. This article describes how to get started and what we did at Playing With Wire to get our front page to load in almost half the time.

YSlow is a handy little tool for analyzing the performance of your websites. It will give you vital statistics and grade your site on 13 performance points with helpful hints for what you may be able to do to improve the loading speed of your pages.

Installation

YSlow is actually a plugin to a plugin in Firefox. To use it, you need Firefox and the Firebug web developer plugin. Both are easily installable using links from YSlow’s homepage however.

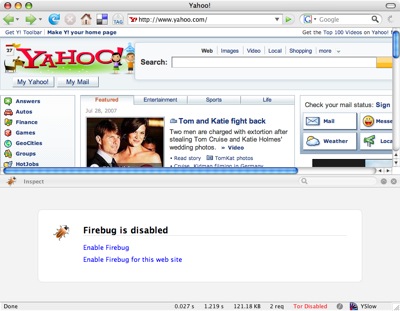
Once you’ve restarted Firefox with the new plugins installed, all you have to do is to activate Firebug for a particular site and you’re ready to go. Normally, this means surfing to the site and then revealing Firebug from its icon in the Firefox status bar. Just click the Firebug icon and it will reveal it’s main view. In it, it will most likely say that Firebug is disabled. Just click ‘Enable Firebug for this web site’ and you’re ready to start dissecting it’s performance with Yahoo!’s YSlow.

This is what Firebug looks like.
Firebug revealed.

Taking your site apart

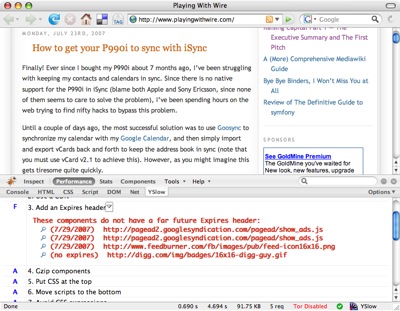
Once you have Firebug enabled, switch to the ‘Performance’ tab and you’ll get a grade on your website’s loading performance. The grade breaks down into several subcomponents where each one corresponds to a point in Yahoo!’s Thirteen Simple Rules for Speeding Up Your Web site. The grading is fairly arbitrary and should be taken with a grain of salt. For example, if you have 35 downloads for your page and just four of them don’t have an Expires header, YSlow will give you a harsh F in that category.

YSlow gives Playing With Wire an F for Expires headers.
Hello, is this Google? YSlow is giving me an F in Expires headers. Could you reconfigure your ad servers for me?

None the less, the sub-points of the grade-sheet are great hints for what you can do with your site. While you’ll probably be forced to ignore the ‘grades’ if you have externally sourced ad units like we do, you can still work your way through the list and fix everything that you do have control over. This is what we did with Playing With Wire and astonishingly enough we reduced the download size to about half of what it used to be. Below are the best tricks we learnt or revisited after using YSlow.

Eliminate HTTP requests

This is a well known method that we had already worked into the design of Playing With Wire. The idea is to have as few CSS, image and Javascript files as possible. Most browsers will only download two files at a time and there’s always some overhead associated with the download of a new file. If you can combine files you reduce this overhead.

YSlow’s Components page let us know exactly what we were bringing in through links and we could eliminate an external Javascript we were no longer using.

Add Expires headers

Expires headers are important to let web browsers know that once they’ve cached an image, CSS include or Javascript file, they can keep using it for a while. Without these headers most browsers will keep downloading the same files over and over out of fear that they may change frequently. Again, YSlow’s Components tab reveals relevant information: the Expires column lets you know what Expiry date your web server is broadcasting for each downloaded file. If you notice files with a value in the Expires column, it may be time to go into your web server configuration file. In Apache, a section like this one might just do the trick:

<virtualhost ...>
...

<directory ...>
  ...
  ExpiresByType text/css "access plus 1 week"
  ExpiresByType text/javascript "access plus 1 week"
  ExpiresByType image/gif "access plus 1 week"
  ExpiresByType image/jpg "access plus 1 week"
  ExpiresByType image/jpeg "access plus 1 week"
  ExpiresByType image/png "access plus 1 week"
</directory>

  ExpiresActive On
</virtualhost>

Enable compression

Most modern clients support streaming compression. This is a feature that lets the web server compress data before sending it to the client. This reduces the download time of the page at the expense of some CPU time on the server. While most graphics can’t be compressed much, this turns out to work out great for HTML, CSS and Javascript. All of these files can often be reduced to as little as a third of their original size. The best part is that the web server won’t try to compress the data unless it already knows the client can handle it.

How to set up compression depends on your application and web server software. If you’re using Apache, you can have the server do it for you for normal files. For dynamic content such as that generated by PHP it depends. In WordPress there’s a switch in the Options tab. If you’re using wp-cache like Playing With Wire is, it may take some more work to get things up and running, but it’s well worth the effort.

Conclusion

Between these tricks and a couple more, Playing With Wire came out about half as heavy for the main HTML, CSS and Javascript, and as a result felt much more responsive. All in all YSlow was a helpful utility, especially thanks to its ‘Components’ tab which made it easy to see what parts of the page were being cached and compressed properly, and which ones were not. The grading system wasn’t very helpful, not all of the grade hints were applicable, and none of the hints were unknown in the field. Still, the list of suggestions was a useful as a kind of laundry list of things to do for the site, combined with data specific to your site. At the end of the day, I’ve found a new partner for optimizing websites with Yahoo!’s YSlow.

Author: Tags: , , ,
Introducing YippieMove '09. Easy email transfers. Now open for all destinations.
Jul
13.

This guide is for the programmer who needs to write a quick and dirty PHP extension. A PHP extension is a module for PHP written in C. You may wish to write such a module to expose library functionality only available in C, or to optimize certain key sections in your execution path.

As I have done before, I will attempt to make a terse summary. I assume you have or confidently can acquire knowledge of PHP and C. I’m a big fan of simple cookbook ‘recipe’ like guides, so here we go. Hold on to your hat.

Step 1: Compile PHP With Debugging Enabled

When developing your own module, you’ll want to enable debugging in PHP. This will generate error messages which may contain additional information beyond an unhelpful ‘segmentation fault’ when your module crashes.

In FreeBSD, just go into your ports, and do make config. Turn on the ‘debugging’ option and recompile PHP and its modules. Other platforms are similar; if you’re compiling from source by hand, take a look at the output of ./configure --help and you’ll find the right option for your version.

Before you start working on your module, make sure everything is in order with your server and that your extensions.ini file looks good. In my experience, rebuilding PHP under FreeBSD sometimes causes modules to appear twice in the extensions.ini file, and you may wish to be wary of this.

Step 2: Set up a project skeleton

PHP comes with great support for developing your module. There are a couple of scripts and configure related tools that automate almost all the work for you.

First, create a config.m4 file in your new project. (There’s even a tool that does this for you – ext_skel – but we’ll do it by hand for the purposes of this guide.) Here’s a bare bones config.m4 file for an extension named “pwwext”:

dnl config.m4 for extension pww

PHP_ARG_ENABLE(pwwext, whether to enable pww support,
[  --enable-pwwext          Enable pww support])

if test "$PHP_PWWEXT" != "no"; then
  PHP_NEW_EXTENSION(pwwext, pwwext.c, $ext_shared)
fi

You’ll also need some source code. Lets begin with the header file, which we’ll call pwwext.h. Lets write a minimal header:


#ifndef PHP_PWWEXT_H
#define PHP_PWWEXT_H

#define PHP_PWWEXT_EXTNAME  "pwwext"
#define PHP_PWWEXT_EXTVER   "0.1"

#ifdef HAVE_CONFIG_H
#include "config.h"
#endif

#include "php.h"

extern zend_module_entry pwwext_module_entry;
#define phpext_pwwext_ptr &pwwext_module_entry

#endif /* PHP_PWWEXT_H */

In my experience, it’s often a waste of time to learn things before you need them. This is a good example of that: the header code does pretty much what it appears to do, and more in depth knowledge is not strictly needed. In short it exposes the entry point of the module and brings in the most important header files.

Step 3: The Actual Source

Finally, we’ll need the file we referred to in config.m4 previously. It’s the main source file, pwwext.c:

/*
 * This extension enables cool pww functionality.
 */

#include "pwwext.h"

PHP_FUNCTION(pwwext_calculate)
{
  long a, b;
  
  /* Get some params. */
  if (zend_parse_parameters(ZEND_NUM_ARGS() TSRMLS_CC, 
      "ll", &a, &b) == FAILURE) {
    RETURN_NULL();
  }

  if (a < = 0) {
    zend_throw_exception(zend_exception_get_default(), 
      "First argument can't be negative nor zero.", 
      0 TSRMLS_CC);
    RETURN_NULL();    
  }

  /* 
  PHP preallocates space for return values, so
  its important to use these return macros.
  */
  RETVAL_LONG(a+b);  
  return;
}

static function_entry php_pwwext_functions[] = {
  PHP_FE(pwwext_calculate, NULL)
  { NULL, NULL, NULL }
};

zend_module_entry pwwext_module_entry = {
#if ZEND_MODULE_API_NO >= 20010901
  STANDARD_MODULE_HEADER,
#endif
  PHP_PWWEXT_EXTNAME,
  php_pwwext_functions, /* Functions */
  NULL, /* MINIT */
  NULL, /* MSHUTDOWN */
  NULL, /* RINIT */
  NULL, /* RSHUTDOWN */
  NULL, /* MINFO */
#if ZEND_MODULE_API_NO >= 20010901
  PHP_PWWEXT_EXTVER,
#endif
  STANDARD_MODULE_PROPERTIES
};

#ifdef COMPILE_DL_PWWEXT
ZEND_GET_MODULE(pwwext)
#endif

There are a couple of important structures here. The variable php_pwwext_functions lists all the functions we wish to expose from the module. In our example, we’re only exporting a single function.

Then we have the pwwext_module_entry structure which truly is the entry point into your module. If you would look near the sixth line in the structure you’d see a pointer to our list of functions, for instance.

Step 4: Compiling and Running

Finally, we’ll want to build the actual module. The command phpize will get everything in order for a compilation based on your configuration. After phpize is done, the normal configure make dance is all we need. Make note of the ‘--enable-pwwext‘ argument to configure.

  1. [~/pwwext]$ phpize
  2. ./configure --enable-pwwext
  3. make

That’s all there is to it. Your module should now be built and almost ready to go. To wrap up, you’ll need to install the module in your PHP extensions folder. If you don’t know it already, run php -i to find the right folder. For me, the result is,

$ php -i|grep extension_dir
extension_dir => /usr/local/lib/php/20060613-debug => 
/usr/local/lib/php/20060613-debug

so I’ll go ahead and copy the module into /usr/local/lib/php/20060613-debug:

# cp modules/pwwext.so /usr/local/lib/php/20060613-debug/

There’s one last step we’ll have to do. We need to add the module to the list of extensions in your php.ini or extensions.ini file. Locate the section with multiple lines beginning with extension=... and add your own line. For me, this line would do it:

extension=pwwext.so

Step 5: Does it work?

Finally, we can test our new module. Run,

$ php -m

and make sure your new module is in the list.

If all is well you should be able to use your new function from any PHP script. For me, this was the final result:

$php -r'echo pwwext_calculate(1, 2);'
3
$ php -r'echo pwwext_calculate(-1, 2);'

Fatal error: Uncaught exception 'Exception' with 
message 'First argument can't be negative.' in 
Command line code:1
Stack trace:
#0 Command line code(1): pwwext_calculate(-1, 2)
#1 {main}
  thrown in Command line code on line 1

Now you have a bare bones module that does something. All that remains now is to change that one function to do something useful and you’re well on your way.

You’ll undoubtedly need more reference material going forward. Php.net is the logical starting point: The Zend API. If that’s not enough, Sara Golemon wrote a whole book about the subject: ‘Extending and Embedding PHP’.

Good luck, and don’t forget to turn off PHP debugging when you’re done.

Author: Tags: , ,

© 2006-2009 WireLoad, LLC.
Logo photo by William Picard. Theme based on BlueMod © 2005 - 2009 FrederikM.de, based on blueblog_DE by Oliver Wunder.
Sitemap