- Review of LifeIO – A first look at this email and social networking aggregation site.
- Taking Thunderbird 3 Beta 4 for Mac OS X out for a spin – A thorough look at the latest version of Mozilla’s Thunderbird.
- Can’t Access Your Hotmail with Outlook, Outlook Express or Entourage? – A quick tip on how to get back on track after Microsoft’s recent service changes.
- Bank emails wrong person, sues – When just receiving an email is enough to get you into trouble.
We’ll definitely be adding to this list quickly in the coming week so make sure to check back often if you’re interested in the email space.
]]>
ESG Front Page
You could spend a few days doing research and browse through various pay-for-the-top-spot top-lists. Another, and much more efficient option, is to check out brand new service named Email Service Guide. With this tool you can find the best possible provider based on your criterions. With Email Service Guide, you are able to answer questions like:
- Who is the cheapest provider that supports IMAP and gives me 8GB in storage per user?
- What providers offers Exchange hosting with 99.999% or more Service License Agreement (SLA)
- Where can I find email hosting powered by renewable energy?
At this point, our database features over 100 different email plans from all of the leading email providers on the market. Email Service Guide enables you to not only find the best provider according to your needs, but it also allows you to compare the matches objectively side-by-side.
Remember that, once you have found the best email provider for you needs, don’t forget to use YippieMove to move your old emails with you.
]]>The most solid evidence of this is how Google is investing vast resources on becoming the biggest player in this game. About a week ago, Google introduced Chrome OS, which is basically a stripped Linux distribution with a browser. The very same day, they also announced that they have begun working on their own version of NoMachine’s FreeNX, named Neatx.
So what does this mean? Think about it. A Netbook makes a perfect thin client. It does not consume a whole lot of energy (great battery life) and it is built to be connected to the internet. Hence, it is the perfect candidate for Chrome OS. Now, since all applications cannot run inside a browser, we need something to bridge the gap. That’s where Neatx comes into play. With a FreeNX installed on the Netbook, the machine becomes can connect to a full-scaled desktop where normal applications can live. This server can be either hosted in Google’s cloud or in a private cloud.
This is is huge! Imagine a life where your computer is completely disposable. It’s just a dumb terminal. All your data lives in the cloud. Yet, the most amazing thing is that it is available today, and we are yet to realize it.
Ps. I also wrote a few other article on the topic of thin clients here and here Ds.
]]>
Scalix Admin
Ok, let’s get started.
First, install CentOS 5.3 as normal. In the software selection, we only selected ‘Server’ and deselect everything else (why people run X-windows on a server is beyond me). The only other thing to keep in mind is to use a static IP and a fully qualified domain name (FQDN).
Once you got your system up and running, we need to make a few changes to the default setup. Login using SSH or the console and run:
# system-config-securitylevel-tui
You will need to disable ‘SELinux’ as well as configuring the firewall according to your needs.
Next we need to trick Scalix into believing that you are running RHEL instead of CentOS. This is pretty easy:
# cp /etc/redhat-release /etc/redhat-release.orig
# echo ‘Red Hat Enterprise Linux Server release 5 (Tikanga)’ > /etc/redhat-release
We also need to make sure your hostname is listed in /etc/hosts under its IP (and not under 127.0.0.1). An example of a proper line is :
xxx.yyy.zzz.nnn server.example.org server
Now, let’s get started with installing Scalix. We start by upgrading the system and installing a few dependencies.
# yum -y upgrade
# yum install -y tk cyrus-sasl-md5 cyrus-sasl-plain sendmail-cf postgresql-server postgresql-libs mx compat-libstdc++-296
Assuming you’ve already downloaded Scalix onto the machine, all you need to launch the installer
# chmod +x scalix-11.4.4-GA-enterprise-redhat-intel.bin && ./scalix-11.4.4-GA-enterprise-redhat-intel.bin
After you are done answering all the questions, you should be able to access your brand new Scalix installation from your browser.
Good Luck!
Update: As Michael points out, the step of ‘tricking Scalix that you are running RHEL’ is not necessary. Thanks Michael.
Update 2: If you want to take Scalix for a spin without actually having to install it, we have created a Virtual Machine with Scalix installed that can be downloaded here.
]]>
Activate the Developer menu in Safari 4's preferences.
Apple’s Safari web browser was upgraded to version 4 yesterday and with it came an update to the developers tools first introduced in Safari 3.1. The new version is set to give Firefox’s FireBug plugin some very serious competition. Not only does the Development environment look and perform very well, it’s also very full featured.
In the toolset we find inspection of HTML and CSS, JavaScript debugging, page load profiling tools and a Databases inspection tool presumably for HTML 5’s offline storage support. There are also tools to disable caching, spoof user agents and more from the handy Develop menu.
Inspecting Pages
When designing a new web page frequently plenty of time is spent making minor changes, updating the server and then checking the results in the web browser. This three stage process slows down the design process and hampers the creative flow. Page inspection tools allow you to review and edit your page live in the browser, allowing you to easily try out different CSS rules or HTML edits until you know what you want. And what you see is literally what you get – your preview is the actual web browser.

A line of HTML highlighted in the rendering.
Safari 4’s “Web Inspector”, shown with Develop / Show Web Inspector, is Apple’s take on page inspection. Reminiscent of Firebug’s equivalent, the inspector area attaches to the bottom of the Safari window. On the left hand you get the HTML for the page and on the right hand you get the full hierarchy of CSS affecting the currently selected element. By choosing the magnifier icon you can click on any element in the page – a headline, an image, a paragraph – and bring it into focus in the HTML view. The same can be done by selecting tags in the HTML source code directly.
When an element is selected it is outlined in blue in the page. A light blue box shows the dimensions of the element itself and a darker blue box behind it outlines the element with margins included. This is helpful when an element is not positioned where you want it or it’s the wrong size. The blue boxes will let you know if the problem is with the margins or if there is something else going on.
Once you have a theory of what you’d like to change you can go in and edit the effective CSS directly using the Styles panel on the right hand side. For instance you could tweak the font-size by double clicking the font-size value and typing in a new number. A set of checkboxes also allow you to toggle individual CSS rules on or off to see how that affects the page as a whole. A great tool for hunting down what CSS rule is doing what. For each section in the Styles panel you also get the responsible selector and the CSS file it comes from, making it easy to copy your changes back to the original style sheet when you are done with your edits.
The CSS editor is well designed but it does not seem to allow adding new CSS rules live, a feature available in FireBug.
What’s Taking so Long?
Another important consideration when designing a website is the page load time. Safari 4 boosts a slick looking Resources inspector which gives the developer a breakdown not only of how long each JavaScript, CSS or image file took to load but also when each download started. All of this is shown in the context of the whole page load from the first millisecond to the last.

Timing the bits and pieces of a web page.
By laying the load time out in a timeline various sources of delay can be tracked. For example in the screenshot above the main document takes just short of half a second to load. We can also see that the CSS file request goes out even before the main HTML is finished loading, as Safari finds the CSS link in the header almost immediately. For each bar the semitransparent section is the latency – the time until the first byte of the response. So in the above case we can see that the latency makes up the majority of the load time. We can also see that the two images used on the page are loaded concurrently and that they start loading immediately when the CSS has been retrieved. Finally the colorful bar on top breaks the total load time down by type and lets us know the whole page finished loading in 1.2 seconds.
Individual resources can be inspected, allowing the developer to review the size and contents of each resource. In the same section the request and response headers can be reviewed. This is useful for the web server administrator in order to determine compression status and cache expiration headers. Strangely enough POST parameters don’t seem to show up which could be a serious problem for debugging.

This CSS file was gzipped and comes with a far future expires header. Great!
Breaking Into the Source

Tracing the execution of Javascript.
In the web 2.0 age, JavaScript is almost as important as the HTML and CSS that make up a page. Luckily Safari 4’s JavaScript debugging facilities give you a window into your code as it runs. You can set breakpoints, step through source code and inspect the call stack and variables as you go along.
When a page has been loaded the Scripts tab shows the various JavaScript resources available on the page, by source filename. When a file has been selected the JavaScript is displayed with syntax highlighting and line numbers. Clicking on a source line number sets a breakpoint. Once the targeted code executes Safari automatically launches into single step mode, allowing for the usual controls: Step Over, Step Into and return (called Step Out). At each step you can also inspect the values of the variables available in the scope.
There is also a Console feature which not only shows console messages and errors generated by your JavaScript during runtime but allows you to run commands live. Need to see what happens if a certain variable has a different value? Just set it using the console and watch the results unfold in the active web page.

Executing a JavaScript command in a live page.
Step Behind the Scenes

Safari 4's Develop Menu.
Safari 4’s Develop menu reveals additional tools and utilities useful for debugging and inspecting a web page. Enable or disable caches, images, CSS or JavaScript to see what the page looks like in a degraded state. This allows you to make sure the web page looks good even without images for instance, a great utility for making sure your website is accessible for persons with disabilities. Toggling JavaScript is also an obvious boon when you need to make sure your software runs in text browsers or where JavaScript has been disabled for security or performance reasons. There is also a “Snippet Editor” which seems to allow easy previewing of HTML snippets.
There are some flaws. Two were mentioned above: there does not seem to be a way to inspect POST data, important especially when debugging AJAX, and it does not seem possible to add new CSS rules dynamically as you could in FireBug.
There is also a selection bug: when the Web Inspector is revealed, selecting any text on the page causes the window to immediately scroll to the bottom. This subsequently selects all text on the page below where you started to select. Another bug is that if an element is selected such that the blue outline boxes show up, switching tabs sometimes left the outline hanging around in the other tabs too, now not highlighting anything in particular. Finally the JavaScript debugger seems to freeze up JavaScript in every Safari page – not just the one you are working with. This makes it hard to work with say an online reference in a different window.
A more minor flaw is a missing feature. There is no page optimization analysis tool such as Yahoo’s YSlow or Google’s Page Speed. These tools help analyze pages for performance problems. For example they check for additional compressibility in images and for correct headers.
These flaws aside the Development tools found in Safari leave little to be desired. All the features you expect are there and the package is polished far beyond what’s ordinary for web development. Apple has clearly been looking to FireBug when picking their features and that’s a good thing. FireBug has for a long time been setting the standard for these kinds of tools, but has been suffering from engineers’ syndrome: heaps of features but with little mind to UI design and detail polish. Safari 4’s development environment meets nearly all the same requirements and does it in style, bringing an excellent choice to the web developer’s toolbox.
Read more about the new developer tools at Apple’s What’s New page.
]]>Ever since the launch over a year ago we used VMware Server 1 for instantiating the YippieMove back-end software. For that year performance was not a huge concern because there were many other things we were prioritizing on for YippieMove ’09. Then, towards the end of development we began doing performance work. We switched from a data storage model best described as “a huge pile of files” to a much cleaner sqlite3 design. The reason for this was technical: the email mover process opened so many files at the same time that we’d hit various limits on simultaneously open file descriptors. While running sqlite over NFS posed its own set of challenges, they were not as insurmountable as juggling hundreds of thousands of files in a single folder.
The new sqlite3 system worked great in testing – and then promptly bogged down on the production virtual machines.

Tough CPU week on a server running VMWare
We had heard before that I/O performance and disk performance are the weaknesses of virtualization but we thought we could work around that by putting the job databases on an NFS export from a non virtualized server. Instead the slowness we saw blew our minds. The core servers spent a constant 70% of CPU time with system tasks and despite an uninterrupted 100% CPU usage we could not transfer more than 400KBit/s worth of IMAP traffic per physical machine. This was off by a magnitude from our expected throughput.
Obviously something was wrong. We doubled the amount of memory per server, we quadrupled sqlite’s internal buffers, we turned off sqlite auto-vacuuming, we turned off synchronization, we added more database indexes. These things helped but not enough. We twiddled endlessly with NFS block sizes but that gave nothing. We were confused. Certainly we had expected a performance difference between running our software in a VM compared to running on the metal, but that it could be as much as 10X was a wake-up call.
At this point we realized that no amount of tweaking was likely to get our new sqlite3 version out of its performance hole. The raw performance just wasn’t there. We suspected at least part of the problem was that we were running FreeBSD guests in VMware. We checked that we were using the right network card driver (yes we were). We checked the OS version – 7.1, yep that one was supposedly the best you could get for VMware. We tuned various sysctl values according to guides we found online. Nothing helped.
We had the ability to switch to a more VM friendly client OS such as Ubuntu and hope it would improve performance. But what if that wouldn’t resolve the situation? That’s when FreeBSD jails came up.
Jails are a sort of lightweight virtualization technique available on the FreeBSD platform. They are like a chroot environment on steroids where not only the file system is isolated out but individual processes are confined to a virtual environment – like a virtual machine without the machine part. The host and the jails use the same hardware but the operating system puts a clever disguise on the hardware resources to make the jail seem like its own isolated system.
Since nobody could think of an argument against using jails we gave them a shot. Jails feature all the things we wanted to get out of VMware virtualization:
- Ease of management: you can pack up a whole jail and duplicate it easily
- Isolation: you can reboot a jail if you have to without affecting the rest of the machine
- Simple scaling: it’s easy to give a new instance an IP and get it going
At the same time jails don’t come with half the memory overhead. And theoretically IO performance should be a lot better since there was no emulated harddrive.
And sure enough, system CPU usage dropped by half. That CPU time was immediately put to good use by our software. And so even that we still ran at 100% CPU usage overall throughput was much higher – up to 2.5MBit/s. Sure there was still space for us to get closer to the theoretical maximum performance but now we were in the right ballpark at least.
More expensive versions of VMware offer process migration and better resource pooling, something we’ll be keen to look into when we grow. It’s very likely our VMware setup had some problems, and perhaps they could have been resolved by using fancier VMware software or porting our software to run in Ubuntu (which would be fairly easy). But why cross the river for water? For our needs today the answer was right in front of us in FreeBSD: jails offer a much more lightweight virtualization solution and in this particular case it was a smash hit performance win.
]]>Since we launched YippieMove, our customers have been asking for support for Yahoo Mail. Today we are finally able to offer our customers this service.
While many modern email providers, such as Googleʼs Gmail, have opened up to allow easy access to a userʼs email, Yahoo Mail users are still locked in. This is why we are proud to announce support for Yahoo Mail in YippieMove. Finally, this vendor lock-in is broken, and users are free to move their emails in and out of Yahoo.
YippieMove now has a potential reach of over a third of the worldʼs email users. Users can transfer mailboxes to and from Yahoo Mail as well as any of the more than 100 different email providers currently supported.
Guidelines for Yahoo Mail users looking to move
With this new addition to YippieMove, we’ve solved one of the main issues with switching email provider, namely moving the actual emails.
With the emails moved, let’s move on to the next problem — incoming mail. The best way to deal with this is email forwarding. Unfortunately this service requires Yahoo Mail Plus which costs $19.95 per year. If you’re not willing to spend that, you can use the free vacation response-feature and write a note telling everyone emailing you that you’ve switched email address.
The next thing you might want to move is your contacts. To export your contacts is quite straight forward. However, in order to access the export feature, you need to switch to Yahoo Mail Classic. Once you’ve exported your contacts you can import that file into your new email provider.
For more information about YippieMove, visit YippieMove.com
]]>Over the course of the last few years, I’ve been in charge of putting up a number of websites for various companies, often as favors for friends. In most cases, I’ve ended up using one out of two solutions: Joomla! and WordPress. While both of these projects have evolved greatly over the last few years, they are vastly different. Joomla! has always been intended as a ‘fit-all-your-possible-needs’-kind of CMS solution, while WordPress was developed as a blog with CMS capabilities. Recently WordPress has opened up to allow its users to set up a site with static-only material (with the option of a blog-page), without having to hack the code. Hence it’s one step closer to being a direct competitor to Joomla!.
 |
 |
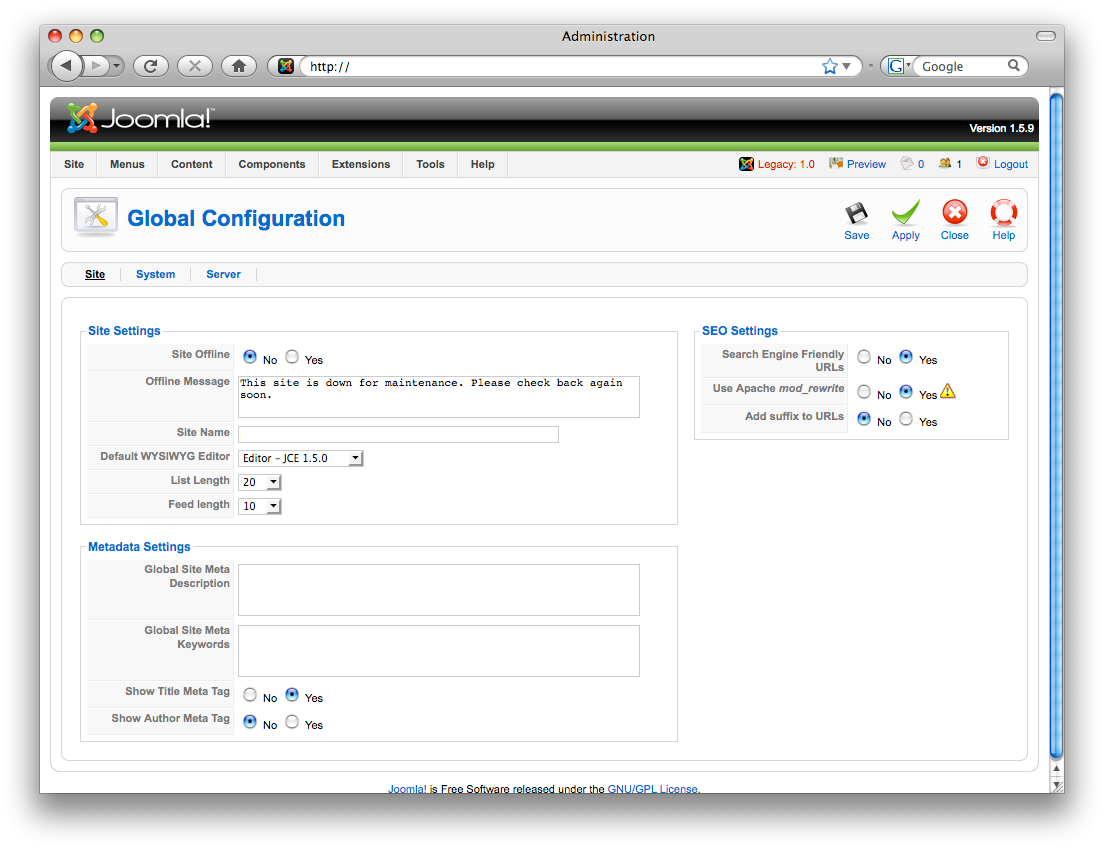
I will probably step on a few peoples feelings here, but I will argue that Joomla! is an example of a poorly managed open source project and that WordPress is a very successfully managed one. Certainly I don’t mean that Joomla! is a useless piece of junk, but that the lead developers have quite a bit to learn from WordPress. The main thing that Joomla! is vastly behind on is usability. While it is true that Joomla! 1.5 is a step in the right direction, it is still light years behind WordPress. Let me illustrate with two examples of common tasks.
Example 1: Create a blog-post with an image
Joomla!
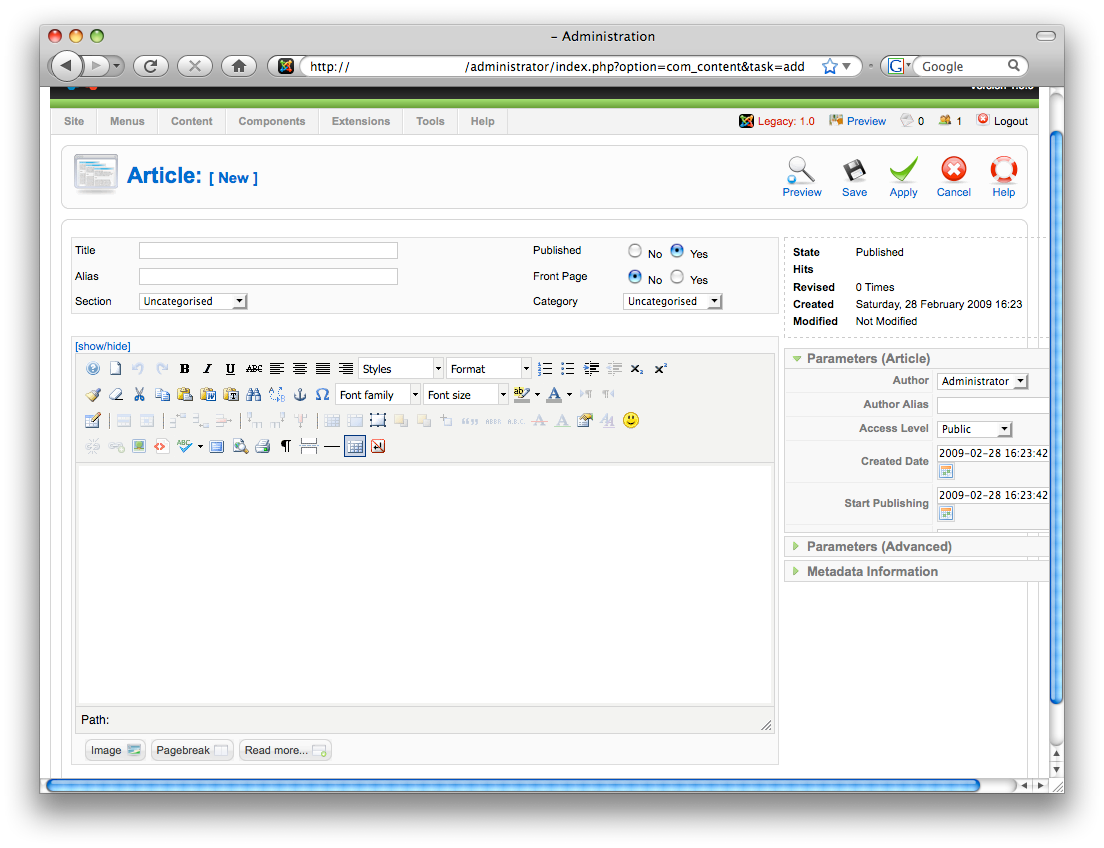
- From the ‘Control Panel,’ click ‘Add New Article.’
- There are two image buttons. If you use the wrong one, you won’t be able to upload an image (as you will only browse the existing images). You must use the one below the text field.
- Select a ‘Title,’ the right ‘Section’, and then the right ‘Category.’
- Write the content and save.
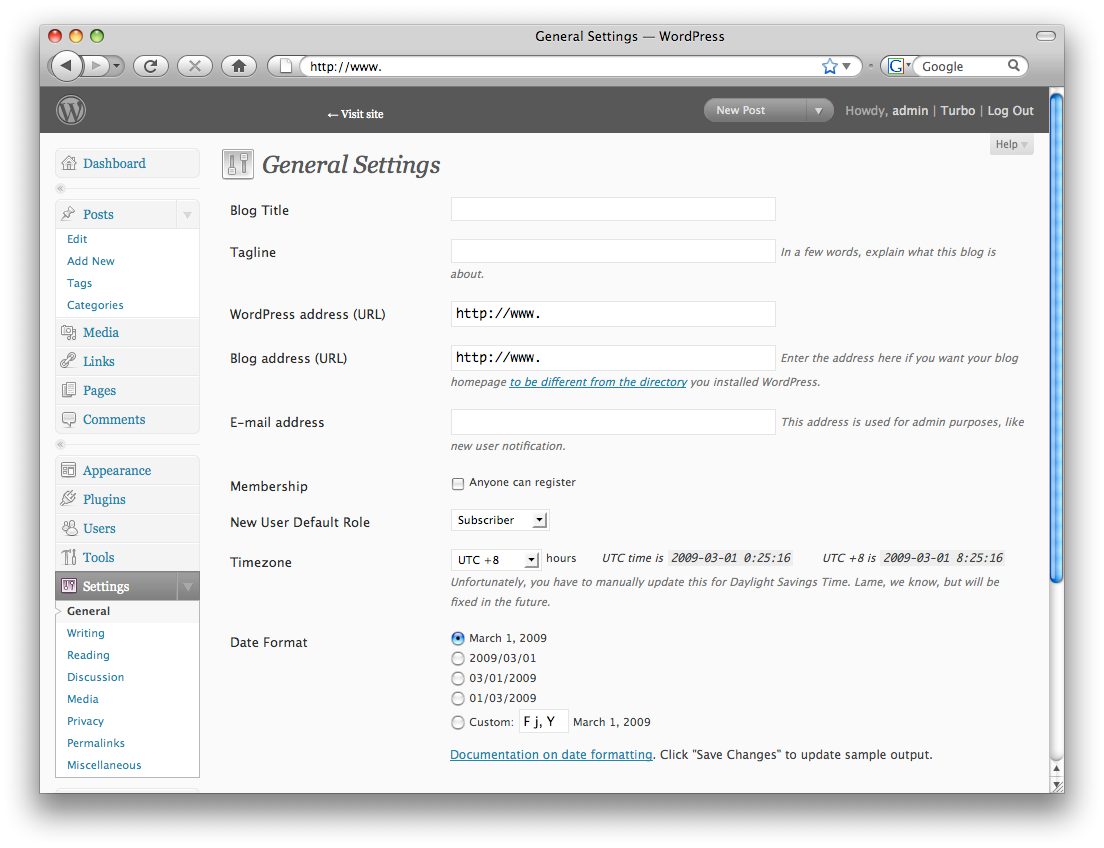
WordPress
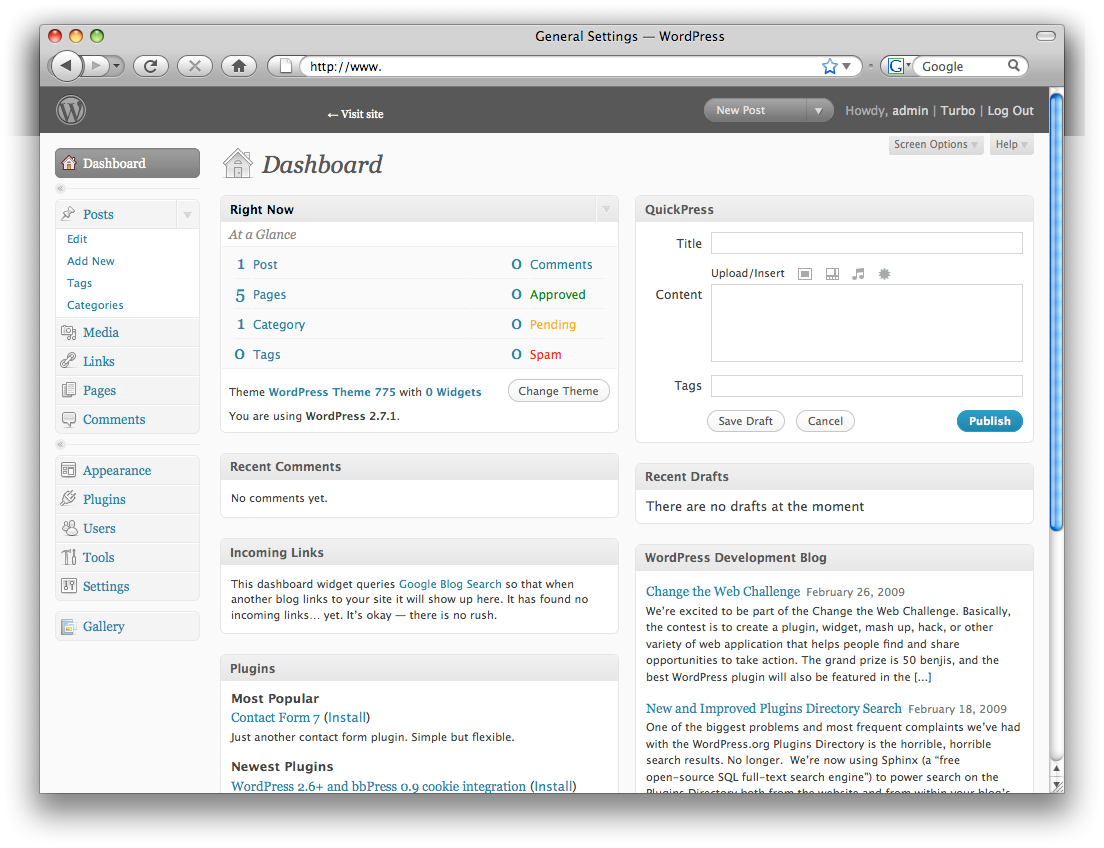
- Select QuickPress in the Dashboard.
- Click on the image icon and upload the image.
- Select title, write your content and press publish.
 |
|
Example 2: Create a static page accessible from the menu
Joomla!
- From the ‘Control Panel,’ click ‘Add New Article.’
- Select a ‘Title,’ the right ‘Section’, and then the right ‘Category.’
- Write the content and save it.
- From the top-menu, select ‘Menu’ and ‘Main Menu’ (assuming you want to add it to the main menu.)
- Click ‘New.’
- Select ‘Internal link,’ and ‘Articles,’ and then finally ‘Article Layout.’
- Fill in the title of the object as well as the parent item.
- In the column to the right, you now need to browse your list of articles and select the desired article.
- Press ‘Save.’
WordPress
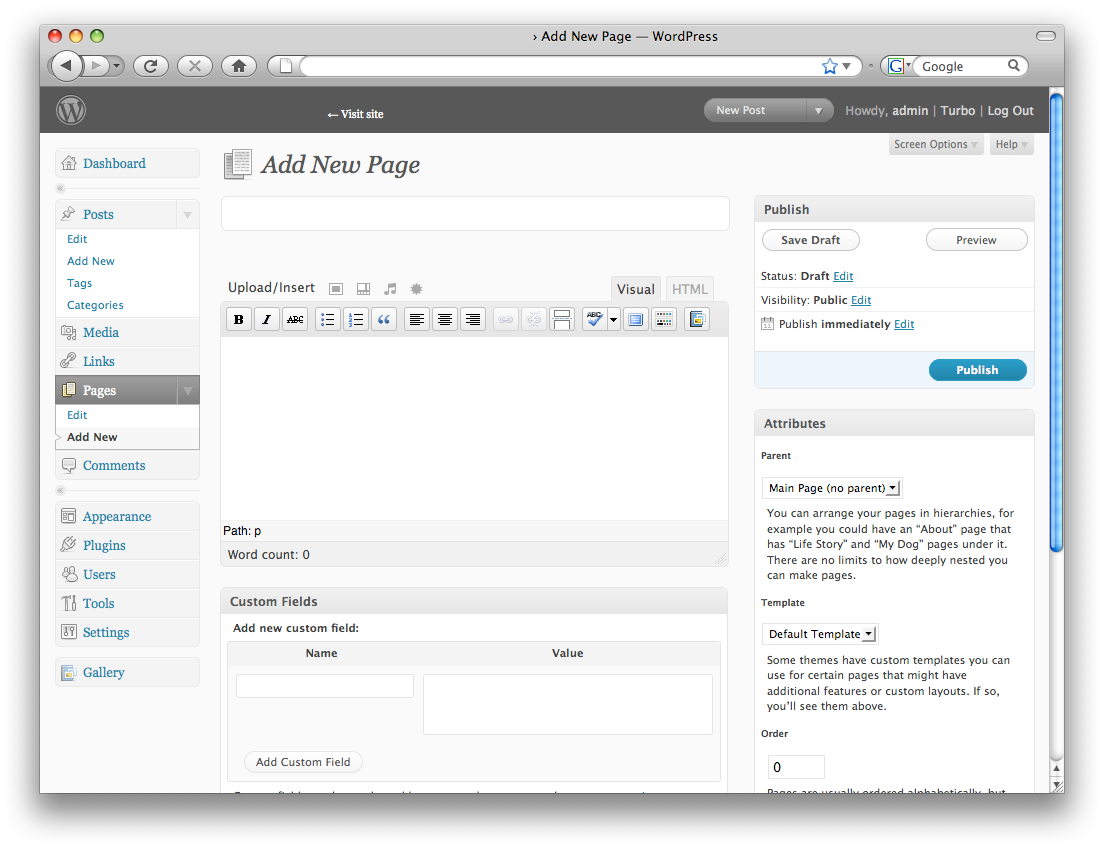
- From the Dashboard, click ‘Pages.’
- Select ‘Add New.’
- Fill in the title and contents.
- Select the parent item (if other than root.)
- Click ‘Publish.’
|
 |
Let’s step back for a minute and imagine the following scenario: you’re in charge of putting up a website for a company. They might want to put up about 10 or so pages with various information. According to my experience this is a pretty common situation. You can do this with either Joomla! or WordPress – both are fully capable of delivering this. Assuming you’re going to buy a template to solve the design issue, it will probably take you about an hour with either of the software to get to the first draft (assuming you’ve been working with them in the past.) So far so good. This is where they start to differ. With WordPress you’re pretty much done by now. However, with Joomla!, you’ll probably have to spend another hour or two just trying to re-organize the different modules to fit the template you bought (in many cases, just to get the basics to work.) Next you will end up spending even more time trying to figure out how to re-organize the different menus. You need to link up a particular document to a particular menu-entry (as illustrated above.) If you want a blog-feed, you need to set up a dedicated section or category (I still don’t really know the difference between the two.) Moreover, you need to select the ‘style’ of blog you want.
 |
 |
in Joomla! |
Let’s say you managed to figure all of that out and that you got the site ready. Now it’s time to hand over the site to the customer. There will obviously be some training involved, and here’s another crucial difference between Joomla! and WordPress. Training someone to learn WordPress takes (in my experience) less than 30 minutes, and they truly understand it. Training someone to use Joomla! takes at least an hour, and they still don’t really understand it.
Again, I’m not saying that Joomla! is useless, it’s that WordPress is a more intuitive piece of software. Let me throw an analogy out there that will probably help you better understand my point. If Joomla! is Linux, then WordPress is Mac OS X. WordPress might offer only 90% of the features of Joomla!, but in most cases WordPress is both easier to use and faster to get up and running. I use and love Linux, it just doesn’t have that elegant touch to Mac OS X does.
To Joomla!’s defense, there are at least two scenarios I can think of where Joomla! is a better fit than WordPress. The first one would be eCommerce. If you install VirtueMart on Joomla! you can be up running with an eCommerce site pretty quickly. However, the problem is that it does not feel like it is a part of Joomla!, but rather as a 3rd party module that works in Joomla! (which is pretty much what it is.) The second one would be a site where you need to have multiple levels of permissions (ie. an extranet). WordPress only offers three levels of permission (public, private, and password protected), while Joomla! is much more flexible.
 |
 |
in Joomla! |
in WordPress |
Joomla! is not doomed. It just has a long way to go when it comes to usability. WordPress has really been developed by the KISS-principle, while Joomla! appears to have been developed to solve every problem on Earth (by engineers, for engineers). Going back to the two problems I mentioned above, where Joomla! beats WordPress. I think it would actually be less of a challenge to add support for eCommerce and more permission levels to WordPress, than it would be to improve the usability in Joomla! to reach WordPress’ level.
Just as a side note, a quick line-count on the latest versions of both software reveals that Joomla 1.5.9 has 350,975 lines of codes, while WordPress 2.7.1 has a mere 159,682 (might not be completely accurate, but that’s what ‘wc -l’ said). Hence, even if WordPress only offers 70% of the features of Joomla!, which I am pretty sure it does, their code is written much more efficiently.
]]>- Unbiased technical consulting. What is really the best email solution/provider for your needs?
- Creation of user accounts on the destination server according to your needs
- Redirecting the email from your old server to the new
- Transfer of your old emails from the old server to the new server
Since we launched YippieMove, we’ve been contacted by many SMBs that are planning to change email provider for various reasons. Whatever your reason for switching is, YippieMove Complete can help you. We will do all the work for you and let you focus on what’s important to you – your business.
What does email downtime cost you per hour? If you’re an SMB, it’s likely that it costs you thousands of dollars an hour in lost productivity. YippieMove Complete can make sure that the transition goes as smoothly as possible, and in most cases, without any email downtime at all.
YippieMove Complete is starting at only $499.95 with 10 transfers included. If you ened more transfer than that our normal rate applies (including volume discount).
Requirements
The requirements are simple; we need access to your old email server and your DNS records. If you don’t know anything about this, our sales team can provide you with further details. We can even contact your provider directly as a last resort. The second requirement is related to the transfer of the old emails. In order for us to successfully transfer your old emails, the old email server needs to support IMAP.
More info
For more information about YippieMove Complete, visit the product page.
]]>Inconsistency between SELECT and CREATE
The first bug might not be very juicy but it took us a while to recognize it. What we first thought was a bug in our system turned out to be a bug in GIMAP. As it turns out, in GIMAP, SELECT is case sensitive, while CREATE is not. Here’s a brief example to illustrate the bug:
0001 SELECT "INBOX/Sales Invoices"

0001 NO Unknown Mailbox: INBOX/Sales Invoices (Failure)

0002 CREATE "INBOX/Sales Invoices"

0002 NO Folder name conflicts with existing folder name. (Failure)
In this case, there is already a folder named ‘INBOX/Sales invoices’, but since SELECT is case sensitive, and CREATE is not, we were unable to select the folder and with an upper case ‘I’ and at the same time unable to create the folder.
We first encountered this bug when a user migrated from a case sensitive IMAP server to Gmail. Hence we could have two folders named ‘foo’ and ‘Foo’ without it being any problem until we tried to copy those to Gmail.
Rejection of random messages
The next bug is of far more serious nature and it is a bug that we run into everyday. We’ve spent a significant amount of time trying to narrow down this problem, but almost entirely without luck. What happens is that GIMAP decides to reject certain emails. Sometimes the upload works when retrying later, sometimes not. To make this even more interesting, GIMAP can reject emails that it just gave us. For instance, let’s say we’re copying messages from [email protected] to [email protected]. Even that a GIMAP just gave us a particular email, another GIMAP server rejects the same email. Strange, isn’t it?
When I said that we’ve spent a serious amount of time trying to narrow down the problem, I was not kidding. We’ve done statistical analysis on tens of thousands of messages trying to find some kind of pattern (including trying to find a correlation between the content in the header and the body), and still no luck.
That said, the failure rate is quite low. Out of all the messages we upload, only a small fraction gets rejected (a quick database query reveals that it’s currently at 0.04%). And if a message gets rejected, we clearly state what message we failed to upload in the Transfer Report that we send out to our customers upon completion.
In Google’s defense, they do state that they do not officially support ‘upload of messages,’ but that is a quite weak argument, as pretty much any other IMAP-enabled service on the market supports this. Not to mention that without APPEND, simple drag and drop operations may fail in email programs.
For the curious geeks reading this article, our software does comply with RFC 3501, as well as other related RFCs.
As a side note, we’re not the only ones experiencing the APPEND bug. The Google Group discussion for Gmail IMAP and POP is full with threads regarding this. The only official-looking response given multiple times by wár17 § is to upload in small batches as you otherwise is likely to hit the bandwidth limit. However, we can testify that this is not the case as the number of messages and the size of the mailbox seem to have little effect. We’ve had this problem with small mailboxes (<10 messages and only a few hundred bytes) and at the same time had mailboxes that exceed several Gigabytes running through flawlessly.
Update: While it seems like the rejection of emails is somewhat random, there are certain emails that are more likely to get rejected. The other day we ran a transfer of a folder including 600-something bounced messages. They were all rejected.
]]>