Introducing YippieMove '09. Easy email transfers. Now open for all destinations.

Finally! Ever since I bought my P990i about 7 months ago, I’ve been struggling with keeping my contacts and calendars in sync. Since there is no native support for the P990i in iSync (blame both Apple and Sony Ericsson, since none of them seems to care to solve the problem), I’ve been spending hours on the web trying to find nifty hacks to bypass this problem.

Until a couple of days ago, the most successful solution was to use Goosync to synchronize my calendar with my Google Calendar, and then simply import and export vCards back and forth to keep the address book in sync (note that you must use vCard v2.1 to achieve this). However, as you might imagine this gets tiresome quite quickly.

A benefit with GooSync was that I could synchronize anytime and anywhere as long as I had access to WiFi. The downside however was that I needed to remember to sync the phone every day. Another downside was that I needed to use Google Calendar instead of my personal preference, Apple’s Calendar. (Although it is possible to configure Apple’s Calendar to access Google Calendar in a read-only fashion when offline.)

Ok, lets cut to the chase: how to get your P990i to work with iSync. The solution to the problem is found here. The solution is a plugin written by ‘mate,’ who posted the plugin at My-Symbian.com. The plugin is still quite buggy, and neither we nor the author of the plugin should be held liable for any problems that might occur to your P990i or your data. It can be quite a bit of headache to get the plugin to work properly, so please follow the following steps carefully.

  • Back up your data
  • Make sure you back up all your data. If you have access to a Windows PC (which you will need in the next step anyways), use Sony Ericsson’s Backup-software from the PC Suite. Also, use the phone’s internal backup-software to perform a backup to the Memory Stick on the Calendar (Calendar -> Calendar Manager -> Backup) and the Contacts (Contacts -> Contact Manager -> Backup).

  • Update the phone to the latest firmware
  • In order to get this plugin to work, your phone need to run the latest firmware. Unfortunately there’s no way to do this on a Mac (maybe using Parallel’s might work, but I didn’t try this), so you need to have a PC running Windows to do this update. Just download the latest version of Sony Ericsson Update Service and install it on your PC. Since you’ve already backed up all your data, you can just go ahead and run the update right away. Note that the update takes quite some time, and that it will wipe all the data off your phone.

  • Restore your data from your Memory Stick
  • Assuming that the update went fine, you can just go ahead and restore your Calendar (Calendar -> Calendar Manager -> Restore) and the Contacts (Contacts -> Contact Manager -> Restore) from your Memory Stick. Don’t recover the data using Sony Ericsson’s backup utility, since you won’t be able to perform a sync if you do. We only took that backup to make sure that we have an additional backup in case something goes wrong.

  • Delete your old bluetooth pairing
  • Now let’s move over to the Mac to connect the phone with your Mac. The first thing we want to do is to delete the (possible) prior pairing with the phone. To do this go “Apple” -> “System Preferences” -> “Bluetooth” and Select the Devices tab. Now select your phone and press the delete button.
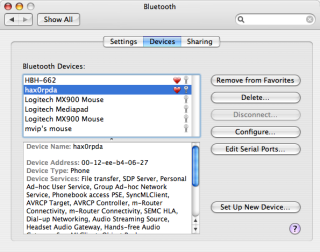
    bluetooth_thumb.png

  • Install the plugin
  • It’s finally time to install the plugin. Download the file from here (or our local mirror). When the download is completed, just go ahead and click on the dmg-file and run the installation.

    bt-add_device_thumb.png

  • Pair the phone with your Mac
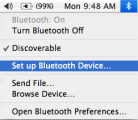
  • The first thing you need to do is to enable bluetooth on your phone. Click Menu (far lower left corner) -> Connections -> Bluetooth -> “Bluetooth On”. Now let’s move over to the Mac and click on the Bluetooth icon up in the very right corner and select “Setup new bluetooth device.” In the wizard, select Phone and select your phone from the list. In the very last step, deselect Dial Up Networking, and just leave Address Book and Contacts selected.

  • Perform your first sync
  • Now, before you hit that sync button in iSync, you should make some changes to the settings. First, go ahead and deselect Calendar, and just perform a Contact sync for the initial sync. If your sync is successful, start by selecting one calendar, and then two calendars in the next sync. I’ve personally had problems with syncing more then one calendar, so you may or may not be able to sync several calendars.
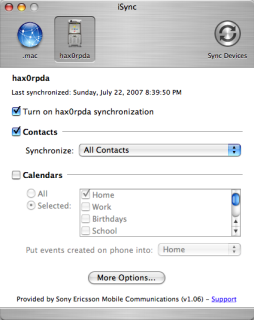
properties_thumb.png
Congratulations, you should now finally be able to sync your P990i with you Mac. As you might notice, the plugin is still in early beta, so it’s not unlikely that you’ll receive some weird error messages or have some failed syncs. Regardless, this is by far the best solution that I’ve run across. If you however do run in to some trouble, I’ve compiled a small troubleshooting guide that you might find useful.

    Troubleshooting

  • My phone crashes and reboots when I try to sync
  • There’s a couple of ways this might happen. I actually ran into this myself, but was able to solve it. If you do run into this problem, try these things:

    * Make sure that you’re running the latest firmware.

    * Deselect the calendar-sync and only sync the Contacts.

    * If you can’t even perform a Contact-sync, you should try to make a Master Reset on your phone. After you’ve performed the Master Reset, try to sync before you restore any data.

  • My phone restarts when I try to sync more than one calendar
  • I actually experienced this too. For some reason some of my calendars won’t sync. At this point I really don’t know why some of my calendars won’t sync, but fortunately my most important calendars synced without problems. What you want to do if your phone crashes when syncing calendars is to select the calendars one by one, and see which calendar(s) cause the sync to fail.

For more troubleshooting ideas, please see the forum over at My-Symbian.com where the plugin was originally posted.

    Other useful tools to make the P990i more Mac friendly

  • USB File mode enabler
  • This little kernel-patch enables you to use the USB cable to connect your P990i to your Mac. Previously I was forced to either use bluetooth or a Memory Stick-reader to transfer data to the P990i. With this nifty tool you are not only able to access the files on the Memory Stick, but the cable also charges the phone.

  • iTunesMyWalkman
  • iTunesMyWalkman is a really nifty tool that works well with the USB enabler mentioned above. The software enables you to easily sync both photos and music to your phone. It also comes with some handy Apple Scripts that you can access from inside iTunes to make your phone act almost like an iPod.

That’s it. Hopefully this article is enough to help making your P990i more Mac friendly. Welcome to the world of synchronized data =)

As a side note I should probably mention that the guide above should be enough to get the m600, P1 and the w950 to get up running with iSync. The only difference (as far as I know) is that you use this plugin for the m600, this plugin for the w950 and this plugin for the P1.

Update: I guess I underestimated Sony Ericsson. As it turns out, the patch/driver mentioned in the article actually turns out to be made by Sony Ericsson (and only leaked, and possibly modified by ‘mate’). Sony Ericsson has now released the driver, which can be found here. The official download offers a new version which is also more stable.

Author: Tags: , , ,
Introducing YippieMove '09. Easy email transfers. Now open for all destinations.

Writing a business plan is an important step in founding your business. Not only is it a required part if you’re going to raise capital, but it’s also very useful since it forces you to research your competitors and the environment you will operate in. As you may or may not know, the by far most important part of you business plan is the Executive Summary. Document

Recently I attended a seminar about executive summaries, delivered by Steve Foster, Partner at Texas Pacific Group Ventures with long experience from the VC industry. The focus of the seminar was executive summaries, but Foster also shared an insider’s view on what VCs actually value when they chose what company to invest in.

Most people with some business experience have some idea of what goes into an executive summary. Although the information that goes into the executive summary might slightly differ between industries, the main objective is always to summarize your business idea in such way that an investor will be enticed to invest in your company.

So how long is an executive summary supposed to be? Traditionally most people say that it’s supposed to be about one page. According to Foster, he would rather see a three to four pages long executive summary, since it’s too hard to summarize all the information in a single page.

How do you get a VC to choose your company over the rest in the huge pile they’re reading through? Well, let’s face it, it’s very unlikely that an investor will get through even your executive summary and much less the rest of your business plan. If you fail to grab the attention of the person reading the executive summary within the first five seconds, it’s quite likely that he or she will stop right there and move on to the next project. One of the more interesting ideas that Foster suggested was to not to play by the rules. Imagine if you were personally going through maybe hundred executive summaries per day: it’d become quite boring with the typical layout and design. Therefore, it’s crucial to find ways to stand out from the crowd. Here it’s more important to use your imagination than what’s considered standard. Don’t only use blocks of text, but rather combine it with quotes, graphs, tables, bullet points and so on.

Now let’s just assume that you managed to get a person at the VC firm to read through your executive summary. When they read through your executive summary, there are a couple of things that they will look for:

References

Who referred you? This is the single most important element. If you have a personal recommendation from someone within the VC’s network, you’re far more likely to be considered than if you just cold call.

Don’t e-mail

We in the tech industry have a tendency to do all kind of communication through e-mail. However, when it comes to sending your executive summary, this is simply a big no no. You’re up to tough competition, and the fact that it takes more energy to open up an attached document than it is to briefly skim over a piece of paper plays an important role here.

Is there a market?

Is there a significant market for your product or service?

Is there room for a VC-backed venture in the market?

This relates to the previous point, and relates to the size of the market. Is the market really large enough to hold a VC backed company?

Is there urgency?

What is the team composition?

According to the presenter, the optimal team composition in the tech industry consists of one programming/tech genius and one business person who knows how to apply the technology to the market.

Ok, so now you know what to include in your executive summary and how to increase your odds of being selected. Next you might wonder if there’s any good or bad time to submit your executive summary to a VC firm. The answer is yes. Generally you should try to avoid the summer, since many VCs are out of town. Also try to avoid submitting before a major holiday. Conversely, it’s a plus if you get your executive summary read the day after major holidays, since people tend to be in a better mood then. Another time to target is January, since that’s when people come back from their long Christmas break with more energy than when they left.

This was part one in the series “Raising Capital.” In the next part we will dive deeper in how to write your actual business plan. Stay tuned…

Author: Tags: ,
Introducing YippieMove '09. Easy email transfers. Now open for all destinations.
Jun
21.

A while back we wrote an article called What’s Your Utilization, Kenneth. In that article we talked about a really cool web-app called Cacti. Today we will take this one step further by describing how to monitor remote servers using SSH tunnels.

In the scope of this article, we assume that you already have one Linux or Unix server configured with Cacti running. Moreover, we also assume that you have another remote server that you want to monitor (why else would you read this article?).

First we start by setting up the remote server. The first thing we need to do is to set up Net-SNMP. If you’re running FreeBSD, chances are that you already have this installed. If so, all you need to do is to change your community string and set up the daemon to bind on port 161/tcp instead of 161/udp. To do this, change/add the following lines in your snmpd.conf (/usr/local/share/snmp/snmpd.conf in FreeBSD):

com2sec local localhost public
agentaddress tcp:161

Once this is done, go on and restart the daemon.

To test that the SNMP daemon is working properly, try to run the following command:

# snmpwalk -v 1 -c public tcp:localhost:161

If your screen gets flooded with information, it worked. If not, please look over your log-files to find out what went wrong.

Next we need to create a secure user which we will be able to use to login from the Cacti-machine onto the remote machine. To maximize security, we suggest that that user has ‘nologin’ as shell and uses public key authentication instead of password. However, we will not cover how to create this user in this guide. Ask Google for help if you need it.

Repeat this for all hosts you want to remotely monitor.

That’s it for the remote server, now let’s move on to the Cacti host.

First we want to create a script that sets up the tunnel to the remote server. We suggest that you create a new user that will be running these tunnels (i.e. snmp). In order to make it easier to manage the tunnel (or tunnels if you have several hosts), we will create a bash-script that initializes the tunnel(s). In the home directory of the the user you created, create a file called tunnels.sh with the following contents:

#!/bin/sh
rm /home/snmp/tunnel.log

# server1.xyz.net
ssh -N -L 16000:127.0.0.1:161 [email protected] >> /home/snmp/tunnel.log &

# server2.xyz.net
ssh -N -L 16001:127.0.0.1:161 [email protected] >> /home/snmp/tunnel.log &

Note that this initalize two tunnels, one to server 1 (on port 16000) and one to server 2 (on port 16001. Also, don’t forget to chmod the file so that you can execute it, by typing chmod +x tunnels.sh.

Next we want to start up the tunnels using the snmp-user we created earlier. To do this run:

#sudo -u snmp /home/snmp/tunnels.sh

If everything went fine, you should now have two tunnels running; one on port 16000 and one on port 16001. Now let’s test the tunnels before we move on to Cacti.

# snmpwalk -v 1 -c public tcp:localhost:16000
# snmpwalk -v 1 -c public tcp:localhost:16001

This should hopefully give you the the same output as you previously received when executing snmpwalk locally on the remote hosts. If this went well, all you need to do now is to add the hosts to Cacti.

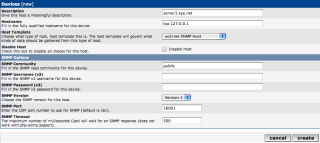
First you need to log into Cacti with an administrative account. Then got to “Create Device.” In the Create Device field, as shown in the screenshot bellow.
Create Device

Description: server1.xyz.net
Hostname: tcp:127.0.0.1
Host Template: ucd/net SNMP Host
SNMP Community: public
SNMP Version: Version 1
SNMP Port: 16000

After you’ve filled out the proper data, hit ‘Create.’ At the next page, just select the data you want to graph, and then hit ‘Next.’

That should be all you need to graph remote hosts. Now you may want to go ahead and add the host to a tree so that you can display it in the ‘Graph’ tab.

Author: Tags: ,
Introducing YippieMove '09. Easy email transfers. Now open for all destinations.
Jun
17.
Comments Off
Comments
Category: Uncategorized

Yesterday we migrated Playing With Wire from our old FreeBSD Jail to a brand new VMware Virtual Server. The new server has a much faster CPU and much more RAM, which we hope will decrease the load-time.

The migration itself went smooth without any downtime for PWW. If you discover something that appears to be missing or malfunctioning, please notify us at admin@wireload.net.

Author: Tags: ,
Introducing YippieMove '09. Easy email transfers. Now open for all destinations.
May
10.

How many times have you made a change to a server to only a couple of days or weeks later discover the change you did broke something? It happened to me a bunch of times. Sure, call me irresponsible, but sometimes I’m in a rush and don’t have time to document the change and write nice comments about it. I try to do so, but sometimes I forget.

For quite some time I’ve thought about a simple way to track the changes to my servers, but without coming up with any perfect solution. My ideas have included everything from wikis to blog-style logging to Tripwire. Sure, a change-blog would work, but it would take quite some extra time to write the entry.

One day when I was working with our development tracker a quite brilliant solution stroke me: why not use CVS/SVN on /etc? It sounds like overkill, but it would do the trick. By using this you would be able to:

* Display when the changes were made
* See what change was made
* Revert to a previous version

There are two different ways to go along using a repository for /etc. One way is to create a CVS/SVN tree on a different server and sync the entire /etc directory to that repository. The benefit with this is that you could have the repository on a different server and be to collect all your servers /etc on the same repository. By combining this with a web-interface, one would be able to easily compare and contrast the configurations of the different servers. Moreover, the change logs would be kept in the repository, and not on the individual servers, creating a cleaner file-structure. Another benefit would be that you could easily sync the /etc filesystem with your local workstation and modify/create your config-files there. The drawback with this solution is that you need to make your local changes first, and then upload the files to the repository. Once you’ve uploaded the files from your local workstation you can go ahead and sync the actual server with the repository to commit the changes.

Another solution would be to use a custom file-system. There are two different filesystem that supports version-tracking: CVSFS and Wayback. Between these two alternatives, Wayback appears to be the most developed alternative. Worth noting though is that both these alternatives only targets the Linux-platform.

The benefit for using such approach is that you don’t need to set up a separate repository to keep the files in, as well as that it enables you to make changes in a traditional way on the server. The drawback is that neither of these two filesystems are very well maintained. It appears that both these programs were last updated back in 2004, rendering them both quite obsolete. The question is if you really want to put the faith of your /etc-folder in a program that no one longer maintain.

Regardless of which one of these two alternatives you find most appealing, the concept is very interesting. I have still not tried to use this myself, but I would certainly argue that having a /etc-folder that allows you to keep track of changes is far superior to the traditional way of keeping /etc.

Edit 1: Since the article was published, I’ve found two more file-systems worth mentioning: CopyFS and ext3cow. Both these filesystems appears to be useful for /etc usage. Out of these two alternatives, ext3cow appears to be more sophisticated. However, CopyFS appears to be easier to set up.

Author: Tags: ,

© 2006-2009 WireLoad, LLC.
Logo photo by William Picard. Theme based on BlueMod © 2005 - 2009 FrederikM.de, based on blueblog_DE by Oliver Wunder.
Sitemap