Introducing YippieMove '09. Easy email transfers. Now open for all destinations.

At least in my personal opinion, one of the strongest trends seen at the LinuxWorld expo in San Francisco over the last years has been virtualization. This year many exhibitors had taken the next step and were actually using VMware products on their exhibit computers to simulate a number of servers in a network. For instance, Hyperic demoed their systems management software with a set of virtual servers.

Whenever virtualization comes up, the idea of grid computing isn’t far away as enterprises wish to maximize server utilization by turning their data centers into grids that each deliver the ‘services’ of CPU, memory, ports and so on. But in this brave new world of virtual machines and grid processing there is an element missing. If you’re moving your computing over to a grid computing model, why is there no corresponding grid storage model?

The commercial open source startup Cleversafe has that corresponding model. By employing a mathematical algorithm known as an Information Dispersal Algorithm, found in the cryptographic field of research, Cleversafe separates data into slices that can be distributed to different servers, even across the world. But it’s much more than just slicing and dicing: the algorithm adds redundancy and security as it goes about its task. When the algorithm is done, each individual slice is useless in isolation, and yet not all slices are needed to reconstruct the original data. In other words, your data is safer both in terms of security and in terms of reliability.

Cleversafe is not the first entity to come up with such a scheme. The idea of an Information Dispersal Algorithm is known from Adi Shamir’s paper ‘How to Share a Secret’ and other publications. When we met up with Cleversafe’s Chairman and CTO Chris Gladwin at LinuxWorld, he mentioned that the Information Dispersal Algorithm had been used in many applications before – even to store launch codes for nuclear weapons securely.

The scheme is different from a simple parity scheme in that you can configure how many redundant pieces you want. With parity as found in common RAID setups, you can lose any one storage unit in the set. With an Information Dispersal Algorithm, you can make your system resistant to failure or corruption of any one, two or indeed any number of units in the set. If there’s a strike in your data center in Texas, and your German data center is on fire, your data will still be fully accessible through the remaining servers provided you began with a sufficient number of servers. And as opposed to the brute force solution of multiple mirrors of the data, the dispersal algorithm has a much smaller overhead.

Google is a well known proponent of the brute force solution: the Google File System implementation suggests that the best method to keep your data continuously available is to keep three copies of it at all times. Cleversafe is a smarter system. If you have 16 slice servers (known as pillars in Cleversafe terminology) with a redundancy of 4 slices (known as the threshold) you can lose up to four servers simultaneously and still retain your data. At the same time the total overhead in storage space is only 4/12 – 33% of the space. The advantage as compared to Google’s three copies method is clear: with three copies you only protect yourself against the failure of any two servers and yet you pay a much greater price with a total of 200% storage and bandwidth overhead. And that’s not all. While you’re storing two additional copies of your data, you have effectively tripled the risk of that data being stolen. When a careless system administrator forgets the backup tapes in his car over night and the car gets stolen, all those credit card numbers or what have you will be out in the wild, even that only one out of three locations was compromised. In our Cleversafe example, 12 separate servers would have to simultaneously be compromised – quite unlikely by comparison.

Cleversafe is not alone and there are other actors on the software market such as the PASIS system. PASIS’ home page describes functionality very similar to Cleversafe’s: “PASIS is a survivable storage system. Survivable storage systems can guarantee the confidentiality, integrity, and availability of stored data even when some storage nodes fail or are compromised by an intruder.” None the less, Cleversafe appears to be a step ahead of its competitors at this time and is poised to be the first to deliver grid storage to a wider market.

While the Cleversafe software is developed as open source through the Cleversafe Open Source Community at cleversafe.org, there is a commercial company behind Cleversafe: Cleversafe, Inc. Cleversafe, Inc. plans to generate revenue by offering a storage grid for rent based on the Cleversafe technology. “The market for a more secure, more cost effective storage solution is enormous,” says Jon Zakin, CEO of Cleversafe in a press release issued in May.

The Cleversafe project is available as Open Source under the GPL 2.0 License. The version online is apparently an early alpha version and is not ready for production use. According to Mr. Gladwin, there will most likely be a new version within a month, and sometime in the beginning of the next year Cleversafe may be ready for production use. In the meantime, you can download the current alpha version of the software at the Cleversafe Open Source Website. You can read more about the algorithm at Cleversafe.org’s wiki, and there’s also a flash video describing the idea available.

Author: Tags: , , , ,
Introducing YippieMove '09. Easy email transfers. Now open for all destinations.

Yahoo! recently released a new Firefox extension called YSlow. This article describes how to get started and what we did at Playing With Wire to get our front page to load in almost half the time.

YSlow is a handy little tool for analyzing the performance of your websites. It will give you vital statistics and grade your site on 13 performance points with helpful hints for what you may be able to do to improve the loading speed of your pages.

Installation

YSlow is actually a plugin to a plugin in Firefox. To use it, you need Firefox and the Firebug web developer plugin. Both are easily installable using links from YSlow’s homepage however.

Once you’ve restarted Firefox with the new plugins installed, all you have to do is to activate Firebug for a particular site and you’re ready to go. Normally, this means surfing to the site and then revealing Firebug from its icon in the Firefox status bar. Just click the Firebug icon and it will reveal it’s main view. In it, it will most likely say that Firebug is disabled. Just click ‘Enable Firebug for this web site’ and you’re ready to start dissecting it’s performance with Yahoo!’s YSlow.

This is what Firebug looks like.
Firebug revealed.

Taking your site apart

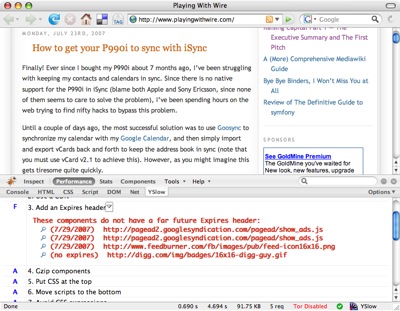
Once you have Firebug enabled, switch to the ‘Performance’ tab and you’ll get a grade on your website’s loading performance. The grade breaks down into several subcomponents where each one corresponds to a point in Yahoo!’s Thirteen Simple Rules for Speeding Up Your Web site. The grading is fairly arbitrary and should be taken with a grain of salt. For example, if you have 35 downloads for your page and just four of them don’t have an Expires header, YSlow will give you a harsh F in that category.

YSlow gives Playing With Wire an F for Expires headers.
Hello, is this Google? YSlow is giving me an F in Expires headers. Could you reconfigure your ad servers for me?

None the less, the sub-points of the grade-sheet are great hints for what you can do with your site. While you’ll probably be forced to ignore the ‘grades’ if you have externally sourced ad units like we do, you can still work your way through the list and fix everything that you do have control over. This is what we did with Playing With Wire and astonishingly enough we reduced the download size to about half of what it used to be. Below are the best tricks we learnt or revisited after using YSlow.

Eliminate HTTP requests

This is a well known method that we had already worked into the design of Playing With Wire. The idea is to have as few CSS, image and Javascript files as possible. Most browsers will only download two files at a time and there’s always some overhead associated with the download of a new file. If you can combine files you reduce this overhead.

YSlow’s Components page let us know exactly what we were bringing in through links and we could eliminate an external Javascript we were no longer using.

Add Expires headers

Expires headers are important to let web browsers know that once they’ve cached an image, CSS include or Javascript file, they can keep using it for a while. Without these headers most browsers will keep downloading the same files over and over out of fear that they may change frequently. Again, YSlow’s Components tab reveals relevant information: the Expires column lets you know what Expiry date your web server is broadcasting for each downloaded file. If you notice files with a value in the Expires column, it may be time to go into your web server configuration file. In Apache, a section like this one might just do the trick:

<virtualhost ...>
...

<directory ...>
  ...
  ExpiresByType text/css "access plus 1 week"
  ExpiresByType text/javascript "access plus 1 week"
  ExpiresByType image/gif "access plus 1 week"
  ExpiresByType image/jpg "access plus 1 week"
  ExpiresByType image/jpeg "access plus 1 week"
  ExpiresByType image/png "access plus 1 week"
</directory>

  ExpiresActive On
</virtualhost>

Enable compression

Most modern clients support streaming compression. This is a feature that lets the web server compress data before sending it to the client. This reduces the download time of the page at the expense of some CPU time on the server. While most graphics can’t be compressed much, this turns out to work out great for HTML, CSS and Javascript. All of these files can often be reduced to as little as a third of their original size. The best part is that the web server won’t try to compress the data unless it already knows the client can handle it.

How to set up compression depends on your application and web server software. If you’re using Apache, you can have the server do it for you for normal files. For dynamic content such as that generated by PHP it depends. In WordPress there’s a switch in the Options tab. If you’re using wp-cache like Playing With Wire is, it may take some more work to get things up and running, but it’s well worth the effort.

Conclusion

Between these tricks and a couple more, Playing With Wire came out about half as heavy for the main HTML, CSS and Javascript, and as a result felt much more responsive. All in all YSlow was a helpful utility, especially thanks to its ‘Components’ tab which made it easy to see what parts of the page were being cached and compressed properly, and which ones were not. The grading system wasn’t very helpful, not all of the grade hints were applicable, and none of the hints were unknown in the field. Still, the list of suggestions was a useful as a kind of laundry list of things to do for the site, combined with data specific to your site. At the end of the day, I’ve found a new partner for optimizing websites with Yahoo!’s YSlow.

Author: Tags: , , ,
Introducing YippieMove '09. Easy email transfers. Now open for all destinations.

Parallels makes a virtual PC type of software for the Mac which allows you to run Windows on the Mac. Great software, but the company has a little bit of a history of quality control problems. Today the company launched a new design of their website. Unfortunately the company forgot about supporting the default Mac browser, Safari!

Parallels website shows a dropdown in the wrong place in Safari.

Nothing big: a drop down menu is showing out of place. The site actually seems to start working after you resize it for the first time, or click a single link. It’s likely to be fixed by the time many people read this, but it’s still a little bit ironic that a company with a major Mac market would not check their site in Safari.

Author: Tags: , ,
Introducing YippieMove '09. Easy email transfers. Now open for all destinations.
Jul
13.

This guide is for the programmer who needs to write a quick and dirty PHP extension. A PHP extension is a module for PHP written in C. You may wish to write such a module to expose library functionality only available in C, or to optimize certain key sections in your execution path.

As I have done before, I will attempt to make a terse summary. I assume you have or confidently can acquire knowledge of PHP and C. I’m a big fan of simple cookbook ‘recipe’ like guides, so here we go. Hold on to your hat.

Step 1: Compile PHP With Debugging Enabled

When developing your own module, you’ll want to enable debugging in PHP. This will generate error messages which may contain additional information beyond an unhelpful ‘segmentation fault’ when your module crashes.

In FreeBSD, just go into your ports, and do make config. Turn on the ‘debugging’ option and recompile PHP and its modules. Other platforms are similar; if you’re compiling from source by hand, take a look at the output of ./configure --help and you’ll find the right option for your version.

Before you start working on your module, make sure everything is in order with your server and that your extensions.ini file looks good. In my experience, rebuilding PHP under FreeBSD sometimes causes modules to appear twice in the extensions.ini file, and you may wish to be wary of this.

Step 2: Set up a project skeleton

PHP comes with great support for developing your module. There are a couple of scripts and configure related tools that automate almost all the work for you.

First, create a config.m4 file in your new project. (There’s even a tool that does this for you – ext_skel – but we’ll do it by hand for the purposes of this guide.) Here’s a bare bones config.m4 file for an extension named “pwwext”:

dnl config.m4 for extension pww

PHP_ARG_ENABLE(pwwext, whether to enable pww support,
[  --enable-pwwext          Enable pww support])

if test "$PHP_PWWEXT" != "no"; then
  PHP_NEW_EXTENSION(pwwext, pwwext.c, $ext_shared)
fi

You’ll also need some source code. Lets begin with the header file, which we’ll call pwwext.h. Lets write a minimal header:


#ifndef PHP_PWWEXT_H
#define PHP_PWWEXT_H

#define PHP_PWWEXT_EXTNAME  "pwwext"
#define PHP_PWWEXT_EXTVER   "0.1"

#ifdef HAVE_CONFIG_H
#include "config.h"
#endif

#include "php.h"

extern zend_module_entry pwwext_module_entry;
#define phpext_pwwext_ptr &pwwext_module_entry

#endif /* PHP_PWWEXT_H */

In my experience, it’s often a waste of time to learn things before you need them. This is a good example of that: the header code does pretty much what it appears to do, and more in depth knowledge is not strictly needed. In short it exposes the entry point of the module and brings in the most important header files.

Step 3: The Actual Source

Finally, we’ll need the file we referred to in config.m4 previously. It’s the main source file, pwwext.c:

/*
 * This extension enables cool pww functionality.
 */

#include "pwwext.h"

PHP_FUNCTION(pwwext_calculate)
{
  long a, b;
  
  /* Get some params. */
  if (zend_parse_parameters(ZEND_NUM_ARGS() TSRMLS_CC, 
      "ll", &a, &b) == FAILURE) {
    RETURN_NULL();
  }

  if (a < = 0) {
    zend_throw_exception(zend_exception_get_default(), 
      "First argument can't be negative nor zero.", 
      0 TSRMLS_CC);
    RETURN_NULL();    
  }

  /* 
  PHP preallocates space for return values, so
  its important to use these return macros.
  */
  RETVAL_LONG(a+b);  
  return;
}

static function_entry php_pwwext_functions[] = {
  PHP_FE(pwwext_calculate, NULL)
  { NULL, NULL, NULL }
};

zend_module_entry pwwext_module_entry = {
#if ZEND_MODULE_API_NO >= 20010901
  STANDARD_MODULE_HEADER,
#endif
  PHP_PWWEXT_EXTNAME,
  php_pwwext_functions, /* Functions */
  NULL, /* MINIT */
  NULL, /* MSHUTDOWN */
  NULL, /* RINIT */
  NULL, /* RSHUTDOWN */
  NULL, /* MINFO */
#if ZEND_MODULE_API_NO >= 20010901
  PHP_PWWEXT_EXTVER,
#endif
  STANDARD_MODULE_PROPERTIES
};

#ifdef COMPILE_DL_PWWEXT
ZEND_GET_MODULE(pwwext)
#endif

There are a couple of important structures here. The variable php_pwwext_functions lists all the functions we wish to expose from the module. In our example, we’re only exporting a single function.

Then we have the pwwext_module_entry structure which truly is the entry point into your module. If you would look near the sixth line in the structure you’d see a pointer to our list of functions, for instance.

Step 4: Compiling and Running

Finally, we’ll want to build the actual module. The command phpize will get everything in order for a compilation based on your configuration. After phpize is done, the normal configure make dance is all we need. Make note of the ‘--enable-pwwext‘ argument to configure.

  1. [~/pwwext]$ phpize
  2. ./configure --enable-pwwext
  3. make

That’s all there is to it. Your module should now be built and almost ready to go. To wrap up, you’ll need to install the module in your PHP extensions folder. If you don’t know it already, run php -i to find the right folder. For me, the result is,

$ php -i|grep extension_dir
extension_dir => /usr/local/lib/php/20060613-debug => 
/usr/local/lib/php/20060613-debug

so I’ll go ahead and copy the module into /usr/local/lib/php/20060613-debug:

# cp modules/pwwext.so /usr/local/lib/php/20060613-debug/

There’s one last step we’ll have to do. We need to add the module to the list of extensions in your php.ini or extensions.ini file. Locate the section with multiple lines beginning with extension=... and add your own line. For me, this line would do it:

extension=pwwext.so

Step 5: Does it work?

Finally, we can test our new module. Run,

$ php -m

and make sure your new module is in the list.

If all is well you should be able to use your new function from any PHP script. For me, this was the final result:

$php -r'echo pwwext_calculate(1, 2);'
3
$ php -r'echo pwwext_calculate(-1, 2);'

Fatal error: Uncaught exception 'Exception' with 
message 'First argument can't be negative.' in 
Command line code:1
Stack trace:
#0 Command line code(1): pwwext_calculate(-1, 2)
#1 {main}
  thrown in Command line code on line 1

Now you have a bare bones module that does something. All that remains now is to change that one function to do something useful and you’re well on your way.

You’ll undoubtedly need more reference material going forward. Php.net is the logical starting point: The Zend API. If that’s not enough, Sara Golemon wrote a whole book about the subject: ‘Extending and Embedding PHP’.

Good luck, and don’t forget to turn off PHP debugging when you’re done.

Author: Tags: , ,
Introducing YippieMove '09. Easy email transfers. Now open for all destinations.
Jun
25.

If you’re in the initial phases of setting up a new software project, one of the first things you should be thinking about is a project collaboration site. A good project site enables you to do at least two things:

  • Collect design documents and documentation in one place
  • Track and assign tasks/bugs/issues to developers

If used correctly, the project site can become a focal point for everyone working on a particular project. Ideas, research and design documents can all be collected in one place and collaborated over. At the same time the site is a management tool enabling assignment and tracking of tasks to a team of workers. This is surprisingly important even for small teams: if your project is a two man thing, there is still great benefit to knowing what the other person is working on and being able to see his or her progress.

A simple solution for your project site is to pick different kinds of software for different tasks. For example, you may choose to use Eventum for bug and issue tracking, with a separate MediaWiki installation set up for the documentation and design collaboration. But wouldn’t it be better to combine all of this functionality into a single piece of software?

Trac is one such piece of software. It gives you issue tracking, complete with SVN integration and wiki functionality, built into a single application. An added bonus of having everything in a single application is that you can make linked references to tickets, milestones and wiki entries pretty much anywhere you want within the application.

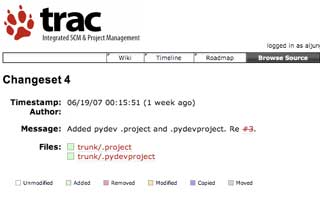
A Trac changeset referencing a ticket.
This changeset references ticket #3.

You also get a timeline which concisely summarizes what’s happening within the project, be it wiki edits or source code commits. This can be a very popular feature for project developers – it gives everyone a chance to see what’s happening in the project, and also to get a feeling for the ‘aliveness’ of the project.

A Trac timeline showing commit messages and wiki edits.
Timeline showing both edits, source code commits and ticket updates.

Installing Trac

Here’s Playing With Wire’s accelerated setup guide for Trac.

  1. Install the basic trac package using your preferred method (ports, emerge, rpms etc).
  2. Create a new folder for the trac website on your server.

    cd /www/
    mkdir mytrac

  3. Use trac-admin to create the instance:

    cd /www/mytrac
    trac-admin `pwd` initenv

  4. Answer the questions asked by trac-admin.
  5. Once the questions have been answered, trac will give you some instructions similiar to what’s below:

    Project environment for ‘MyProject’ created.

    You may now configure the environment by editing the file:

    /www/mytrac/conf/trac.ini

    If you’d like to take this new project environment for a test drive, try running the Trac standalone web server `tracd`:

    tracd –port 8000 /www/mytrac

    Then point your browser to http://localhost:8000/mytrac. There you can also browse the documentation for your installed version of Trac, including information on further setup (such as deploying Trac to a real web server).

    The latest documentation can also always be found on the project website:

    http://trac.edgewall.org/

  6. If you use SQLite, give +rw permissions to www for the database:

    chown -R :www db
    chmod -R g+rwX db

  7. If you need to install new graphics, e.g. a new logo file you will want to copy it into the actual htdocs folder: /usr/local/share/trac/htdocs

Httpd Setup

How to configure your web server depends on both what server you’re running and what method you want to use for serving trac (cgi, fast cgi or mod python). If you’re going to run trac using CGI, you’ll basically want to link to the main trac cgi file, and also set up serving of the supporting html documents. Here’s a sample config file for how it may look like with using Apache and CGI:

Alias /trac/chrome/common /usr/local/share/trac/htdocs
<Directory “/usr/local/share/trac/htdocs”>
Order allow,deny
Allow from all
</Directory>

ScriptAlias /trac /usr/local/share/trac/cgi-bin/trac.cgi
<Location “/trac”>
SetEnv TRAC_ENV “/www/mytrac”

AuthType Basic
AuthName “WireLoad Protected Area”
AuthUserFile /www/mytrac/.htpasswd
Require valid-user
</Location>
<Directory /usr/local/share/trac/cgi-bin>
Options -Indexes +ExecCGI
AllowOverride None
Allow from all

AuthType Basic
AuthName “WireLoad Protected Area”
AuthUserFile /www/mytrac/.htpasswd
Require valid-user
</Directory>

This is fairly straight forward. The most imporant part is,

ScriptAlias /trac /usr/local/share/trac/cgi-bin/trac.cgi

which sets up trac as a cgi script accessible by going to the /trac address of the webhost.

For performance reasons, we don’t want the CGI script to serve every trac file. The following alias will override the /trac URL for the theme related files:

Alias /trac/chrome/common /usr/local/share/trac/htdocs

This has to go before the ScriptAlias line.

User Accounts

Trac’s login scheme is based on basic http authentication, which is why we added a the AuthType sections in the config file above. In fact, to log in to trac you simply authenticate with the web server using a user name and password from the .htaccess file.

Every user you define in the .htaccess file (using htpasswd) will be able to log in with some basic permissions. To configure the permissions more precisely, use the trac-admin command. For instance, to make the user with login ‘aljungberg’ an admin:

cd /www/mytrac
trac-admin `pwd` permission add aljungberg admin
trac-admin `pwd` permission add admin TRAC_ADMIN

This assigns the user ‘aljungberg’ to an admin group and gives the admin group the TRAC_ADMIN permission set.

Notice that everyone who logs in gets the ‘authenticated’ group permissions which are by default pretty useful. You can find what they are by running this command:

trac-admin `pwd` permission list authenticated

It’ll say something like:

User Action
——————————
authenticated BROWSER_VIEW
authenticated CHANGESET_VIEW
authenticated FILE_VIEW
authenticated LOG_VIEW
authenticated MILESTONE_VIEW
authenticated REPORT_SQL_VIEW
authenticated REPORT_VIEW
authenticated ROADMAP_VIEW
authenticated SEARCH_VIEW
authenticated TICKET_APPEND
authenticated TICKET_CHGPROP
authenticated TICKET_CREATE
authenticated TICKET_MODIFY
authenticated TICKET_VIEW
authenticated TIMELINE_VIEW
authenticated WIKI_CREATE
authenticated WIKI_MODIFY
authenticated WIKI_VIEW

Available actions:
BROWSER_VIEW, CHANGESET_VIEW, CONFIG_VIEW, FILE_VIEW, LOG_VIEW, MILESTONE_ADMIN, MILESTONE_CREATE, MILESTONE_DELETE, MILESTONE_MODIFY, MILESTONE_VIEW, REPORT_ADMIN, REPORT_CREATE, REPORT_DELETE, REPORT_MODIFY, REPORT_SQL_VIEW, REPORT_VIEW, ROADMAP_ADMIN, ROADMAP_VIEW, SEARCH_VIEW, TICKET_ADMIN, TICKET_APPEND, TICKET_CHGPROP, TICKET_CREATE, TICKET_MODIFY, TICKET_VIEW, TIMELINE_VIEW, TRAC_ADMIN, WIKI_ADMIN, WIKI_CREATE, WIKI_DELETE, WIKI_MODIFY, WIKI_VIEW

To find out which permissions are available, check out the TracPermissions documentation page.

Setting up the SVN hook

To allow SVN commits to close tickets using cool syntax like ‘Fixes #1′ in commit messages, an SVN hook has to be installed. Hook scripts in SVN are described in the SVN documentation.

Enter a post-commit script in the hooks/ folder of your SVN repository:

REPOS=”$1″
REV=”$2″
LOG=`/usr/local/bin/svnlook log -r $REV $REPOS`
AUTHOR=`/usr/local/bin/svnlook author -r $REV $REPOS`

TRAC_ENV=’/www/mytrac/’
TRAC_URL=’http://mytrac.wireload.net/trac/’

/usr/local/bin/python /www/mytrac/trac-post-commit-hook \
-p “$TRAC_ENV” \
-r “$REV” \
-u “$AUTHOR” \
-m “$LOG” \
-s “$TRAC_URL”

You may have to download the actual script from the repository. Make sure you get the right version. I initially accidentally got the latest version since I grabbed it from the SVN, and it wasn’t compatible with trac 0.10.3 which I had installed.

Finally make sure the script can be run,

chmod a+rx post-commit
chmod a+x /www/mytrac/trac-post-commit-hook

The users who run the script must also be able to read and write to the trac database. You can make sure this works by test submitting some change set for analysis:

su -m wlaljungberg post-commit /home/mysvn/myproject/ 4

If the database isn’t accessible you’ll get an error message similar to this one:

trac.core.TracError: The user root requires read _and_ write permission to the database file /www/mytrac/db/trac.db and the directory it is located in.

The hook is nice. Here’s a description of what it does, quoted from the actual script:

# It searches commit messages for text in the form of:
# command #1
# command #1, #2
# command #1 & #2
# command #1 and #2
#
# You can have more then one command in a message. The following commands
# are supported. There is more then one spelling for each command, to make
# this as user-friendly as possible.
#
# closes, fixes
# The specified issue numbers are closed with the contents of this
# commit message being added to it.
# references, refs, addresses, re
# The specified issue numbers are left in their current status, but
# the contents of this commit message are added to their notes.
# A fairly complicated example of what you can do is with a commit message
# of:
#
# Changed blah and foo to do this or that. Fixes #10 and #12, and refs #12.
#
# This will close #10 and #12, and add a note to #12.

If you run into any trouble, take a look at the excellent Trac documentation. Good luck with your new project!

Author: Tags: ,

© 2006-2009 WireLoad, LLC.
Logo photo by William Picard. Theme based on BlueMod © 2005 - 2009 FrederikM.de, based on blueblog_DE by Oliver Wunder.
Sitemap