

What is Samba?
For all you new users out there, I just want to let you know that Samba is great piece of Open Source software. It solves many issues for both sysadmins and ordinary users. What it does is to give UNIX users the ability to share files and printers with Windows users. Since Samba is available on most modern platforms, it’s also a great way to share files in a multi-platform environment. Samba can even act PDC (Primary Domain Controller), and BDC (Backup Domain Controller) to handle domain logins from Windows clients. PDCs and BDCs were something that used to required a purchase of a Windows NT or Windows 2000/2003 Server license, but they can now be done fairly simple with Samba under UNIX or Linux.
Now that you know a bit about Samba, lets get started.
Adding a public share to Samba
One of the things I miss as a default feature in OS X is the ability to share folders with Samba. The default configuration of Samba only shares the users’ home directories after authorization. However, since I wanted to share my files with non-Mac users, I simply made some changes to smb.conf (the Samba config-file). After running Samba in various *nix-environment for years, this was a simple modification to do.
First open the Terminal, and type in the following commands:
$ sudo nano /private/etc/smb.conf
Now you’re in a text editor called Nano. A simple, but useful editor. Scroll down to the end of the first part, under the [global] section, and type in the following:
security = share
workgroup = whatever-your-workgroup-is-called
netbios name = Your-computers-name
Note that under Tiger (might be under other versions too), the line “workgroup” already exists. If that is the case, then just replace whatever it was previously set to with your workgroup of choice.
That was the first part. Now you’ve made it possible for everybody to access you public shares.
By default though, Samba isn’t configured to have any public shares. Don’t worry, we’ll take care of that next.
Now it’s time to add the actual sharing to the list of public shares. This is done by adding the following lines to your Samba file. There are different ways to configure a share in Samba, but this is a pretty straight-forward and simple way. At the end of the file, add the following lines (still under the [global] section):
[public]
path = /path/to/the/share
public = yes
only guest = yes
writable = no
printable = no

Where [public] can be set to whatever name you want for your share, and the path is equal to the path to
the directory you want to share.
Note that you can add as many shares as you’d like. Also, pay attention to the line that says writable: that line determines whether you clients will be able to write files to your share or not. If you want your share to be writable, you want this to say “writable = yes”.
Make sure that there are no typos, and that everything looks proper. Exit Nano and save changes to the file by pressing “ctrl + x” followed by “y” and Enter.
Now we need to set the proper permission to the shared folder. The simplest way to do this is to just type the following command:
$ chmod -R a+rx /path/to/the/share
Note that if you decided to allow write-access to the share, use the command $ chmod -R a+rwx /path/to/share instead of the above command
To verify that your smb.conf is properly configured, we use a command called ‘testparm’. In the Terminal, type:
$ testparm
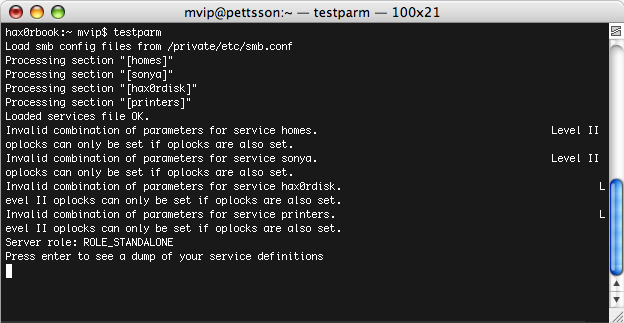
Look at the output. If you observe something that doesn’t look right, back up and fix the error in smb.conf.
If everything did work out fine, you’re just one step from getting your share visible. The last step is to fire up samba (or restart it if you already had it running). This is can be done either through the System Preferences, or trough the console. I prefer the latter, and here are the commands:
$ sudo service smbd stop
$ sudo service nmbd stop
$ sudo service smbd start
$ sudo service nmbd start
Connecting to the share(s)
Now you’re supposed to be up and running. The most simple way to test if everything worked is to mount your share locally. Here is how it’s done:
In Finder, go to the menu “Go” and click at “Connect to Server” and type in:
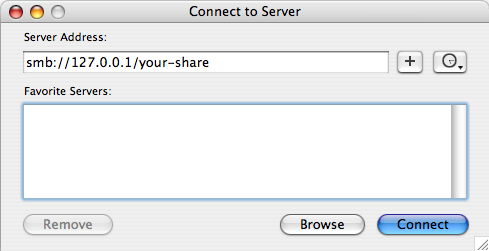
You will most likely be prompted for username and password now, but just hit “ok” without entering anything. Since it’s a public share, anyone is able to access it without authorization.

If everything went well, you will find your share mapped in Finder. Now all Windows machines and *nix-machines should be able to browse your files.
This is the beauty with OS X: you are running a commercial desktop OS, but still have all the benefits that a UNIX-environment brings. Running UNIX-programs (as Samba) is done painlessly.
Since Samba is a part of Mac OS X out-of-the-box, Apple has already done half the work for you. The possibilities are many: theoretically, you could make your Mac act as a PDC and replace an entire Windows NT or Windows 2000/2003 Server. I’m not sure about what modifications Apple has done to the source, but if you compile the source code from scratch yourself, it shouldn’t be too hard. Samba simply gives UNIX-users the ability to share files and printers with Windows users.
Please give us feedback if something didn’t work for you.
For further information about Samba, please visit samba.org.
If you have the possibility, please donate to the Samba-team. These guys work for free, and contribute with a lovely piece of software to the Open Source-world. However, they are in need of your donations to be able to invest in new hardware needed to improve Samba further.


I don’t know about you but Tiger has always given us trouble with SMB shares. Apple does not seem to want to address the problems :(
Blah,
True indeed. Tiger (or other OS X versions) seems to have a lot of problem resolving NetBIOS names, but by using IPs you can circumvent this problem.
I know that Tiger also has problem with listing available SMB shares. However, if you use smb:/// it works most of the time.